


The idea of this article is to explain how to use the Node.js module Nodemailer, the next in our series of “how to send emails with different frameworks and technologies” posts. You may also want to check our article with more options for sending emails with Node.js.
We will focus mainly on SMTP and HTML to help you prepare and test email messages to send out with your Node.js backend using Nodemailer and we’ll also review its capabilities.
Nodemailer’s creators say that it makes sending an email a piece of cake. Let’s see if they are talking about cooking or eating 🙂

What is Nodemailer
Nodemailer is a single module with zero dependencies for Node.js, designed for sending emails.
Its main features include (but are not limited to):
- Platform-independence
- Security, in particular, email delivery with TLS/STARTTLS and DKIM email authentication
- Unicode support
- HTML content and embedded image attachments
- Different transport methods besides SMTP support.
Nodemailer’s package.json file, other main .js files, folders and code can be found on their Github page.
How to use Nodemailer: From Installation
The only thing required to start using Nodemailer module is the server-side tool Node.js version 6.0 or above – here’s an updated guide on how to install Node.js, to spare you from headaches later on.
You should also install Nodemailer itself but it’s really easy with the npm or Yarn package manager.
Execute the following command in the Node.js command prompt:
npm install nodemailer --save
or
yarn add nodemailer<br>
Once completed, include it into your web application with the following code:
var nodemailer = require('nodemailer');<br>
or this if you are using ES modules:
import nodemailer from ‘nodemailer’;
How to send emails with Nodemailer?
For your app to send transactional and other types of emails with Nodemailer, there are three main steps.
Create Nodemailer transporter
SMTP (Simple Mail Transfer Protocol) is the most common transporter, and below we will describe it in more detail, as well as demonstrate some examples.
But there is a list of other available options:
- Built-in transports
- sendmail, a regular sendmail command for simple messages. It’s similar to the mail() function in PHP
- SES , to handle large traffic of emails by sending them using Amazon SES
- stream, a buffer for testing purposes, to return messages.
- External transport. To put it simply, you can create your own transportation method.
For more details, refer to the Nodemailer documentation.
With SMTP, everything is pretty straightforward. Set host, port, authentication details and method, and that’s it.
It’s also useful to verify that SMTP connection is correct at this stage: add verify(callback) call to test connection and authentication.
transporter.verify(function(error, success) {
  if (error) {
        console.log(error);
  } else {
        console.log('Server is ready to take our messages');
  }
});
For further testing instructions review the below “How to test emails with Mailtrap Email Testing?” section.
Set Nodemailer message options
At this point, we should specify the email sender, receiver, and the content of the message. Remember, Unicode is supported, so you can include emojis, even in the subject line!
To send a text formatted as HTML, no extra attributes are required, just put your HTML body into the message with an html attribute. For advanced templates, you can add attachments and embed images.
Let’s take a look at this example of simple message options first:
var mailOptions = {
    from: '"Example Team" <from@example.com>',
    to: 'user1@example.com, user2@example.com',
    subject: 'Nice Nodemailer test',
    text: 'Hey there, it’s our first message sent with Nodemailer 😉 ',
    html: '<b>Hey there! </b><br> This is our first message sent with Nodemailer'
};
Deliver a message with sendMail()
Once we created a transporter and configured a message, we can send it using the sendMail() method:
transport.sendMail(mailOptions, (error, info) => {
        if (error) {
            return console.log(error);
        }
        console.log('Message sent: %s', info.messageId);
});
How to test emails with Mailtrap Email Testing?
To test emails sent with Nodemailer, we will use Mailtrap Email Testing, a tool developers use to test emails in staging without the risk of spamming users. Email Testing allows you to inspect and debug email messages in a safe environment to understand how your application handles email sending, check the content and formatting of the emails via HTML/CSS check feature.


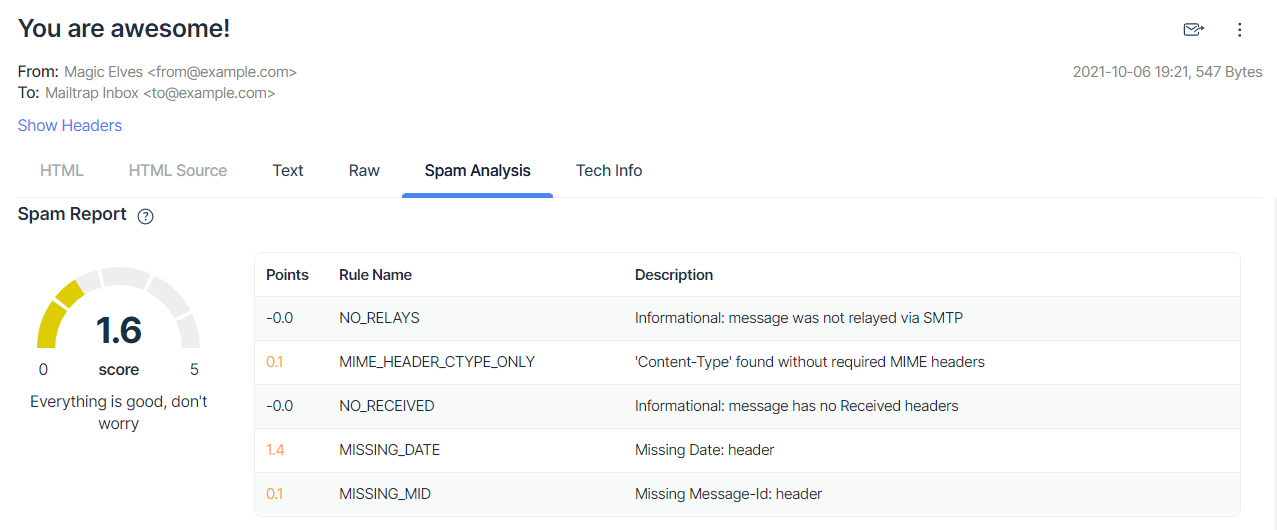
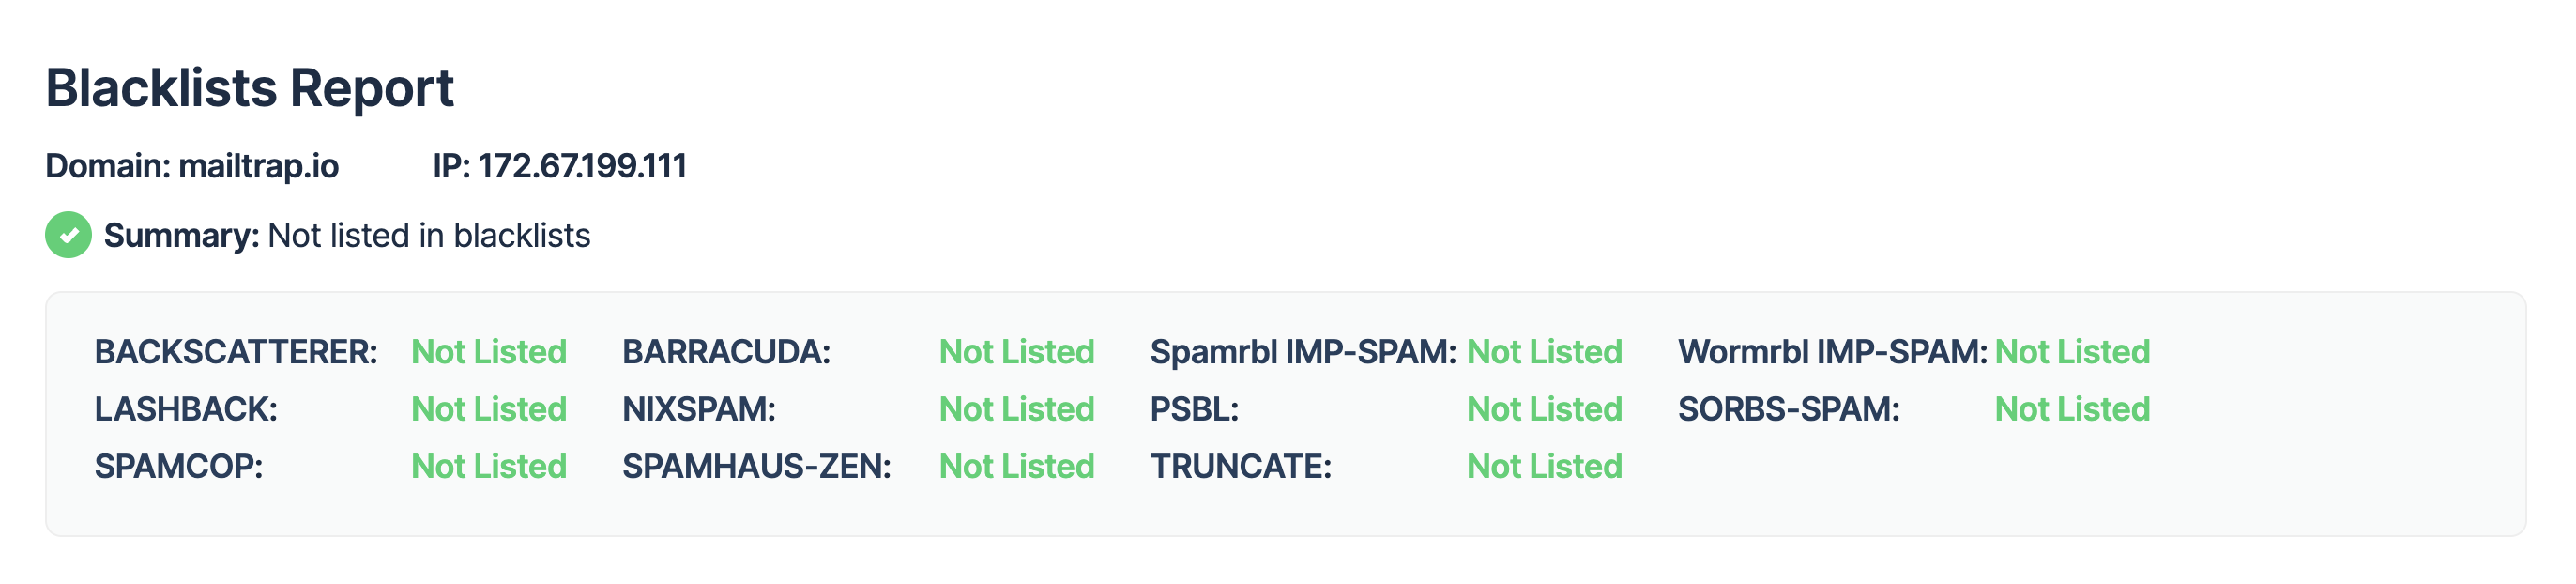
Additionally, you can run a spam analysis of your emails and get a detailed report of spam test points with their descriptions and see whether your IP or domain has been listed on any of the commonly used blacklists.


Mailtrap Email Testing also provides BCC testing options and allows you to share your email testing results with other team members and forward emails to real and verified addresses.
Even If you don’t have an account with a sender address yet, the whole setup process takes just a couple of minutes.
Quickly sign up (it’s free):
- Go to the SMTP settings tab in your Inbox
- Copy the necessary settings
- Insert them into your Node.js application script
Mailtrap offers a ready-to-use integration with Nodemailer:
- Select it from the Integrations section
- Insert it into your application code
It already contains transporter and syntaxis attributes:
var transport = nodemailer.createTransport({
  host: "smtp.mailtrap.io",
  port: 2525,
  auth: {
    user: "1a2b3c4d5e6f7g",
    pass: "1a2b3c4d5e6f7g"
  }
});
For a wider picture of Email Testing capabilities check out our recent in-depth Mailtrap – Sendgrid comparison post.
Apart from that, you can use auto-generated email test accounts on Ethereal, which is a fake SMTP service, mostly aimed at Nodemailer users.
Additionally, Nodemailer has a NodemailerApp. It provides Sendmail replacement, but first of all, is designed to debug emails. Furthermore, NodemailerApp has a local POP3 and SMTP servers, a catchall email domain service, along with email preview capabilities.
How to use Nodemailer with Gmail?
Being one of the leading modules for sending emails from a Node.js app, it only makes sense that Nodemailer works with a top email services such as Gmail.
From a few basic installations and Gmail account configuration steps, it’s possible to send emails via Google servers.
For detailed installation instructions check out our Nodemailer Gmail tutorial post.
How to send attachments in email using Nodemailer?
You can add different types of data to your message in Nodemailer using the following main properties:
- filename: the name of the attached file. Here you can use Unicode as well.
- content: the body of your attachment. It can be a string, a buffer, or a stream.
- path: path to the file, to stream it instead of including it in the message. It is a good option for big attachments.
- href: attachment URL. Data URIs are also supported.
list: {
            // List-Help: <mailto:admin@example.com?subject=help>
            help: 'admin@example.com?subject=help',

            // List-Unsubscribe: <http://example.com> (Comment)
            unsubscribe: [
                {
                    url: 'http://example.com/unsubscribe',
                    comment: 'A short note about this url'
                },
                'unsubscribe@example.com'
            ],

            // List-ID: "comment" <example.com>
            id: {
                url: 'mylist.example.com',
                comment: 'my new list'
            }
        }
    };
Optional properties let you add specific content types or inline images.
- contentType: if you don’t set it, it will be inferred from the filename property/
 // An array of attachments
        attachments: [
            // String attachment
            {
                filename: 'notes.txt',
                content: 'new important notes',
                contentType: 'text/plain' // optional, would be detected from the filename
},- CID: inline images in the HTML message. For more details on attaching images to HTML emails, read this post. Note that the CID value should be unique.
       cid: 'note@example.com' // should be as unique as possible
            },

            // File Stream attachment
            {
                filename: 'matrix neo.gif',
                path: __dirname + '/assets/neo.gif',
                cid: 'neo@example.com' // should be as unique as possible
            }
],- Encoding: can be added to the string type of content. It will encode the content to a buffer type according to the encoding value you set (base64, binary, etc.)
 // Binary Buffer attachment
            {
                filename: 'image.png',
                content: Buffer.from(
                    'iVBORw0KGgoAAAANSUhEUgAAABAAAAAQAQMAAAAlPW0iAAAABlBMVEUAAAD/' +
                        '//+l2Z/dAAAAM0lEQVR4nGP4/5/h/1+G/58ZDrAz3D/McH8yw83NDDeNGe4U' +
                        'g9C9zwz3gVLMDA/A6P9/AFGGFyjOXZtQAAAAAElFTkSuQmCC',
                    'base64'
                )
Nodemailer examples
Let’s review and test a full message created with Nodemailer.
Example 1. First, let’s go back to the HTML template, and check how embedded images work.
var nodemailer = require('nodemailer');
var transport = nodemailer.createTransport({
  host: "smtp.mailtrap.io",
  port: 2525,
  auth: {
    user: "1a2b3c4d5e6f7g",
    pass: "1a2b3c4d5e6f7g"
  }
});

var mailOptions = {
  from: '"Example Team" <from@example.com>',
  to: 'user1@example.com, user2@example.com',
  subject: 'Nice Nodemailer test',
  text: 'Hey there, it’s our first message sent with Nodemailer ',
  html: '<b>Hey there! </b><br> This is our first message sent with Nodemailer<br /><img src="cid:uniq-mailtrap.png" alt="mailtrap" />',
  attachments: [
    {
      filename: 'mailtrap.png',
      path: __dirname + '/mailtrap.png',
      cid: 'uniq-mailtrap.png'
    }
  ]
};
%s
transport.sendMail(mailOptions, (error, info) => {
  if (error) {
    return console.log(error);
  }
  console.log('Message sent: %s', info.messageId);
});
In this example, Mailtrap will catch our message, and demonstrates how it will look in a standard email client. The image will appear embedded with CID into the message body and at the same time it will be shown as an attachment.
Example 2. The second example demonstrates how to add two different files (text and image) to the HTML email. Also, we have added executing mail sending in the Shell script.
var nodemailer = require('nodemailer');


var transport = nodemailer.createTransport({
  host: "smtp.mailtrap.io",
  port: 2525,
  auth: {
    user: "1a2b3c4d5e6f7g", //example of generated by Mailtrap
    pass: "1a2b3c4d5e6f7g" //example of generated by Mailtrap
  }
});

var mailOptions = {
  from: 'from@example.com',
  to: 'test@example.com',
  subject: 'Test Nodemailer with Mailtrap',

  html: '<h1>Attachments</h1>',
  attachments: [
    {   // utf-8 string as an attachment
        filename: 'text.txt',
        content: 'Attachments'
    },
	{
		filename: 'logo',
		path: 'newlogo.png'
	}
  ]
};

transport.sendMail(mailOptions, (error, info) => {
  if (error) {
    return console.log(error);
  }
  console.log('Email sent: ' + info.response);
});
Execute in shell:
$ node index.js
Email sent: 250 2.0.0 Ok: queued
Debugging options in Nodemailer
We have walked through the main steps of sending emails with Nodemailer, checked how to add different objects to HTML messages, and there is one more option worth mentioning: for successful testing of mail sending, let’s use native debugging.
It is simple with Nodemailer: set both debug and logger to true and you will be able to see all the data which is passed to the server as an output in the console.
This way, you will be able to analyze the email sending process and quickly fix errors, if there are any.
Specify debug options in the transporter section of the mail script in your Node.js app:
var transport = nodemailer.createTransport({
  host: "smtp.mailtrap.io",
  port: 2525,
  auth: {
    user: "1a2b3c4d5e6f7g",
    pass: "1a2b3c4d5e6f7g"
  },
  debug: true, // show debug output
  logger: true // log information in console
});
Here is what you will get in the console:
[2018-12-28 18:05:10] DEBUG Creating transport: nodemailer (5.0.0; +https://nodemailer.com/; SMTP/5.0.0[client:5.0.0])
[2018-12-28 18:05:10] DEBUG Sending mail using SMTP/5.0.0[client:5.0.0]
[2018-12-28 18:05:10] DEBUG [nJWMVEIqQCE] Resolved smtp.mailtrap.io as 54.87.153.8 [cache miss]
[2018-12-28 18:05:10] INFO  [nJWMVEIqQCE] Connection established to 54.87.153.8:2525
[2018-12-28 18:05:10] DEBUG [nJWMVEIqQCE] S: 220 smtp.mailtrap.io ESMTP ready
[2018-12-28 18:05:10] DEBUG [nJWMVEIqQCE] C: EHLO [127.0.0.1]
[2018-12-28 18:05:10] DEBUG [nJWMVEIqQCE] S: 250-smtp.mailtrap.io
[2018-12-28 18:05:10] DEBUG [nJWMVEIqQCE] S: 250-SIZE 5242880
[2018-12-28 18:05:10] DEBUG [nJWMVEIqQCE] S: 250-PIPELINING
[2018-12-28 18:05:10] DEBUG [nJWMVEIqQCE] S: 250-ENHANCEDSTATUSCODES
[2018-12-28 18:05:10] DEBUG [nJWMVEIqQCE] S: 250-8BITMIME
[2018-12-28 18:05:10] DEBUG [nJWMVEIqQCE] S: 250-DSN
[2018-12-28 18:05:10] DEBUG [nJWMVEIqQCE] S: 250-AUTH PLAIN LOGIN CRAM-MD5
[2018-12-28 18:05:10] DEBUG [nJWMVEIqQCE] S: 250 STARTTLS
[2018-12-28 18:05:10] DEBUG [nJWMVEIqQCE] C: STARTTLS
[2018-12-28 18:05:10] DEBUG [nJWMVEIqQCE] S: 220 2.0.0 Start TLS
[2018-12-28 18:05:10] INFO  [nJWMVEIqQCE] Connection upgraded with STARTTLS
[2018-12-28 18:05:10] DEBUG [nJWMVEIqQCE] C: EHLO [127.0.0.1]
[2018-12-28 18:05:11] DEBUG [nJWMVEIqQCE] S: 250-smtp.mailtrap.io
[2018-12-28 18:05:11] DEBUG [nJWMVEIqQCE] S: 250-SIZE 5242880
[2018-12-28 18:05:11] DEBUG [nJWMVEIqQCE] S: 250-PIPELINING
[2018-12-28 18:05:11] DEBUG [nJWMVEIqQCE] S: 250-ENHANCEDSTATUSCODES
[2018-12-28 18:05:11] DEBUG [nJWMVEIqQCE] S: 250-8BITMIME
[2018-12-28 18:05:11] DEBUG [nJWMVEIqQCE] S: 250-DSN
[2018-12-28 18:05:11] DEBUG [nJWMVEIqQCE] S: 250 AUTH PLAIN LOGIN CRAM-MD5
[2018-12-28 18:05:11] DEBUG [nJWMVEIqQCE] SMTP handshake finished
[2018-12-28 18:05:11] DEBUG [nJWMVEIqQCE] C: MAIL FROM:<from@example.com>
[2018-12-28 18:05:11] DEBUG [nJWMVEIqQCE] S: 250 2.1.0 Ok
[2018-12-28 18:05:11] DEBUG [nJWMVEIqQCE] C: RCPT TO:<user1@example.com>
[2018-12-28 18:05:11] DEBUG [nJWMVEIqQCE] C: RCPT TO:<user2@example.com>
[2018-12-28 18:05:11] DEBUG [nJWMVEIqQCE] S: 250 2.1.0 Ok
[2018-12-28 18:05:11] DEBUG [nJWMVEIqQCE] S: 250 2.1.0 Ok
[2018-12-28 18:05:11] DEBUG [nJWMVEIqQCE] C: DATA
[2018-12-28 18:05:11] DEBUG [nJWMVEIqQCE] S: 354 Go ahead
…
[2018-12-28 18:05:12] DEBUG [nJWMVEIqQCE] S: 250 2.0.0 Ok: queued
[2018-12-28 18:05:12] DEBUG [nJWMVEIqQCE] Closing connection to the server using "end"
Message sent: <74bfe12e-92fa-91f8-8643-a166b66c62d7@example.com>
[2018-12-28 18:05:12] INFO  [nJWMVEIqQCE] Connection closed
Nodemailer capabilities
We have reviewed how to create and send an email in Nodemailer via SMTP, experimenting with different types of content:
- HTML
- Tables
- Lists
- Attachments
- Embedded images
What is good about Nodemailer is that it offers a bunch of various options and settings, so you can customize every piece of your email no matter if it’s an HTML with CSS one or just a plain text notification type.
For more advanced options, there is a list of additional plugins expanding Nodemailer’s capabilities with:
- Email templates
- Mailer classes and utilities
- Loggers and helpers to send authentication emails
- Modules to send emails using Gmail
- Node.js implementations of various email APIs
Sending emails with Nodemailer is a piece of cake, indeed. It is straightforward and stumbling-block free. It’s a great recipe for email success!
Check out some of our other posts from the “How to send emails with different frameworks and technologies” series.