 Skip to Navigation


Python send email? No problem. This article covers everything you need to know about sending emails in Python including code examples, security, and email testing.
Setting up ‘smtplib’
Python’s ‘smtplib’ module simplifies the process of sending emails directly from your applications, offering a straightforward interface to interact with SMTP servers.
This section guides you through importing ‘smtplib’, creating an SMTP object for your server, and leveraging its core functions to send emails. Follow along to learn how to integrate email functionalities into your Python scripts.
The built-in smtplib module can be imported using the following statement:
import smtplibTo send an email later, create one SMTP (Simple Mail Transfer Protocol) object:
smtpObj = smtplib.SMTP( [host [, port]] )Parameter details:
host− this is an optional argument and is the host running your SMTP server. The IP address of the host or a domain name can be specified.port− if the host argument is specified, specify a port, where the SMTP server is listening.local_hostname− if the used SMTP server is running on your local machine, specify localhost.
An SMTP object has an instance method called sendmail that is used to send a message and has three parameters:
sender− string with the address of the sender.receivers− list of strings, one for each recipient.message− a message as a string formatted as specified in RFCs.
smtpObj.sendmail(sender, receivers, message)To make sure that the email module has been imported properly and get the full description of its classes and arguments, type in an interactive Python session:
help(smtplib)Refer to Python documentation to further review the rest of the SMTP Objects (e.g., smtp.ehlo; smtp.send_message(msg) etc.) and how to apply them.
The following section tells you how to send emails via Python using Mailtrap Email Sending, a feature of Mailtrap Email Delivery Platform. First, I’ll cover the SMTP method and later show you how to do it with our Python SDK.
Send emails using SMTP
The method is very similar to what I covered under the ‘smtplib’ above, however, you need to set up custom SMTP credentials. Here, I assume that you already signed up for Mailtrap and verified your domain.
If not, check out our detailed guide and a bonus video instruction on how to do this.
Note: The code below contains dummy Mailtrap credentials (bar the server endpoint) make sure to replace it with your real credentials.
Here’s a bare-bones script to send ‘plaintext’ emails with Python using Mailtrap SMTP.
import smtplib
from email.mime.text import MIMEText

# Configuration
port = 587
smtp_server = "live.smtp.mailtrap.io"
login = "api"  # Your login generated by Mailtrap
password = "1a2b3c4d5e6f7g"  # Your password generated by Mailtrap

sender_email = "mailtrap@example.com"
receiver_email = "new@example.com"

# Plain text content
text = """\
Hi,
Check out the new post on the Mailtrap blog:
SMTP Server for Testing: Cloud-based or Local?
https://blog.mailtrap.io/2018/09/27/cloud-or-local-smtp-server/
Feel free to let us know what content would be useful for you!
"""

# Create MIMEText object
message = MIMEText(text, "plain")
message["Subject"] = "Plain text email"
message["From"] = sender_email
message["To"] = receiver_email

# Send the email
with smtplib.SMTP(smtp_server, port) as server:
    server.starttls()  # Secure the connection
    server.login(login, password)
    server.sendmail(sender_email, receiver_email, message.as_string())

print('Sent')
Quick breakdown:
- Imports and setup – I’ve imported the necessary modules from Python’s standard library for emailing (‘smtplib’, and ‘MIMEText’,).
- Email server configuration – The SMTP server details including the server address, port number, and authentication credentials.
- Email content – I’ve created a
MIMETextmessage that can hold plain text only. Later, I’ll show you how to include HTML and plain text versions of the email. - Sending the email – I’ve used a context manager (
withstatement) to ensure the connection to the SMTP server is properly closed after sending the email.
Bonus tip: Hardcoding sensitive data such as login credentials and server information in your script can pose a security risk. That’s why I recommend using environment variables to store sensitive information. This makes your code more secure and flexible when moving between different environments (development, testing, production).
Send an HTML email
If you want to learn more about sending HTML emails in Python, check out our dedicated tutorial.
To modify the script for sending HTML emails (while still including multiple recipients), I’ll adjust how the email body is created and attached. Here’s the revised script:
import smtplib
from email.mime.text import MIMEText
from email.mime.multipart import MIMEMultipart

# Configuration
port = 587
smtp_server = "live.smtp.mailtrap.io"
login = "api"  # Your login generated by Mailtrap
password = "1a2b3c4d5e6f7g"  # Your password generated by Mailtrap

sender_email = "mailtrap@example.com"
receiver_email = "new1@example.com"

# Email content
subject = "HTML Email without Attachment"
html = """\
<html>
  <body>
    <p>Hi,<br>
    This is a <b>test</b> email without an attachment sent using <a href="https://www.python.org">Python</a>.</p>
  </body>
</html>
"""

# Create a multipart message and set headers
message = MIMEMultipart()
message["From"] = sender_email
message["To"] = receiver_email
message["Subject"] = subject

# Attach the HTML part
message.attach(MIMEText(html, "html"))

# Send the email
with smtplib.SMTP(smtp_server, port) as server:
    server.starttls()
    server.login(login, password)
    server.sendmail(sender_email, receiver_email, message.as_string())

print('Sent')
Quick breakdown:
- Attaching the HTML content – The HTML content is attached to the email message using ‘MIMEText(html, “html”)’ instead of ‘MIMEText (text, “plain”)’. By specifying
htmlas the second argument, we inform the email client that this part of the email should be interpreted as HTML.
Send email to multiple recipients
Here, I’ll reuse the script above and adjust how the receivers’ addresses are handled.
import smtplib
from email.mime.text import MIMEText

# Configuration
port = 587
smtp_server = "live.smtp.mailtrap.io"
login = "api"  # Your login generated by Mailtrap
password = "1a2b3c4d5e6f7g"  # Your password generated by Mailtrap

sender_email = "mailtrap@example.com"
# List of recipient email addresses
receiver_emails = ["new1@example.com", "new2@example.com", "new3@example.com"]

# Plain text content
text = """\
Hi,
Check out the new post on the Mailtrap blog:
SMTP Server for Testing: Cloud-based or Local?
https://blog.mailtrap.io/2018/09/27/cloud-or-local-smtp-server/
Feel free to let us know what content would be useful for you!
"""

# Create MIMEText object
message = MIMEText(text, "plain")
message["Subject"] = "Plain text email"
message["From"] = sender_email
# Join the list of receiver emails into a string separated by commas
message["To"] = ", ".join(receiver_emails)

# Send the email
with smtplib.SMTP(smtp_server, port) as server:
    server.starttls()  # Secure the connection
    server.login(login, password)
    # Loop through each recipient and send the email individually
    for recipient in receiver_emails:
        server.sendmail(sender_email, recipient, message.as_string())

print('Sent')
Quick breakdown of what’s different from the original plaintext script:
- Multiple recipients configuration – I changed the
receiver_emailvariable toreceiver_emails. It’s now a list of email addresses instead of a single string.
- Setting the
Toheader – TheToheader in the MIMEText message object is set by joining the list of recipient emails into a single string separated by commas. This is important for the email header to correctly display all recipients when they receive the email.- Note: Some email clients (Outlook, Yahoo, Gmail etc.) may show all recipients in the
Tofield to each recipient, which isn’t desirable for privacy reasons. You can “fix” it by usingCCand/orBCC.
- Note: Some email clients (Outlook, Yahoo, Gmail etc.) may show all recipients in the
- Sending emails in a loop – Instead of sending the email once, the script now loops through each recipient in the
receiver_emailslist and sends them the email individually.
Pro tip: ⬆️ This approach works well for a small number of recipients. However, for sending emails to a large number of recipients, it might be more efficient to use the SMTP server’s capability to handle multiple recipients in a single send operation, depending on the server’s limitations and policies.
Send email with attachments
I’ll be using MIMEMultipart since attachments require a multipart email. Also, I’ll use the MIMEBase class for attaching files. Here’s the updated script:
import smtplib
from email.mime.text import MIMEText
from email.mime.multipart import MIMEMultipart
from email.mime.base import MIMEBase
from email import encoders

# Configuration
port = 587
smtp_server = "live.smtp.mailtrap.io"
login = "api"  # Your login generated by Mailtrap
password = "1a2b3c4d5e6f7g"  # Your password generated by Mailtrap

sender_email = "mailtrap@example.com"
receiver_email = "new@example.com"  # Single recipient

# Email content
subject = "Email with Attachment"
body = "Hi,\nThis is a test email with attachment."

# Create a multipart message and set headers
message = MIMEMultipart()
message["From"] = sender_email
message["To"] = receiver_email
message["Subject"] = subject

# Add body to email
message.attach(MIMEText(body, "plain"))

# Specify the attachment file path
filename = "path/to/your/file.pdf"  # Change this to the correct path

# Open the file in binary mode
with open(filename, "rb") as attachment:
    part = MIMEBase("application", "octet-stream")
    part.set_payload(attachment.read())

# Encode file in ASCII characters to send by email
encoders.encode_base64(part)

# Add header as key/value pair to attachment part
part.add_header("Content-Disposition", f"attachment; filename= {filename}")

# Add attachment to message
message.attach(part)

# Send the email
with smtplib.SMTP(smtp_server, port) as server:
    server.starttls()
    server.login(login, password)
    server.sendmail(sender_email, receiver_email, message.as_string())

print('Sent')
Quick breakdown:
- Using
MIMEMultipart– I switched fromMIMETextfor the body toMIMEMultipartfor the overall message structure. This allows us to add both the text part and the attachment as separate parts of the email. - Adding the attachment:
- File preparation – The attachment file is opened in binary mode
rb, and its content is read. MIMEBaseobject – AMIMEBaseobject is created for the attachment, with the type set toapplication/octet-stream. This type is a generic binary stream, which means it’s suitable for any file type, and email clients will typically treat it as an attachment.- Encoding – The file content is encoded in base64 to ensure it can be safely transmitted over email. This is done using the
encoders.encode_base64(part)function. - Adding headers – A header is added to the attachment part to indicate the file name and that it should be treated as an attachment (
Content-Dispositionheader). - Attaching the file to the message – The attachment part is then attached to the message using
message.attach(part).
- File preparation – The attachment file is opened in binary mode
Send an email with an embedded image
To send emails with an embedded image (in the HTML content), I’ll use the MIMEImage class.
Embedding an image directly in the email allows it to be displayed as part of the email content rather than as a separate attachment. Here’s how you can do it:
import smtplib
from email.mime.text import MIMEText
from email.mime.multipart import MIMEMultipart
from email.mime.image import MIMEImage
from email.mime.base import MIMEBase
from email import encoders
import os

# Configuration
port = 587
smtp_server = "live.smtp.mailtrap.io"
login = "api"  # Your login generated by Mailtrap
password = "1a2b3c4d5e6f7g"  # Your password generated by Mailtrap

sender_email = "mailtrap@example.com"
receiver_email = "new1@example.com"

# HTML content with an image embedded
html = """\
<html>
  <body>
    <p>Hi,<br>
    This is a <b>test</b> email with an embedded image.<br>
    Here is an image: <img src="cid:image1">.</p>
  </body>
</html>
"""

# Create a multipart message and set headers
message = MIMEMultipart()
message["From"] = sender_email
message["To"] = receiver_email
message["Subject"] = "HTML Email with Embedded Image"

# Attach the HTML part
message.attach(MIMEText(html, "html"))

# Specify the path to your image
image_path = "path/to/your/image.jpg"  # Change this to the correct path

# Open the image file in binary mode
with open(image_path, 'rb') as img:
    # Attach the image file
    msg_img = MIMEImage(img.read(), name=os.path.basename(image_path))
    # Define the Content-ID header to use in the HTML body
    msg_img.add_header('Content-ID', '<image1>')
    # Attach the image to the message
    message.attach(msg_img)

# Send the email
with smtplib.SMTP(smtp_server, port) as server:
    server.starttls()
    server.login(login, password)
    server.sendmail(sender_email, receiver_email, message.as_string())

print('Sent')
Quick breakdown:
- HTML content update: The HTML content now includes an
<img>tag with asrcattribute pointing to theContent-ID (cid)of the image you want to embed. Thiscidmust match theContent-IDheader value of the image attachment. - Embedding the image:
- Using
MIMEImage– The script now includes theMIMEImageclass to handle the image file. This class is specifically designed for attaching images to emails. - Open image file – The image you want to embed is opened in binary mode.
- Create
MIMEImageobject – The binary data of the image is used to create aMIMEImageobject. This object represents the image attachment. - Content-ID header – The
MIMEImageobject is given aContent-IDheader, which is referenced by thesrcattribute in the HTML content’s<img>tag. This linkage is what allows the email client to embed the image directly in the email body instead of showing it as a downloadable attachment. - Attaching the image – The
MIMEImageobject is attached to the multipart message, similar to how other parts are attached.
- Using
Asynchronous email sending
For asynchronous email sending you need to use Python’s asyncio library along with aiosmtplib, an asynchronous SMTP client.
This modification allows your script to send emails without blocking the execution of your program, making it more efficient, especially when sending multiple emails or performing other tasks concurrently.
For simplicity, I’ll be sending a text/plain email to a single recipient without attachments and embedded images. Here’s how it works.
First, make sure to install the aiosmtplib.
pip install aiosmtplibNow, here’s the script:
import asyncio
from email.mime.text import MIMEText
from aiosmtplib import SMTP

async def send_email_async(sender_email, receiver_email, smtp_server, port, login, password, subject, body):
    message = MIMEText(body)
    message["From"] = sender_email
    message["To"] = receiver_email
    message["Subject"] = subject

    async with SMTP(hostname=smtp_server, port=port) as smtp:
        await smtp.connect()
        await smtp.starttls()
        await smtp.login(login, password)
        await smtp.send_message(message)

async def main():
    # Email configuration
    smtp_server = "live.smtp.mailtrap.io"
    port = 587
    sender_email = "mailtrap@example.com"
    receiver_email = "new@example.com"  # Single recipient
    login = "api"  # Your login generated by Mailtrap
    password = "1a2b3c4d5e6f7g"  # Your password generated by Mailtrap
    subject = "Test Async Email"
    body = "This is a plain text email sent asynchronously."

    await send_email_async(sender_email=sender_email, receiver_email=receiver_email, smtp_server=smtp_server, port=port, login=login, password=password, subject=subject, body=body)
    print("Email sent asynchronously.")

if __name__ == "__main__":
    asyncio.run(main())
Quick breakdown:
- Asynchronous function definition: The script now defines asynchronous functions using
async def. - Async functionality: Utilizing ‘asyncio and ‘aiosmtplib’, the script establishes an SMTP connection asynchronously, logs in, and sends the email. This approach allows for non-blocking email sending, which is particularly useful in applications that require maintaining responsiveness while performing network operations.
- Running the script: The
mainasync function sets up the email details and calls send_email_async to send the email. It demonstrates how to run asynchronous tasks in Python effectively, withasyncio.run(main())bootstrapping the asynchronous execution.
Bulk email sending
The code above uses live.smtp.mailtrap.io which is the endpoint for transactional emails. But Mailtrap Email Delivery Platform’s email package allows you to send bulk emails via a separate stream bulk.smtp.mailtrap.io under the same plan.
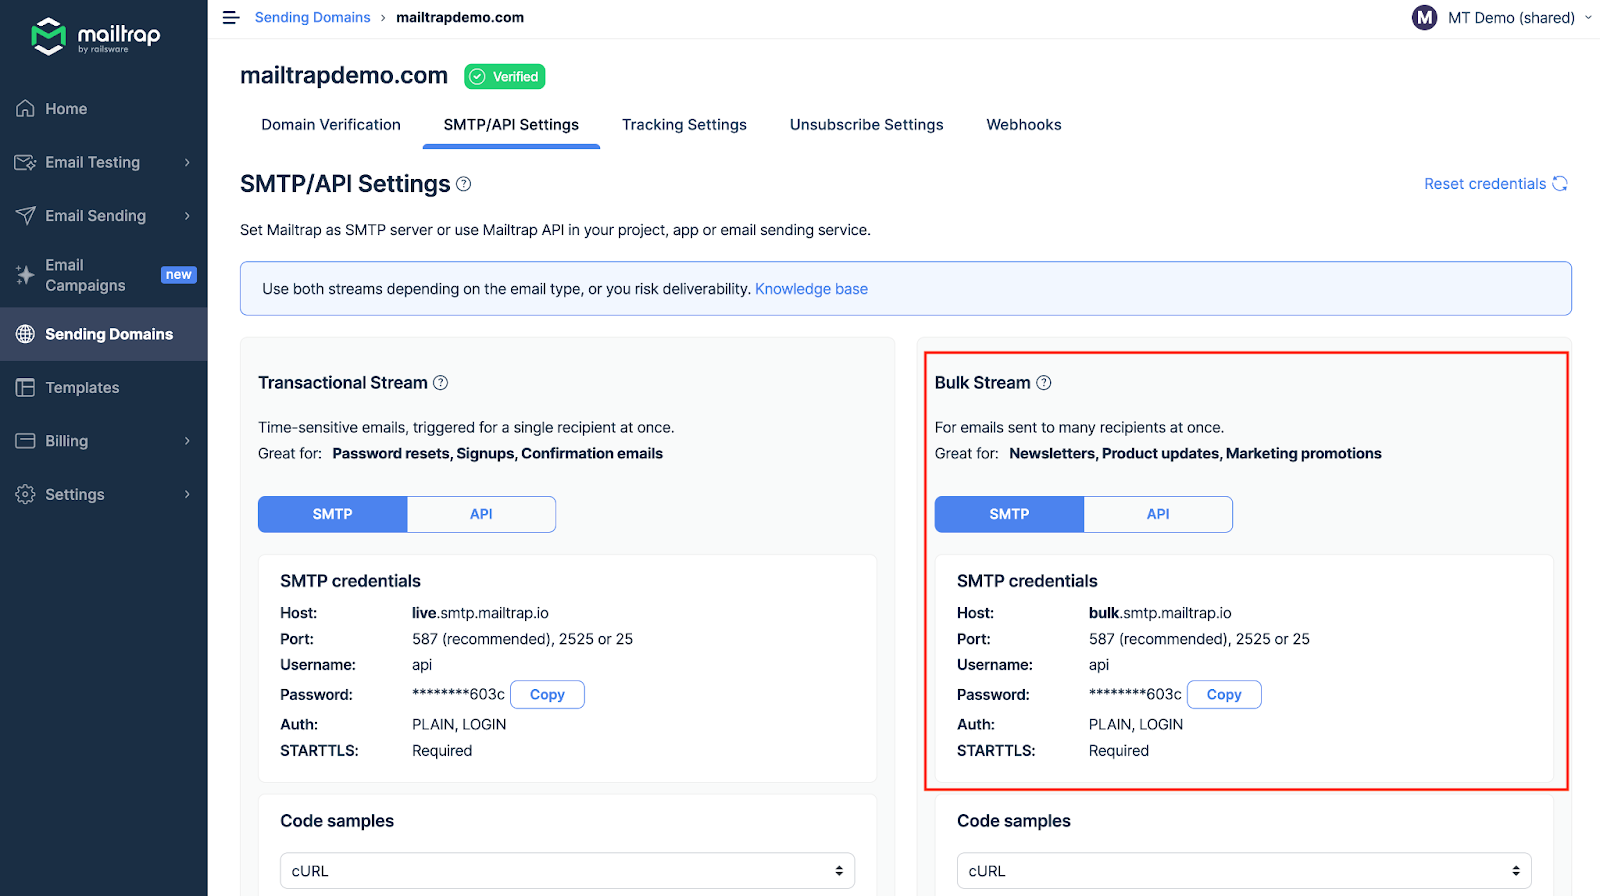
Now, the only different thing is the Host (endpoint), and you’d need to adjust your script to that. But keep in mind that Transactional and Bulk emails have separate infrastructures, even though your credentials are almost the same. That helps improve deliverability and email management.
To illustrate the changes, I created a simple script using the given SMTP endpoint.
import smtplib
from email.mime.text import MIMEText
from email.mime.multipart import MIMEMultipart

# Configuration for Mailtrap's Bulk SMTP server
smtp_server = "bulk.smtp.mailtrap.io"
port = 587
login = "api"  # Your Mailtrap login
password = "1a2b3c4d5e6f7g"  # Your Mailtrap password

sender_email = "mailtrap@example.com"
receiver_email = "new@example.com"  # Single recipient

# Create a MIMEText message for plain text
subject = "Plain Text Email via Bulk SMTP"
body = "This is a plain text email sent via Mailtrap's Bulk SMTP server."

# Create a MIMEMultipart message and set headers
message = MIMEMultipart()
message["From"] = sender_email
message["To"] = receiver_email
message["Subject"] = subject

# Attach the text part
message.attach(MIMEText(body, "plain"))

# Send the email
with smtplib.SMTP(smtp_server, port) as server:
    server.starttls()  # Secure the connection
    server.login(login, password)  # Log in to the SMTP server
    server.sendmail(sender_email, receiver_email, message.as_string())  # Send the email

print('Email sent successfully.')
Quick breakdown:
MIMEMultipartusage: Even though the email is plain text and sent to a single recipient, I’ve retained the use ofMIMEMultipart. This approach offers flexibility if you decide to add attachments or HTML content in the future. However, you could simplify further by usingMIMETextalone.- Sending the email: The call to
server.sendmailis straightforward, specifying the sender, the recipient, and convert the message object to a string format to be sent.
Pro Tip: If you’re using environment variables or external configuration file for the SMTP credentials, it’s best to have separate files for Transactional and Bulk configuration.
Send emails using API
To make your integration more straightforward, Mailtrap has an official Python SDK (check the GitHub link ◀️). I’ll use that to show you how to send a plain text email, send it to multiple recipients, send bulk emails, etc.
Here, I won’t cover the asynchronous email sending method as Mailtrap doesn’t support it, and it doesn’t make much sense in the API contexts.
As a reminder, you’ll need to connect and verify your domain with Mailtrap. Check out our detailed guide and a bonus video instruction on how to do this.
Once that’s done, go back to your Python app and install Mailtrap’s official Python SDK with the following command:
pip install mailtrapNote: make sure the package version is 3.6+ or higher.
Then you should create the mail object and fill in variables (such as email and name) with your Mailtrap credentials. Keep in mind that you should indicate the address with the verified sending domain in it.
import mailtrap as mt
# create mail object
mail = mt.Mail(
sender=mt.Address(email="mailtrap@example.com", name="Mailtrap Test"),
to=[mt.Address(email="your@email.com")],
subject="You are awesome!",
text="Congrats for sending test email with Mailtrap!",
)
# create client and send
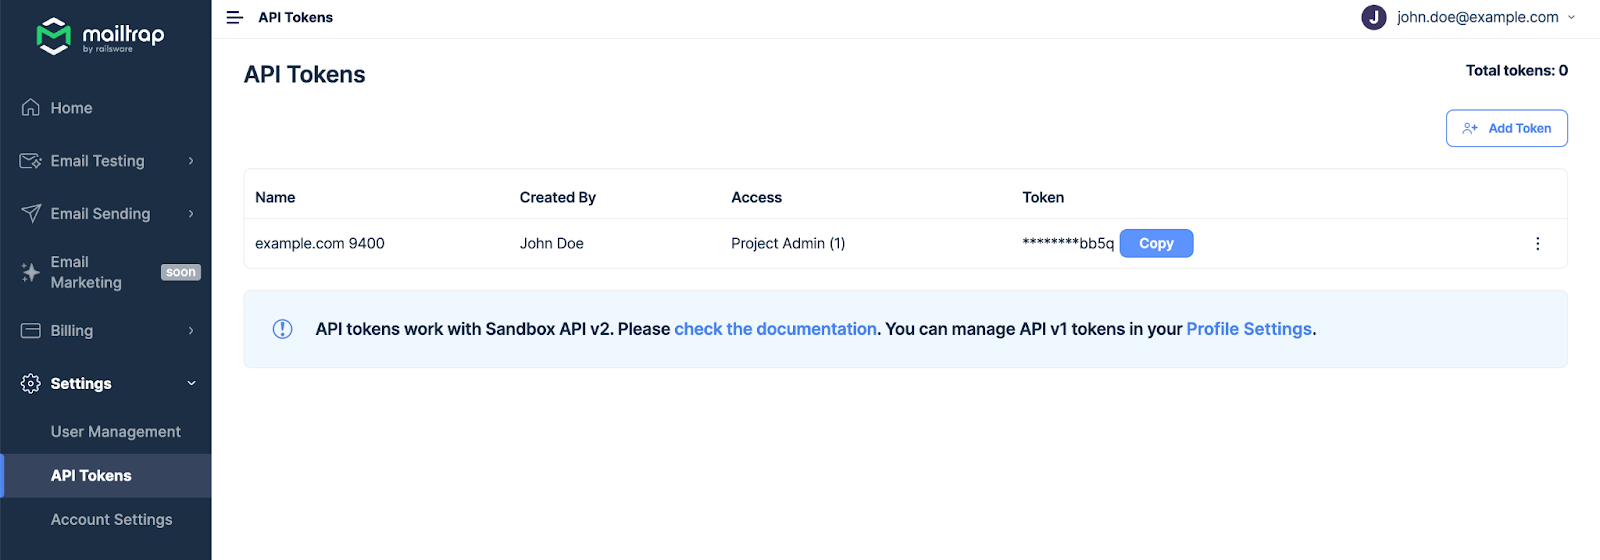
client = mt.MailtrapClient(token="your-api-key")
client.send(mail)You’ll also need to create the client with your API token. Go to your Mailtrap account by expanding the ‘Settings’ dropdown, then choose the ‘API Tokens’ tab. Copy the credentials by pressing ‘Copy’ next to your token.
Then, you can use the command below to send the email.
# create client and send
client = mt.MailtrapClient(token="your-api-key")
client.send(mail)
That out of the way, I’ll proceed to show you how to leverage the SDK for different use cases.
Here’s a bare-bones script to send plain text email:
from mailtrap import Mail, Address, MailtrapClient

# Create a Mail object with basic details for a plain text email
mail = Mail(
    # Specify the sender's email address and optional name
    sender=Address(email="mailtrap@example.com", name="Mailtrap Test"),
    # Specify one or more recipients; here we use a list with a single recipient
    to=[Address(email="your@email.com", name="Your Name")],
    # Subject of the email
    subject="Simple Plain Text Email",
    # The plain text content of the email
    text="This is a plain text email sent using the Mailtrap SDK. Simple and straightforward.",
    # Optional: categorize this email for easier sorting or management in the Mailtrap service
    category="Test",
    # Optional: Additional headers can be specified, but are not required for plain text emails
    headers={"X-Example-Header": "HeaderValue"}
)

# Initialize the MailtrapClient with your API token
client = MailtrapClient(token="your-api-key")

# Send the email using the client's send method
client.send(mail)

print("Plain text email sent successfully.")
Quick breakdown:
- Importing classes: Only the classes ‘Mail’, ‘Address’, and ‘MailtrapClient’ from the Mailtrap library are imported since we’re focusing on sending a simple plain text email.
- Creating the
Mailobject:The Mail– constructor is used to create an email object.Sender– Uses the ‘Address’ class to define the sender’s email and name.to– A list of ‘Address’ objects for each recipient. For plain text email, you typically have one or more direct recipients listed here.subject– The subject line of the email.text– The actual content of the email, in plain text format.categoryandheaders– Optional fields that allow for additional categorization and custom headers. While not strictly necessary for sending a plain text email, these can be useful for organizational or technical purposes within the Mailtrap service or for email client handling.
- Sending the email:
- An instance of
MailtrapClientis created, and authenticated with an API token. - The ‘send’ method of the
MailtrapClientis then called, passing themailobject as an argument to send the email. - Finally, a confirmation message is printed to indicate that the email has been sent.
- An instance of
Send an HTML email
I’ll adjust the script by specifying the html parameter in the Mail object with the HTML content.
from mailtrap import Mail, Address, MailtrapClient

# Create a Mail object for sending an HTML email
mail = Mail(
    sender=Address(email="mailtrap@example.com", name="Mailtrap Test"),
    to=[Address(email="recipient@email.com", name="Recipient Name")],
    subject="Your HTML Email Subject Here",
    text="This is a fallback text for email clients that don't render HTML",
    html="""
    <!DOCTYPE html>
    <html>
        <head>
            <title>Email Title</title>
        </head>
        <body>
            <h1>Hello, World!</h1>
            <p>This is an <strong>HTML email</strong> sent from the Mailtrap Python SDK.</p>
            <p>Here's a link: <a href="https://example.com">Visit Example.com</a></p>
        </body>
    </html>
    """,
    # You can categorize this email or add custom headers as needed
    category="HTML Email",
    headers={"X-Custom-Header": "Value"}
)

# Initialize the MailtrapClient with your API token
client = MailtrapClient(token="your-api-key")

# Send the email
client.send(mail)

print("HTML email sent successfully.")
Quick breakdown:
- HTML content: The
htmlparameter of the ‘Mail’ object is where you put your HTML content. This is the part of the email that will be rendered by email clients capable of displaying HTML. - Fallback text content: The plain text version of the email content serves as a fallback for email clients that do not render HTML or for users who prefer plain text emails.
- Sending the email: With the HTML content defined, the rest of the process for sending the email remains the same.
Send email to multiple recipients
I’ll modify the recipient part of the email setup to include multiple recipients.
There are comments throughout the script to explain how to handle multiple recipients for both the To field and adding Cc (Carbon Copy) and Bcc (Blind Carbon Copy) recipients. So, I won’t be adding the Quick breakdown section in this case as the method is simple and the logic is obvious in the script.
from mailtrap import Mail, Address, MailtrapClient

# Create a Mail object targeting multiple recipients, including Cc and Bcc addresses
mail = Mail(
    # Specify the sender's email address and optional name
    sender=Address(email="mailtrap@example.com", name="Mailtrap Test"),
    # Specify multiple recipients in the "To" field
    to=[
        Address(email="recipient1@email.com", name="Recipient One"),
        Address(email="recipient2@email.com", name="Recipient Two"),
    ],
    # Additionally, specify recipients in the "Cc" field
    cc=[
        Address(email="cc1@email.com", name="Cc Recipient One"),
        Address(email="cc2@email.com", name="Cc Recipient Two"),
    ],
    # And recipients in the "Bcc" field for hidden copies
    bcc=[
        Address(email="bcc1@email.com", name="Bcc Recipient One"),
        Address(email="bcc2@email.com", name="Bcc Recipient Two"),
    ],
    # Subject of the email
    subject="Email to Multiple Recipients",
    # The plain text content of the email
    text="This email is sent to multiple recipients, including Cc and Bcc addresses.",
    # Optional: categorize this email or add custom headers as needed
    category="Mass Email",
    headers={"X-Custom-Header": "Value"}
)

# Initialize the MailtrapClient with your API token
client = MailtrapClient(token="your-api-key")

# Send the email using the client's send method
client.send(mail)

print("Email sent to multiple recipients successfully.")
Send an email with attachments
Here, I’ll primarily need to focus on how the Attachment class is used to include files in your email. This example will demonstrate attaching a generic file, but the approach is similar for any file type.
from mailtrap import Mail, Address, MailtrapClient, Attachment, Disposition
import base64
from pathlib import Path

# Prepare the file you want to attach
file_path = Path("path/to/your/file.pdf")  # Update this to the path of your file
file_content = file_path.read_bytes()  # Read the file content as bytes

# Encode the file content in base64
encoded_content = base64.b64encode(file_content)

# Create a Mail object with an attachment
mail = Mail(
    sender=Address(email="mailtrap@example.com", name="Mailtrap Test"),
    to=[Address(email="recipient@email.com", name="Recipient Name")],
    subject="Email with Attachment",
    text="This email contains an attachment. Check it out!",
    # Define the attachment
    attachments=[
        Attachment(
            content=encoded_content,  # The base64 encoded content of the file
            filename=file_path.name,  # The name of the file as it should appear in the email
            disposition=Disposition.ATTACHMENT,  # Indicates that the file is an attachment
            mimetype="application/pdf",  # The MIME type of the file
            # `content_id` is optional and usually used for embedding images directly in the HTML body
        )
    ],
)

# Initialize the MailtrapClient with your API token
client = MailtrapClient(token="your-api-key")

# Send the email
client.send(mail)

print("Email with attachment sent successfully.")
Quick breakdown:
- Preparing the file: The script starts by specifying the path to the file you want to attach and reading its content as bytes. It’s important to read the file in binary mode (‘read_bytes()’ method) to ensure the content is correctly encoded and transmitted.
- Base64 encoding: Since email protocols are not binary-safe, the file content needs to be encoded in base64. This encoding converts binary data into a text format that can be safely transmitted over email. The ‘base64.b64encode’ method is used for this purpose.
- Creating the attachment: The Attachment class is instantiated with several parameters:
content– The base64 encoded content of the file.filename– The name of the file as you want it to appear in the email.disposition– This is set to ‘Disposition.ATTACHMENT’ to indicate that the file is an attachment (as opposed to inline, which would be used for embedded images).mimetype– The MIME file type, which helps email clients understand how to handle the file. For a PDF, this is ‘application/pdf’.
Send an email with an embedded image
Here, I’ll attach the image so that it can be displayed directly within the HTML content of the email. This is usually achieved by attaching the image with a Content-ID (cid) that can be referenced in the HTML. Here’s how to do it:
from mailtrap import Mail, Address, MailtrapClient, Attachment, Disposition
import base64
from pathlib import Path

# Specify the path to your image
image_path = Path("path/to/your/image.jpg")
image_content = image_path.read_bytes()  # Read the image content as bytes

# Encode the image content in base64
encoded_image = base64.b64encode(image_content)

# Create a Mail object with HTML content and an embedded image
mail = Mail(
    sender=Address(email="mailtrap@example.com", name="Mailtrap Test"),
    to=[Address(email="recipient@email.com", name="Recipient Name")],
    subject="Email with Embedded Image",
    text="This is a fallback text for email clients that do not render HTML.",
    html="""
    <!DOCTYPE html>
    <html>
        <body>
            <h1>Hello, World!</h1>
            <p>This email contains an embedded image.</p>
            <!-- Use 'cid:image_cid' in the src attribute to embed the image -->
            <img src="cid:image_cid">
        </body>
    </html>
    """,
    attachments=[
        Attachment(
            content=encoded_image,
            filename=image_path.name,
            disposition=Disposition.INLINE,  # Mark the attachment as inline
            mimetype="image/jpeg",  # The MIME type of the image
            content_id="image_cid",  # Content-ID used to reference the image in the HTML src attribute
        )
    ],
)

# Initialize the MailtrapClient with your API token
client = MailtrapClient(token="your-api-key")

# Send the email
client.send(mail)

print("Email with an embedded image sent successfully.")
Quick breakdown:
- Prepare the image: Before attaching the image, you read its content as bytes and then encode it in base64. This encoding is necessary because email content (including attachments) needs to be transmitted in a text-based format.
- HTML content: In the
htmlparameter of theMailobject, you include an<img>tag where thesrcattribute uses acid:scheme followed by the Content-ID of the image attachment (image_cidin this case). Thiscidlinks the embedded image in the HTML content to the attached image file. - Attaching the image: The image is attached using the Attachment class with several specific parameters:
content– The base64 encoded image content.filename– The image file name. It’s used as a fallback in some email clients if the image cannot be displayed.disposition– Set toDisposition.INLINEto indicate the attachment should be displayed in line with the HTML content, not as a separate, downloadable attachment.mimetype– Specifies the MIME type of the image (e.g., “image/jpeg”). This helps the email client understand how to handle the file.content_id– A unique identifier for the attachment referenced in the HTMLsrcattribute to embed the image.- Sending the email – The process for sending the email remains unchanged.
Bulk email sending
To remind you, Mailtrap Email Deliver Platform allows you to send bulk emails on top of transactional, under the same plan. You need to select the stream, hit the API button, and choose the Python integration.
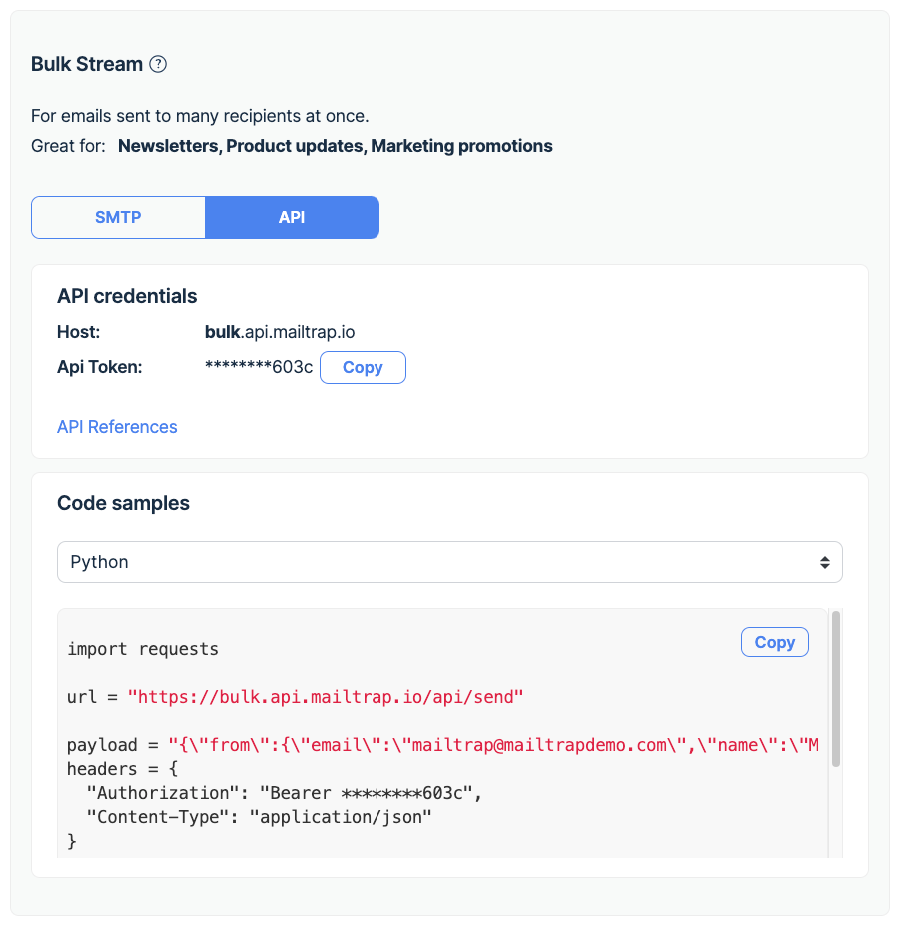
That out of the way, here’s what else you need to do.
- Ensure you have the ‘requests’ library installed. If not, you can install it using pip:
pip install requests- Construct a JSON payload that specifies the email’s details and adjust the
tofield to include multiple recipients.
- Using the requests library, you make a POST request to the Mailtrap Bulk API endpoint, providing the necessary headers (including authorization) and the payload. Check the exemplary script below.
import requests
import json

def send_mailtrap_email(payload):
    url = "https://bulk.api.mailtrap.io/api/send"
    headers = {
      "Authorization": "Bearer your_api_token",  # Replace with your Mailtrap API token
      "Content-Type": "application/json"
    }

    response = requests.post(url, headers=headers, data=json.dumps(payload))
    return response.text

payload = {
    "from": {"email": "mailtrap@mailtrapdemo.com", "name": "Mailtrap Test"},
    "to": [{"email": "recipient@example.com"}],  # Add more recipients as needed
    "subject": "You are awesome!",
    "text": "Congrats for sending test email with Mailtrap!",
    "category": "Integration Test"
}

response_text = send_mailtrap_email(payload)
print(response_text)
Quick breakdown:
payload– It’s a dictionary that matches the JSON structure expected by the Mailtrap Bulk API. You can modify this dictionary to include the details of your email, such as the sender, recipient(s), subject, and body.send_mailtrap_email– The function encapsulates the process of sending the email. It takes the payload as input, converts it to JSON format, and makes a POST request to the Mailtrap Bulk API.
Email sending security considerations
If you plan to automate sending emails and send them to a large number of recipients consistently, it’s best to take extra precautions. (Mostly relating to the SMTP method.)
Here, I’ll cover some tried and tested methods to avoid hardcoding credentials into your scripts and handle errors. Note that the tips below apply regardless of the email provider you’re using (SendGrid, SES, Gmail account, etc.)
Using environment variables for sensitive information
Environment variables are a secure way to manage configuration settings and sensitive information outside of your application code.
In Python, you can use the os module to access environment variables.
import os

smtp_server = os.getenv("SMTP_SERVER", "default.smtp.server")
login = os.getenv("SMTP_LOGIN")
password = os.getenv("SMTP_PASSWORD")

# Example usage in an SMTP connection setup
# smtp.login(login, password)
Before running your script, set the environment variables in your operating system. For example, in a Linux or macOS terminal, you can set them temporarily like this:
export SMTP_SERVER=live.smtp.mailtrap.io
export SMTP_LOGIN=your_login
export SMTP_PASSWORD=your_password
In Windows, you can set them via the command line as follows:
set SMTP_SERVER=live.smtp.mailtrap.io
set SMTP_LOGIN=your_login
set SMTP_PASSWORD=your_password
Error handling
Here’s how to manage unexpected errors, such as network errors, authentication problems, or other exceptions that may occur during the email sending process.
try:
    # Attempt to send an email
    server.sendmail(sender_email, recipient_email, message.as_string())
except smtplib.SMTPException as e:
    print(f"SMTP error occurred: {e}")
except Exception as e:
    print(f"An error occurred: {e}")
Using SSL
Here’s a basic outline of how you might use smtplib.SMTP_SSL in a script to send an email:
import smtplib
from email.mime.text import MIMEText


# Configuration
port = 465
smtp_server = "live.smtp.mailtrap.io"
login = "username"
password = "password"


sender_email = "sender@registerd_domain.com"
receiver_email = "receiver@gmail.com"


text = """\
Hi,
Feel free to let us know what content would be useful for you!
"""


message = MIMEText(text, "plain")
message["Subject"] = "Plain text email"
message["From"] = sender_email
message["To"] = receiver_email


with smtplib.SMTP_SSL(smtp_server, port) as server:
    server.login(login, password)
    server.sendmail(sender_email, receiver_email, message.as_string())
    print("Email sent successfully!")
External configuration
Storing configuration data (like SMTP server details and email addresses) in external files or environment variables enhances your script’s security and flexibility. For more complex configurations, you might consider using a JSON file or similar.
- Example JSON configuration (
config.json):
{
    "smtp_server": "live.smtp.mailtrap.io",
    "smtp_port": 587,
    "login": "your_login",
    "password": "your_password"
}- How to load configuration:
import json

with open('config.json', 'r') as config_file:
    config = json.load(config_file)

smtp_server = config.get('smtp_server')
smtp_port = config.get('smtp_port')
login = config.get('login')
password = config.get('password')Tip: If you want to send emails from your Google account and leverage Gmail’s SMTP server (smtp.gmail.com), we already blogged about it. Check the article here.
Test emails and email sending in a staging environment
When creating a new app or adding any functionality, especially when doing it for the first time, it’s essential to experiment on a test server. Here is a brief list of reasons:
- You won’t hit your friends’ and customers’ inboxes. This is vital when you test bulk email sending or work with an email database.
- You won’t flood your inbox with testing emails.
- Your domain won’t be blacklisted for spam.
A testing SMTP server environment imitates the work of a real 3rd party web server. In the following examples, I’ll use Mailtrap Email Testing, which allows devs to capture SMTP traffic from staging and inspect and debug emails before they go out to actual recipients.
On top of that, the Email Testing can help validate your HTML/CSS, analyze the email’s content, preview txt and content, and give a relevant spam score. The tool is easy to set up; all you need is to copy the credentials generated by the app and paste them into your code.
Note: I’ll be covering SMTP and API methods separately. And if you wan’t in-depth tutorial on testing with Python, check this article.
SMTP
Go to Mailtrap, select Email Testing, then My Inbox. Under the SMTP Settings tab, click “Show credentials” to reveal the testing credentials.
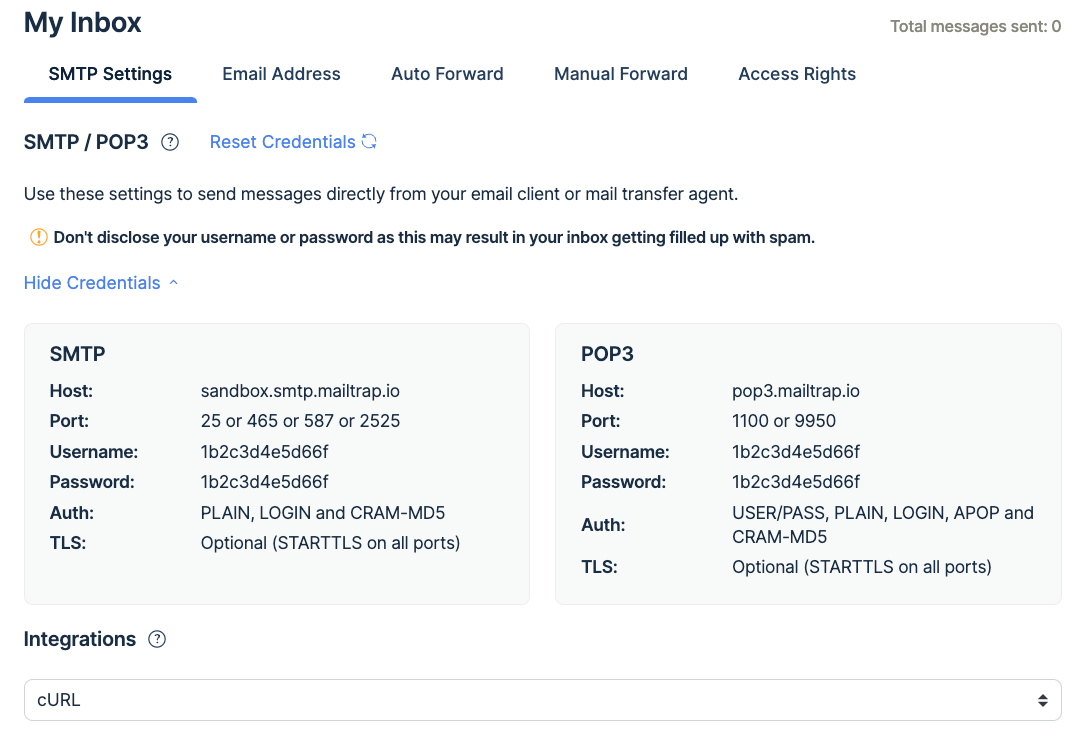
Here is how it looks in practice:
import smtplib
port = 2525
smtp_server = "sandbox.smtp.mailtrap.io"
login = "1b2c3d4e5d66f" # your login generated by Mailtrap
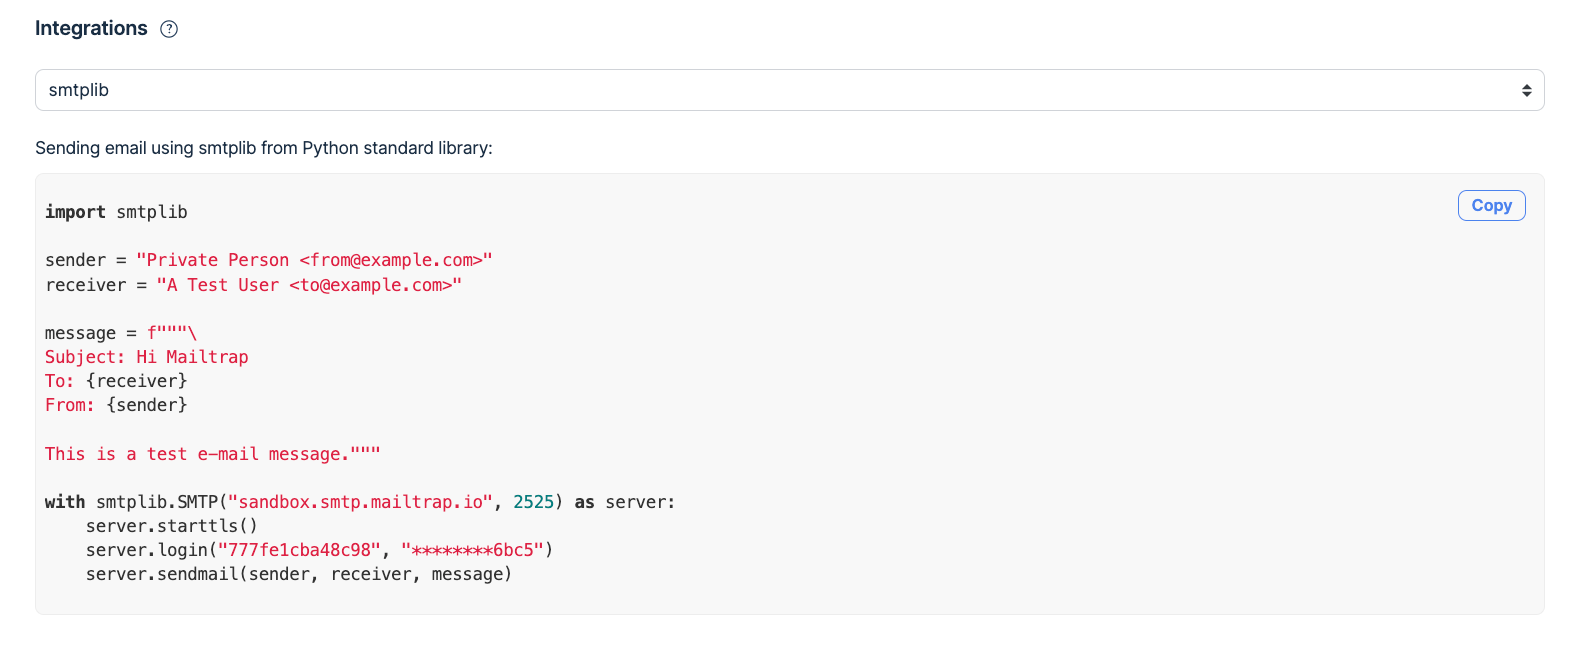
password = "1b2c3d4e5d66f" # your password generated by MailtrapMailtrap makes things even easier. Go to the Integrations section in the SMTP settings tab and get the ready-to-use template of the simple text message with your Mailtrap credentials.
Important note: The snippets use dummy credentials for safety, please make sure to copy-paste your real credentials into the code.
The most basic option for instructing your Python code on who sends what to who is the sendmail() instance method, which I’ll use here. But we also have exemplary integrations for Django and Flask.
Let’s take a closer look at the example and add some error handling (see the #explanations in between). To catch errors, we use the try and except blocks. Refer to the documentation for the list of exceptions here.
# the first step is always the same: import all necessary components:
import smtplib
from socket import gaierror
# now you can play with your code. Let's define the SMTP server separately here:
port = 2525
smtp_server = "sandbox.smtp.mailtrap.io"
login = "1b2c3d4e5d66f" # paste your login generated by Mailtrap
password = "1b2c3d4e5d66f" # paste your password generated by Mailtrap
# specify the sender's and receiver's email addresses
sender = "from@example.com"
receiver = "mailtrap@example.com"
# type your message: use two newlines (\n) to separate the subject from the message body, and use 'f' to automatically insert variables in the text
message = f"""\
Subject: Hi Mailtrap
To: {receiver}
From: {sender}
This is my first message with Python."""
try:
#send your message with credentials specified above
with smtplib.SMTP(smtp_server, port) as server:
server.login(login, password)
server.sendmail(sender, receiver, message)
# tell the script to report if your message was sent or which errors need to be fixed
print('Sent')
except (gaierror, ConnectionRefusedError):
print('Failed to connect to the server. Bad connection settings?')
except smtplib.SMTPServerDisconnected:
print('Failed to connect to the server. Wrong user/password?')
except smtplib.SMTPException as e:
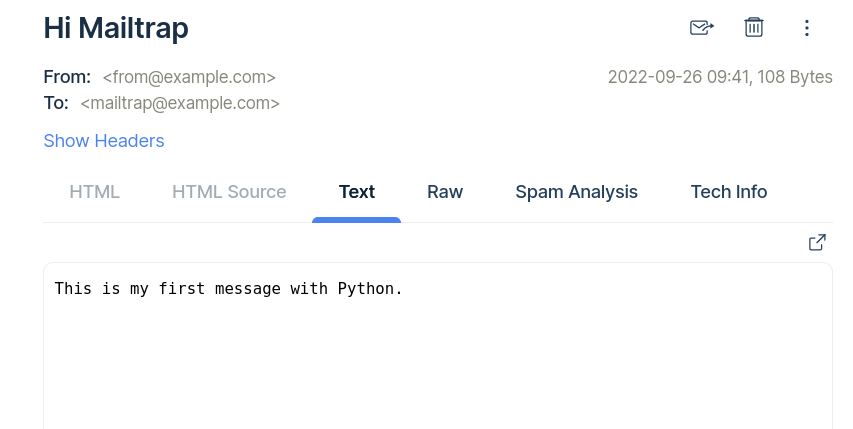
print('SMTP error occurred: ' + str(e))Once you get the Sent result in Shell, you should see your message in your Mailtrap inbox:
If you prefer working in the local environment, the local SMTP debugging server might be an option. For this purpose, Python offers an smtpd module. It has a DebuggingServer feature, which will discard messages you are sending out and will print them to stdout. It is compatible with all operations systems.
Set your SMTP server to localhost:1025
python -m smtpd -n -c DebuggingServer localhost:1025In order to run SMTP email server on port number 25, you’ll need root permissions:
sudo python -m smtpd -n -c DebuggingServer localhost:25It will help you verify whether your code is working and point out the possible problems if there are any. However, it won’t allow you to check how your HTML email template is rendered.
API
You can check our API docs for full details on API testing. I’ll be using Python 3 to show you the method, and lead you the way step-by-step.
- Establish a connection to the Mailtrap Email Testing API endpoint using
http.client.HTTPSConnection. - Define your email content, including recipients (
to,cc,bcc), sender (from), subject, text content, and any attachments or custom variables as a JSON payload. - Make a POST request to the Mailtrap Email Testing API with your payload and necessary headers, including your API token for authorization. Here’s an example:
import http.client
import json

def test_send_email():
    conn = http.client.HTTPSConnection("sandbox.api.mailtrap.io")

    payload = {
        "to": [{"email": "john_doe@example.com", "name": "John Doe"}],
        "cc": [{"email": "jane_doe@example.com", "name": "Jane Doe"}],
        "bcc": [{"email": "james_doe@example.com", "name": "Jim Doe"}],
        "from": {"email": "sales@example.com", "name": "Example Sales Team"},
        "attachments": [
            {
                "content": "base64_encoded_content_here",
                "filename": "index.html",
                "type": "text/html",
                "disposition": "attachment"
            }
        ],
        "custom_variables": {"user_id": "45982", "batch_id": "PSJ-12"},
        "headers": {"X-Message-Source": "dev.mydomain.com"},
        "subject": "Your Example Order Confirmation",
        "text": "Congratulations on your order no. 1234",
        "category": "API Test"
    }

    headers = {
        'Content-Type': "application/json",
        'Accept': "application/json",
        'Api-Token': "your_api_token_here"  # Replace with your real API token
    }

    # Convert the payload to a JSON string
    json_payload = json.dumps(payload)

    # Make the POST request
    conn.request("POST", "/api/send/inbox_id", json_payload, headers)  # Replace 'inbox_id' with your real inbox ID

    # Get the response
    response = conn.getresponse()
    data = response.read()

    print(data.decode("utf-8"))

if __name__ == "__main__":
test_send_email()Notes:
- Payload: The dictionary contains all the details of the email you want to test. Make sure to replace placeholder values with actual data relevant to your test case. For attachments, encode your file content to Base64 and include it in the
contentfield. - Headers: Include your
Content-Type,Accept, andApi-Tokenheaders. The Api-Token should be your Mailtrap API token. - Request and response: The script makes a POST request to the
/api/send/inbox_idendpoint, replacinginbox_idwith your actual inbox ID. Then, it reads and prints the response to check the result.
Next steps with emails in Python
I demonstrated the options of sending emails with Python to describe the logic and a range of its capabilities. But I recommend reviewing the Python documentation and experimenting with your own code to get great results!
There are a bunch of various Python frameworks and libraries that make creating apps more elegant and dedicated. In particular, some of them can help improve your experience with building email-sending functionality:
The most popular frameworks are:
- Flask, which offers a simple interface for email sending— Flask Mail. Feel free to learn more in our guide on how to send emails with Flask.
- Django can be a great option for building HTML templates. Also, take a look at our Django email sending tutorial.
- Zope comes in handy for website development.
- Marrow Mailer is a dedicated mail delivery framework adding various helpful configurations.
- Plotly and its Dash can help with mailing graphs and reports.
Good luck, and don’t forget to stay on the safe side when sending your emails!


Comments
1 replies