 Skip to Navigation


A contact form represents an opportunity for web app users to address the web app owner or team. As a rule, “contact us” pages use the email method for communication. A user needs to fill in the required fields like name, email address, and message. When he or she submits the form, the details are sent as an email to your email address. The final stage is the response, which confirms that the user’s request has been accepted. Today, we’re going to dismantle this process and find out how you can implement a contact form with React.
How do you create a contact form with React?
I wish it was so easy. All you can do with React is to build a contact form. As for sending emails, you’ll have to set up a backend part using some server-side languages like PHP. Actually, there is a way to avoid messing up with backend – it is an outer email service. For example, in the blog post, Sending Emails with ReactJS, we’ve reviewed emailjs.com. But you can always Google another one.
We won’t go this way and will settle on a more reliable and traditional solution that consists of:
- Frontend part that is responsible for the contact form in React
- Backend part that is responsible for sending a form submission email and confirmation email to the user
Visually, it may look as follows:

- The user submits the contact form
- The React app sends the POST request to the backend
- The backend sends an email with user’s details to your mailbox
- Your mailbox replies with a confirmation email sent to the user’s email address
This is clear. Now, let’s do some coding!
Front End – Building the contact form
Again, you can choose different ways to do this. The first one is easier and faster, because you can use one of the ready-to-go contact forms available at react.rocks. The second way is to do it manually like this:
Create the React app
Your contact form will be built in the React application. So, you need to create one. For this:
- install the create-react-app package with
npm install create-react-app- change directory to the one your project will be stored in
cd ~/my-react-app- generate your React app in this folder
npx create-react-appNow, you need to open the App.js file in /my-react-app/src using your IDE like Visual Studio, Atom, Codelobster or code editor. Here, you will build your contact form.
Create the contact form
Release your creativity and make the contact form you wish to have. As an example, we’ll settle on a regular option with three fields: name, email address, and message. Below, there will be a button to submit this data. So, set up a component that returns our HTML form:
<form id="contact-form" onSubmit={this.handleSubmit.bind(this)} method="POST">
    <div className="form-group">
        <label htmlFor="name">Name</label>
        <input type="text" className="form-control" />
    </div>
    <div className="form-group">
        <label htmlFor="exampleInputEmail1">Email address</label>
        <input type="email" className="form-control" aria-describedby="emailHelp" />
    </div>
    <div className="form-group">
        <label htmlFor="message">Message</label>
        <textarea className="form-control" rows="5"></textarea>
    </div>
    <button type="submit" className="btn btn-primary">Submit</button>
</form>
In this example above, we used Bootstrap classes in order to not bother CSS styling. But if you want to add some widths or otherwise tinker with CSS code, get to the App.css file in the /src folder. It’s up to you. Now, take a look at how the code from above will look in the App component in full:
class App extends React.Component {
  constructor(props) {
    super(props);
    this.state = {
      name: '',
      email: '',
      message: ''
    }
  }
  render() {
    return(
      <div className="App">
        <form id="contact-form" onSubmit={this.handleSubmit.bind(this)} method="POST">
          <div className="form-group">
            <label htmlFor="name">Name</label>
            <input type="text" className="form-control" value={this.state.name} onChange={this.onNameChange.bind(this)} />
          </div>
          <div className="form-group">
            <label htmlFor="exampleInputEmail1">Email address</label>
            <input type="email" className="form-control" aria-describedby="emailHelp" value={this.state.email} onChange={this.onEmailChange.bind(this)} />
          </div>
          <div className="form-group">
            <label htmlFor="message">Message</label>
            <textarea className="form-control" rows="5" value={this.state.message} onChange={this.onMessageChange.bind(this)} />
          </div>
          <button type="submit" className="btn btn-primary">Submit</button>
        </form>
      </div>
    );
  }
  onNameChange(event) {
    this.setState({name: event.target.value})
  }
  onEmailChange(event) {
    this.setState({email: event.target.value})
  }
  onMessageChange(event) {
    this.setState({message: event.target.value})
  }
  handleSubmit(event) {
  }
}
export default App;
If you want to see how it works, just run npm start in the project root folder. Your default browser will open up with localhost:3000 port and will show your contact form.
Handler function for the contact form
One more thing before moving to the backend part. You have your contact form but it’s static. To make it work, we need the form submit handler method that will send HTTP requests to the API. The following code snippet makes sure the code is correct and the action is initiated when the button is pressed.
handleSubmit( event ) {
  event.preventDefault();
  console.log(this.state);
}
This can be done with JavaScript Fetch API like this:
handleSubmit(e) {
  e.preventDefault();
  fetch('http://localhost:3002/send', {
      method: "POST",
      body: JSON.stringify(this.state),
      headers: {
        'Accept': 'application/json',
        'Content-Type': 'application/json'
      },
    }).then(
    (response) => (response.json())
      ).then((response)=> {
    if (response.status === 'success') {
      alert("Message Sent.");
      this.resetForm()
    } else if(response.status === 'fail') {
      alert("Message failed to send.")
    }
  })
}
Another solution is Axios. It’s a worthwhile npm package to handle HTTP requests. Install it first with npm install axios. Don’t forget to import it as well (import axios from 'axios'), and use Axios as follows:
handleSubmit(e) {
  e.preventDefault();
  axios({
    method: "POST",
    url:"http://localhost:3002/send",
    data:  this.state
  }).then((response)=>{
    if (response.data.status === 'success') {
      alert("Message Sent.");
      this.resetForm()
    } else if(response.data.status === 'fail') {
      alert("Message failed to send.")
    }
  })
}
That’s how your App.js file should look like in the end:
import React from 'react';
import axios from 'axios';
class App extends React.Component {
  constructor(props) {
    super(props);
    this.state = {
      name: '',
      email: '',
      message: ''
    }
  }
  handleSubmit(e){
    e.preventDefault();
    axios({
      method: "POST",
      url:"http://localhost:3002/send",
      data:  this.state
    }).then((response)=>{
      if (response.data.status === 'success') {
        alert("Message Sent.");
        this.resetForm()
      } else if (response.data.status === 'fail') {
        alert("Message failed to send.")
      }
    })
  }
  resetForm(){
    this.setState({name: ‘’, email: ‘’, message: ‘’})
  }
  render() {
    return(
      <div className="App">
        <form id="contact-form" onSubmit={this.handleSubmit.bind(this)} method="POST">
          <div className="form-group">
              <label htmlFor="name">Name</label>
              <input type="text" className="form-control" id="name" value={this.state.name} onChange={this.onNameChange.bind(this)} />
          </div>
          <div className="form-group">
              <label htmlFor="exampleInputEmail1">Email address</label>
              <input type="email" className="form-control" id="email" aria-describedby="emailHelp" value={this.state.email} onChange={this.onEmailChange.bind(this)} />
          </div>
          <div className="form-group">
              <label htmlFor="message">Message</label>
              <textarea className="form-control" rows="5" id="message" value={this.state.message} onChange={this.onMessageChange.bind(this)} />
          </div>
          <button type="submit" className="btn btn-primary">Submit</button>
        </form>
      </div>
    );
  }
  onNameChange(event) {
	  this.setState({name: event.target.value})
  }
  onEmailChange(event) {
	  this.setState({email: event.target.value})
  }
  onMessageChange(event) {
	  this.setState({message: event.target.value})
  }
}
export default App;
That’s it, your React contact form can send emails, as soon as we set up a mechanism for that.
Back End – Handling emails
You’re free to choose a technology to build your back end part. We’ve reviewed several in our blog posts:
- Sending emails with Python and its framework Django
- Sending emails with Ruby
- Sending emails with ASP.NET C#
But today, we’ll focus on two back end options: PHP and Node.js (represented by Express.js).
Using PHP web server
Create a php file where your email sending function will live. For example, index.php. In order to run this file as a backend web application, execute the following command in your project directory:
php -S localhost:3002 index.phpTo ensure that your setup is correct, try putting the following code to index.php and then open http://localhost:3002/ in your browser:
<?php
echo 'hello world';
If it’s correct, you’ll see the ‘hello world’ text as a response in your browser window.
Now, let’s fill it with some code that will basically do the following:
- Setting up CORS headers. If you are running frontend and backend on different host and/or ports, which will be the case if you follow our guide, then you’ll have to set cross origin headers in order to make asynchronous calls work from your browser to your backend.
<?php
header("Access-Control-Allow-Origin: *");
header("Access-Control-Allow-Headers: Content-Type");- Set content type of the response
header("Content-Type: application/json");- Check for form submission
if ($_SERVER['REQUEST_METHOD'] === 'POST') {
}- Check, collect, and validate submitted data
$errors = array();
if ($_SERVER['REQUEST_METHOD'] === "POST") {
  if (empty($_POST['email'])) {
    $errors[] = 'Email is empty';
  } else {
    $email = $_POST['email'];
    // validating the email
    if (!filter_var($email, FILTER_VALIDATE_EMAIL)) {
      $errors[] = 'Invalid email';
    }
  }
  if (empty($_POST['message'])) {
    $errors[] = 'Message is empty';
  } else {
    $message = $_POST['message'];
  }
}- Create the email
if (empty($errors)) {
  $date = date('j, F Y h:i A');
  $emailBody = "
  <html>
  <head>
    <title>$email is contacting you</title>
  </head>
  <body style=\"background-color:#fafafa;\">
    <div style=\"padding:20px;\">
      Date: <span style=\"color:#888\">$date</span>
      <br>
      Email: <span style=\"color:#888\">$email</span>
      <br>
      Message: <div style=\"color:#888\">$message</div>
    </div>
  </body>
  </html>
";- Send the email
    $headers = 	'From: Contact Form <contact@mydomain.com>' . "\r\n" .
    "Reply-To: $email" . "\r\n" .
    "MIME-Version: 1.0\r\n" .
    "Content-Type: text/html; charset=iso-8859-1\r\n";
    $to = 'contact@example.com';
    $subject = 'Contacting you';
    if (mail($to, $subject, $emailBody, $headers)) {
      $sent = true;
    }
  }
}
?>- Report errors
<?php if (!empty($errors)) : ?>
{
  "status": "fail",
  "error":  <?php echo json_encode($errors) ?>
}
<?php endif; ?>
In the end, you may want to display a message telling the user that the data submission was successful.
<?php if ($sent === true) : ?>
{
  "status": "success",
  "message": "Your data was successfully submitted"
}
<?php endif; ?>
By default, the PHP mail function uses the sendmail command as a method of sending emails. It’s important to note that sending emails from PHP requires your environment to have the correct settings. Make sure the sendmail command works correctly or use another email sending method instead of the mail funciton.
Now, let’s take a look at the full code:
<?php
header("Access-Control-Allow-Origin: *");
header("Access-Control-Allow-Headers: Content-Type");
header("Content-Type: application/json");
$rest_json = file_get_contents("php://input");
$_POST = json_decode($rest_json, true);
$errors = array();
if ($_SERVER['REQUEST_METHOD'] === "POST") {
  if (empty($_POST['email'])) {
    $errors[] = 'Email is empty';
  } else {
    $email = $_POST['email'];
    // validating the email
    if (!filter_var($email, FILTER_VALIDATE_EMAIL)) {
        $errors[] = 'Invalid email';
    }
  }
  if (empty($_POST['message'])) {
    $errors[] = 'Message is empty';
  } else {
    $message = $_POST['message'];
  }
  if (empty($errors)) {
    $date = date('j, F Y h:i A');
    $emailBody = "
    <html>
    <head>
    <title>$email is contacting you</title>
    </head>
    <body style=\"background-color:#fafafa;\">
    <div style=\"padding:20px;\">
    Date: <span style=\"color:#888\">$date</span>
    <br>
    Email: <span style=\"color:#888\">$email</span>
    <br>
    Message: <div style=\"color:#888\">$message</div>
    </div>
    </body>
    </html>
    ";
    $headers = 	'From: Contact Form <contact@mydomain.com>' . "\r\n" .
    "Reply-To: $email" . "\r\n" .
    "MIME-Version: 1.0\r\n" .
    "Content-Type: text/html; charset=iso-8859-1\r\n";
    $to = 'contact@example.com';
    $subject = 'Contacting you';
    if (mail($to, $subject, $emailBody, $headers)) {
      $sent = true;
    }
  }
}
?>
  <?php if (!empty($errors)) : ?>
{
  "status": "fail",
  "error":  <?php echo json_encode($errors) ?>
}
  <?php endif; ?>
  <?php if (isset($sent) && $sent === true) : ?>
{
  "status": "success",
  "message": "Your data was successfully submitted"
}
  <?php endif; ?>
If you want to see more options, check out our blog posts Sending Emails with PHP, and its frameworks: Symfony and Laravel.
Using Express.js + Nodemailer
Another popular backend solution for the React app is Node.js. Node.js is represented with a combination of Express.js and Nodemailer. First, create a new project and set up Express:
npm create -y
npm install express --save
then Nodemailer
npm install nodemailer --saveSame as for PHP backend – in the case when backend and frontend host and/or port are different, you need to provide CORS headers. The simplest way to do that is to use the cors NPM module:
npm install --save corsNow, create a configuration file (config.js). Your email credentials will be stored here.
module.exports = {
    USER: 'YOUR_EMAIL_ADDRESS',
    PASS: 'PASSWORD_FOR_EMAIL'
}
After that, you need to configure the SMTP transporter and set up the post route. It will send the data received through the transporter. Create the index.js file in your project directory and put the following code:
var express = require('express');
var router = express.Router();
var nodemailer = require('nodemailer');
var cors = require('cors');
const creds = require('./config');
var transport = {
    host: 'smtp.example.com', // Don’t forget to replace with the SMTP host of your provider
    port: 587,
    auth: {
    user: creds.USER,
    pass: creds.PASS
  }
}
var transporter = nodemailer.createTransport(transport)
transporter.verify((error, success) => {
  if (error) {
    console.log(error);
  } else {
    console.log('Server is ready to take messages');
  }
});
router.post('/send', (req, res, next) => {
  var name = req.body.name
  var email = req.body.email
  var message = req.body.message
  var content = `name: ${name} \n email: ${email} \n message: ${message} `
  var mail = {
    from: name,
    to: 'RECEIVING_EMAIL_ADDRESS_GOES_HERE',  // Change to email address that you want to receive messages on
    subject: 'New Message from Contact Form',
    text: content
  }
  transporter.sendMail(mail, (err, data) => {
    if (err) {
      res.json({
        status: 'fail'
      })
    } else {
      res.json({
       status: 'success'
      })
    }
  })
})
const app = express()
app.use(cors())
app.use(express.json())
app.use('/', router)
app.listen(3002)
Now start your server by running:
node index.jsRead our blog posts to learn more about Sending Emails with Nodemailer or how to send emails with Node.js.
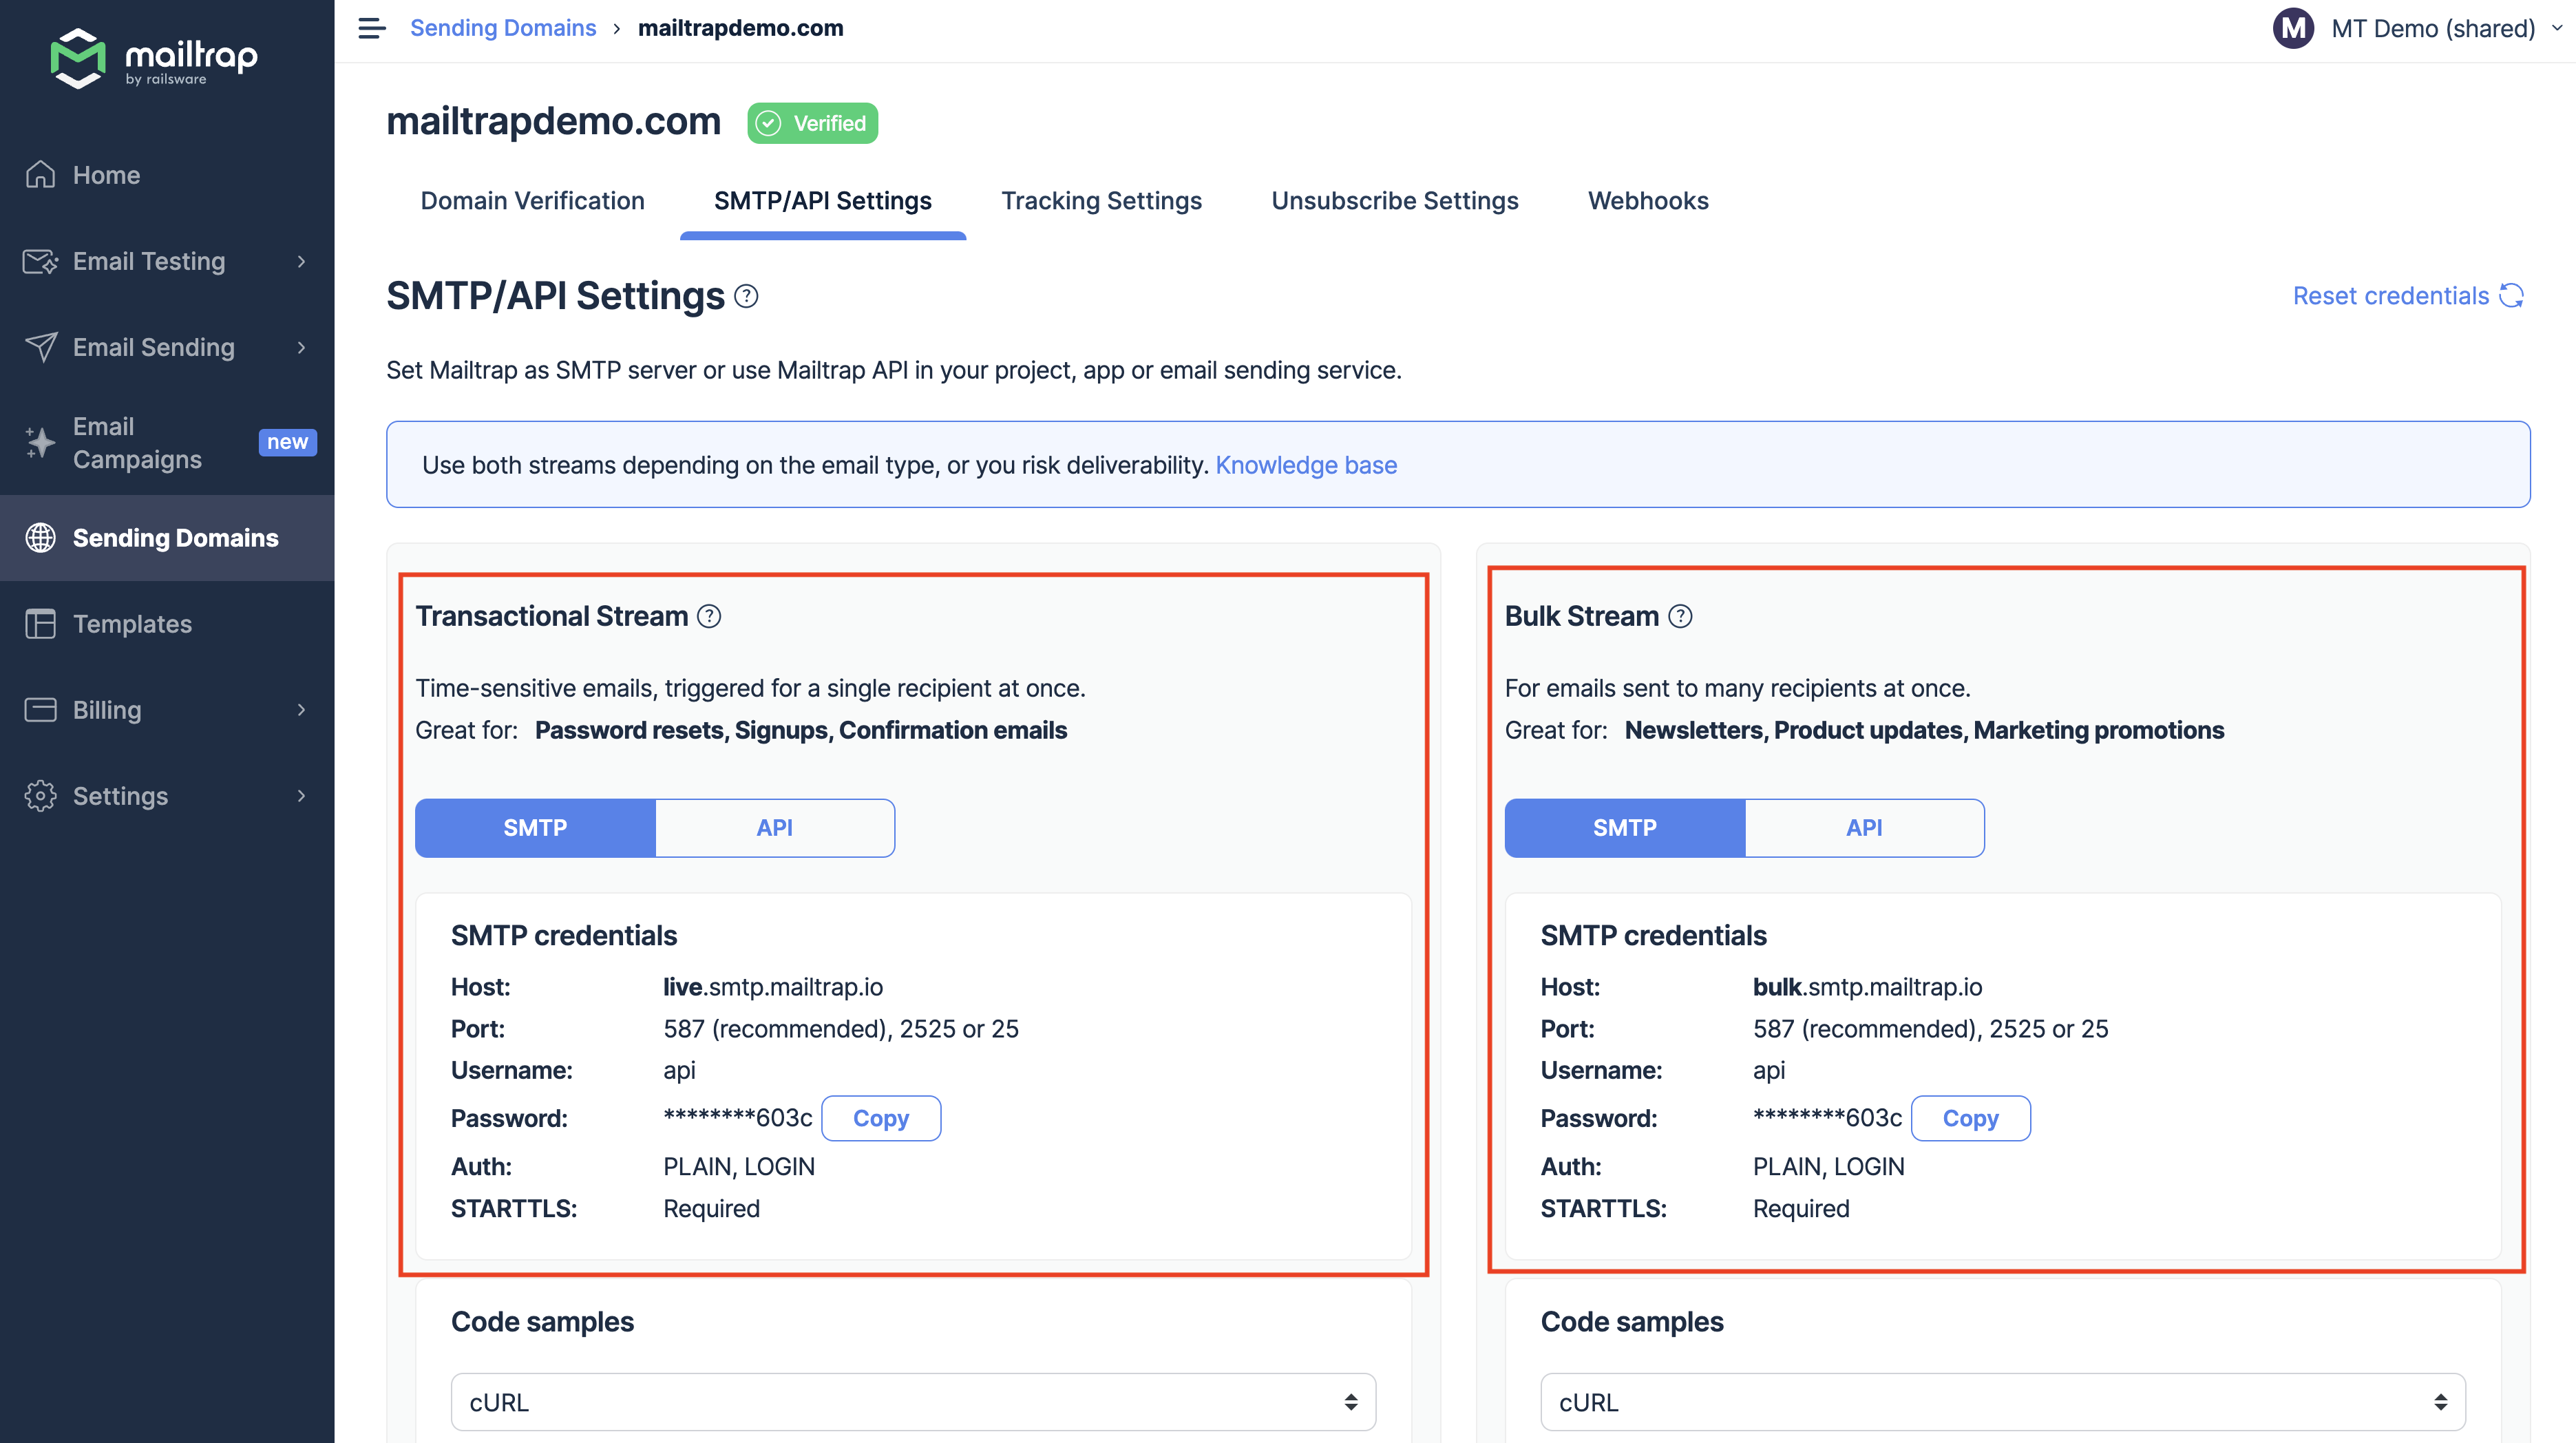
If you wish to decrease dependencies and keep all of your email infrastructures in one place, Mailtrap Email Sending will help you achieve that. After a fairly quick setup process described below, your app will be fitted with an email-sending feature that helps get high deliverability rates, monitor any deliverability issues, get weekly performance reports, and so much more.
Once your domain name is connected and verified, go to the SMTP/API Settings tab under Sending Domains menu, and choose a stream you’d like to use Transactional or Bulk. From there, select the integration type. If you’re choosing API, from the drop-down menu, select your app’s language and run the displayed script with your credentials. If you chose SMTP, you’ll just need to configure the credentials.
How to set up auto-reply messages
The contact form sent an email to your inbox, and now the user will want to know if the submission was successful. In this case, you will want to set up an auto-reply email to immediately respond to the user. Check out the following code samples to implement this.
Script for PHP auto-reply email
Just add the following code to the end of the index.php file that you created in the section above.
<?php
  $email_subject = "Submission was successful";
  $email_message = "Form details\n\n";
  $email_message .= "Name: ".$name."\n\n";
  $email_message .= "Email: ".$email."\n\n";
  $email_message .= "Message: ".$message."\n\n";
  // create email headers
  $headers = 'From: '.$to."\r\n".
  'Reply-To: '.$to."\r\n" .
  "MIME-Version: 1.0\r\n" .
  "Content-Type: text/plain; charset=iso-8859-1\r\n";
  mail($email, $email_subject, $email_message, $headers);
Script for Express.js (Node.js) auto-reply email
transporter.sendMail({
    	from: "<your email address>",
    	to: email,
    	subject: "Submission was successful",
    	text: `Thank you for contacting us!\n\nForm details\nName: ${name}\nEmail: ${email}\nMessage: ${message}`
  }, function(error, info){
    	if(error) {
      	  console.log(error);
    	} else{
      	  console.log('Message sent: ' + info.response);
    	}
});
Add this code snippet to the success handler of your mail sending function in index,js. You should get the following:
transporter.sendMail(mail, (err, data) => {
  if (err) {
    res.json({
      status: 'fail'
    })
  } else {
    res.json({
       status: 'success'
    })
    transporter.sendMail({
      from: "<your email address>",
      to: email,
      subject: "Submission was successful",
      text: `Thank you for contacting us!\n\nForm details\nName: ${name}\n Email: ${email}\n Message: ${message}`
    }, function(error, info){
      if(error) {
        console.log(error);
      } else{
        console.log('Message sent: ' + info.response);
      }
    });
  }
})
Test your contact form before deploying
Issues with server configuration can sometimes hinder email delivery. The recipient’s email provider may also have strict spam filtering, which can get in the way. That’s why it is essential to test whether your contact form functions well. For this, you can utilize Mailtrap Email Testing, which gives you a safe environment for inspecting, testing, and debugging emails.
Additionally, the Sandbox has Apache SpamAssassin integrated into it, which means you can quickly get an accurate spam analysis score based on numerous tests on email headers and body text.
To start testing your emails, simply update your SMTP settings with those listed in the Sandbox. For example, if your backend is based on Node.js, copy and paste the following script, add your credentials, and your emails will be trapped for you to analyze content, validate HTML/CSS, and do the rest of the tests available.
var transport = nodemailer.createTransport({
  host: "smtp.mailtrap.io",
  port: 2525,
  auth: {
    user: "<your Mailtrap username>",
    pass: "<your Mailtrap password>"
  }
});
To verify whether the auto-reply message is sent, the dedicated email address is a useful feature. You can send messages from other email accounts or right from your app during the testing process. This feature is available starting from the Business billing plan
If emails from your React contact form end up in Mailtrap’s Email Sandbox inbox, the next step is to check the SMTP on your site. It is important to set up SMTP authentication and protect your server from numerous threats. Read more on this in our blog post, Everything You Need to Know About SMTP Security.
Wrapping up
We hope that you enjoyed this blog post about creating contact forms in React. We encourage you to check out other materials available on the Mailtrap blog. Some of them are for startuppers; others are meant to strengthen your testing skills. And stay tuned for many more interesting publications to come!

Comments
18 replies
View all comments