 Skip to Navigation


Windows PowerShell is mostly known as a command-line shell used to solve some administration tasks in Windows and apps running on this OS. At the same time, it is a scripting language that allows you to tailor cmdlets – lightweight commands to perform specific functions. And today, we’ll talk about Send-MailMessage, a cmdlet to send emails from PowerShell, as well as other ways to handle this.
The simplest script to send an email with PowerShell
Let’s start with simple things. Here is a one-line script based on the Send-MailMessage cmdlet you can use right now to send an email from PowerShell using SMTP protocol.
Send-MailMessage -To '<recipient’s email address>' -From '<sender’s email address>' -Subject 'Your message subject' -Body 'Some important plain text!' -Credential (Get-Credential) -SmtpServer '<smtp server>' -Port 587All you need is to insert the email address of a sender and a recipient, as well as specify the SMTP server you’re going to use. Then copy-paste this script to your PowerShell and press enter.
We cover the process of writing the one-line script in detail in our Mailtrap tutorial:
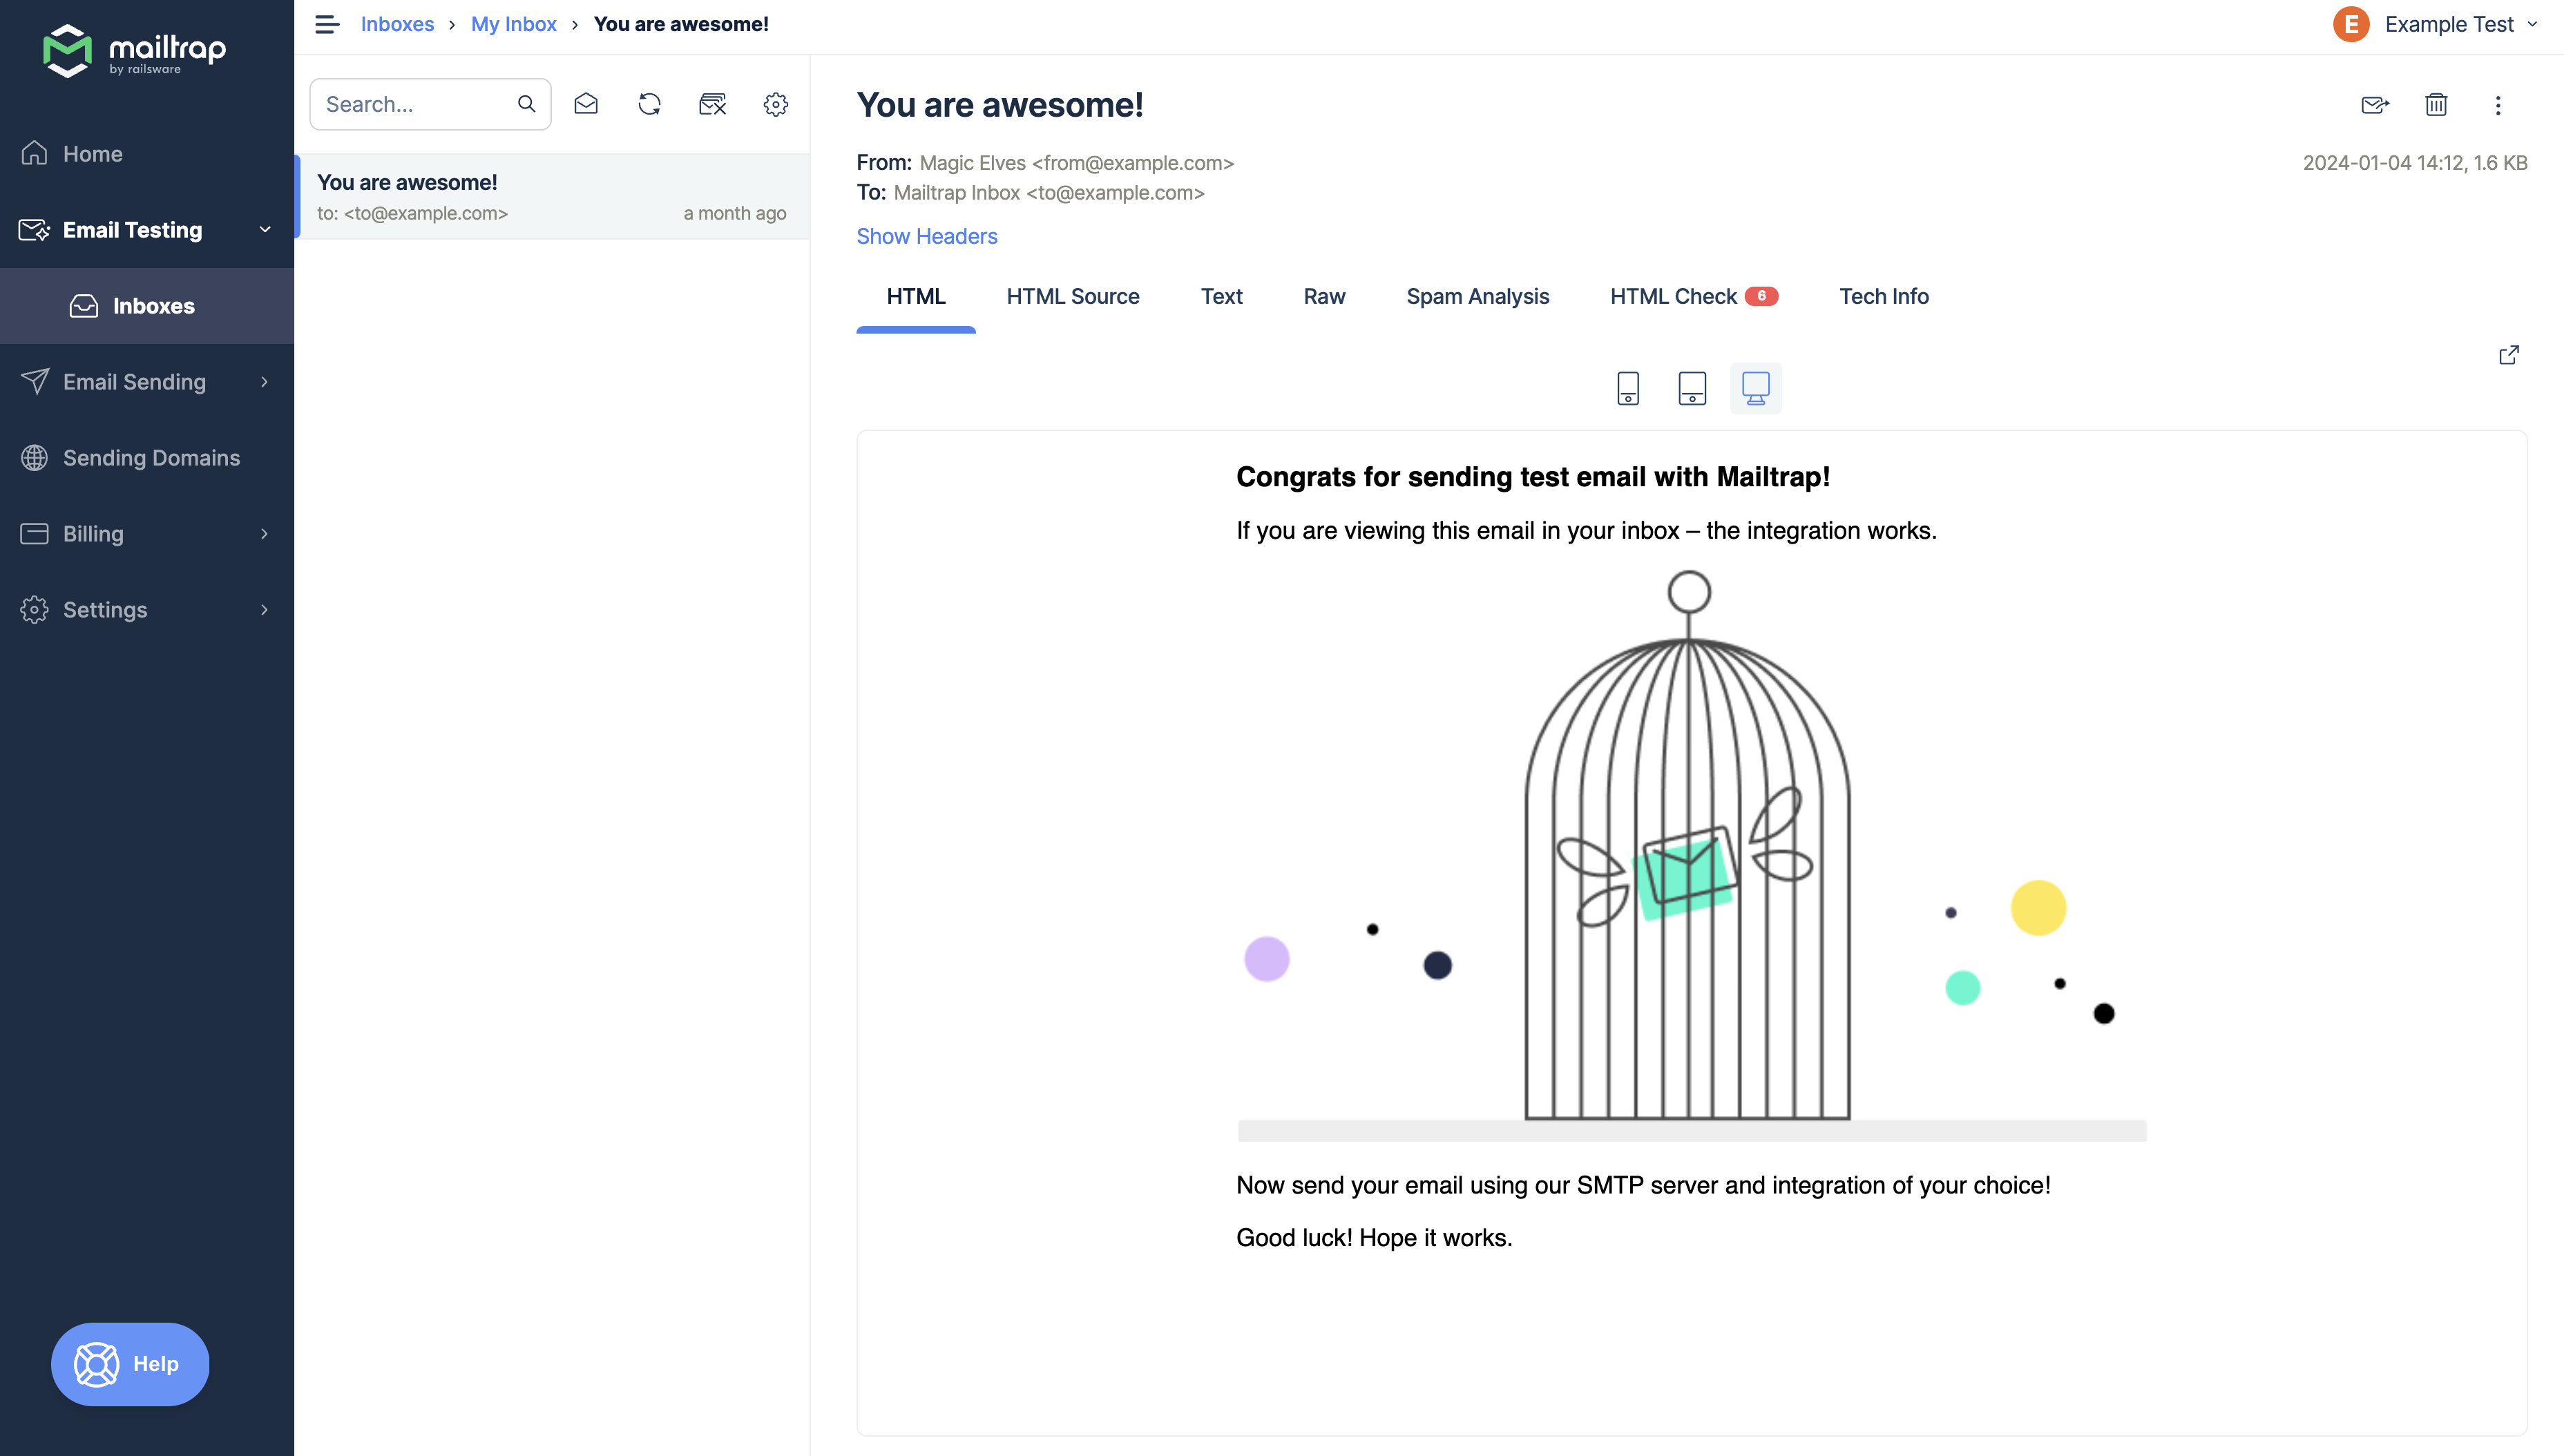
To check if the code works properly, you can send a test email to a virtual inbox. For this, you need a proper email-testing solution, such as Mailtrap Email Sandbox belonging to the Mailtrap Email Delivery Platform.
Email Sandbox provides you with a virtual inbox (or up to 300 virtual inboxes with its highest plan) to which you can send test emails and then inspect and debug them. This way, the solution creates a safe environment for you to find any issues related to your emails without the risk of spamming real recipients or ruining your domain reputation since you no longer have to use your personal inbox for testing purposes.
The features of Mailtrap Email Sandbox include HTML/CSS analysis, email content spam score checking and previewing, insight into valuable tech info, domain blacklist reports, and more. This means that this testing solution will come in handy regardless of if you are working with plain text or HTML emails, include images/attachments or not, and so on.
To send a test email to Email Sandbox, this is the script you can use:
Send-MailMessage -To 'jon-snow@winterfell.com' -From 'mother-of-dragons@houseoftargaryen.net' -Subject 'Hey, Jon' -Body 'Some important plain text!' -Credential (Get-Credential) -SmtpServer 'smtp.mailtrap.io' -Port 587Here, we’ve just specified the SMTP host. The addresses of the recipient and the sender are not real, as you might have guessed. And that’s one of the benefits of using an email testing solution – you don’t have to deal with an actual email to test the email workflow.
Once you copy and paste this script to PowerShell and hit Enter, a window requesting the SMTP credentials (username and password) of your virtual inbox will pop up. You can find those credentials in your Mailtrap account under Email Sandbox → Inboxes → SMTP Settings.

Enter the credentials using the pop-up window and continue. Soon after that, the test email should appear in your virtual inbox.
For full instructions on how to send test emails from PowerShell using Mailtrap, watch our dedicated tutorial:
Alternatively, you can use a dummy email, but that can be poor testing practice. Learn why in our blog post Why Using Dummy Email for Testing Just Doesn’t Work.
Can I send an HTML email or an email with attachments from PowerShell to multiple recipients?
Yes you can! Send-MailMessage lets you pump up your email with many parameters, including HTML content, priority, and so on. Also, you can send emails to multiple recipients by specifying them in the corresponding parameter. Here is what you can make use of:
| Parameter | Description |
|---|---|
-To | Email address of a recipient or recipients |
-Bcc | Email address of a BCC recipient or recipients |
-Cc | Email address of a CC recipient or recipients |
-From | Sender’s email address |
-Subject | Email subject |
-Body | Email body text |
-BodyAsHtml | Defines that email body text contains HTML |
-Attachments | Filenames to be attached and the path to them |
-Credential | Authentication to send the email from the account |
-SmtpServer | Name of the SMTP server |
-Port | Port of the SMTP server |
-DeliveryNotificationOption | The sender(s) specified in the Form parameter will be notified on the email delivery. Here are the options:
|
-Encoding | The encoding for the body and subject |
-Priority | Defines the level of priority of the message. Valid options are:Normal (default parameter)LowHigh |
-UseSsl | Connection to the SMTP server will be established using the Secure Sockets Layer (SSL) protocol |
So, let’s make a script that will send an email containing HTML text and an attachment. This time, we’ll define the parameters in advance and then refer to them in the Send-MailMessage cmdlet:
$From = "mother-of-dragons@houseoftargaryen.net"
$To = "jon-snow@winterfell.com", "jorah-mormont@night.watch"
$Cc = "tyrion-lannister@westerlands.com"
$Attachment = "C:\Temp\Drogon.jpg"
$Subject = "Photos of Drogon"
$Body = "<h2>Guys, look at these pics of Drogon!</h2><br><br>"
$Body += "He is so cute!"
$SMTPServer = "smtp.mailtrap.io"
$SMTPPort = "587"
Send-MailMessage -From $From -to $To -Cc $Cc -Subject $Subject -Body $Body -BodyAsHtml -SmtpServer $SMTPServer -Port $SMTPPort -UseSsl -Credential (Get-Credential) -Attachments $Attachment
As you noticed, we used $Body += to add a new line to the body text of the message.
You can now preview how this email looks and do an analysis of its HTML/CSS using Mailtrap Email Sandbox’s HTML Check feature. This feature gives you insight into the support top email clients have for the HTML elements and CSS rules used in your emails.
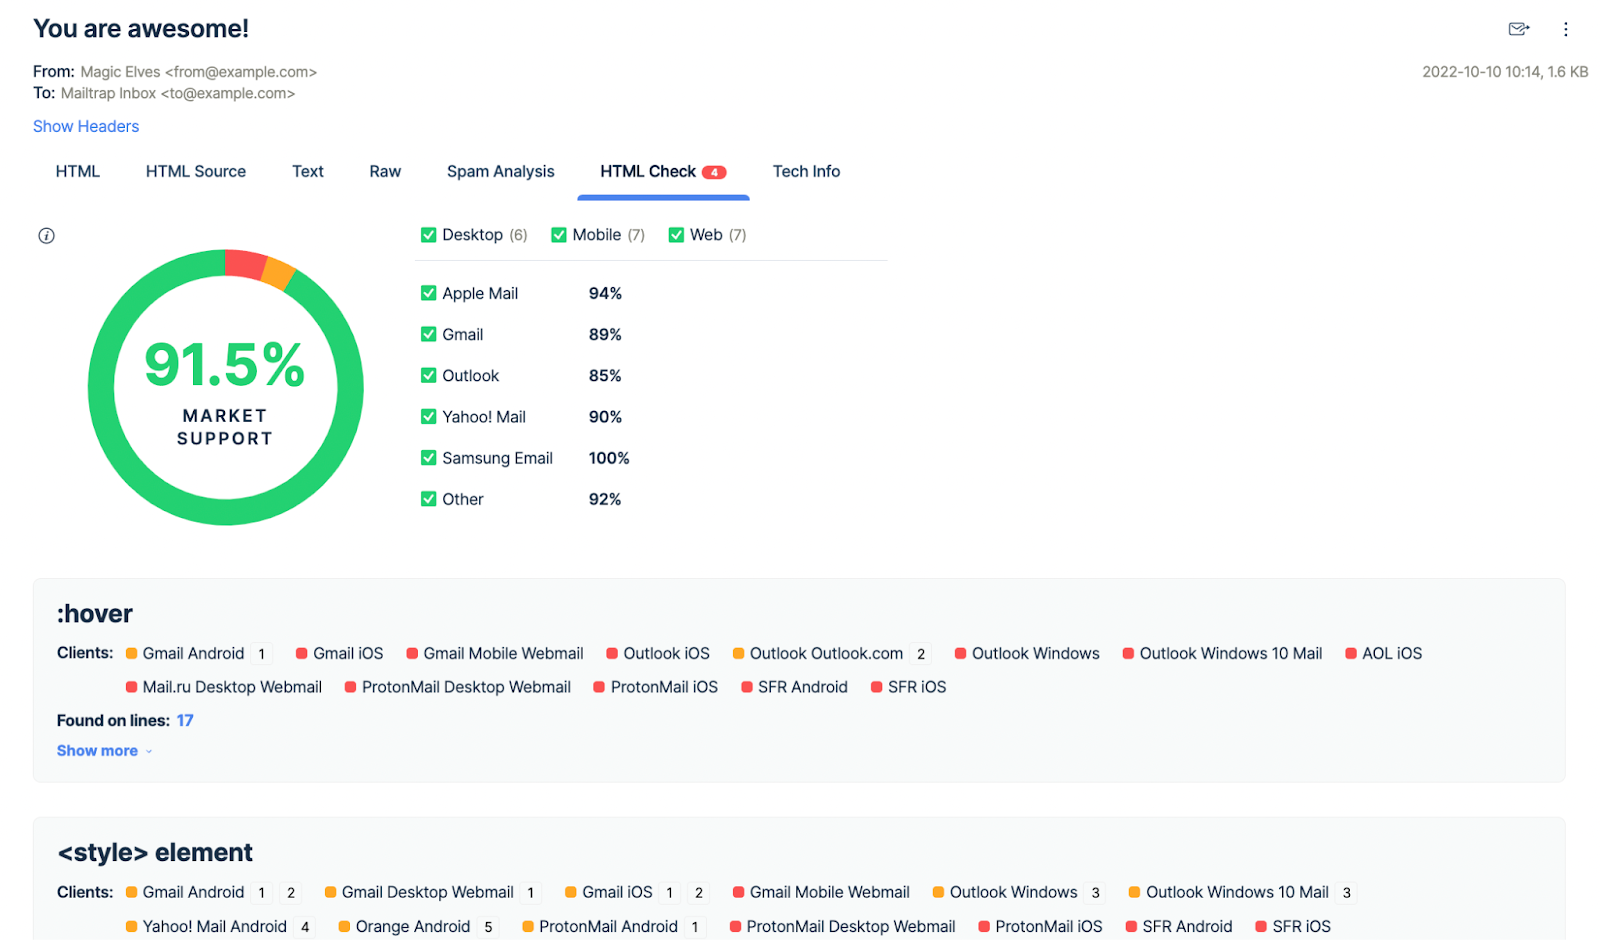
For any unsupported or partially supported elements/rules, it will provide a list of email clients facing the issue as well as a link to the line of code containing the element/rule.
Start testing your PowerShell emails for free.
Send an email from PowerShell using Mailtrap Email API
The Mailtrap email delivery platform also comes with an email-sending solution called Mailtrap Email Sending you can use to send your emails to real recipients from PowerShell or any other app.
Email API provides a sending throughput of up to ~10,000 emails/second but also more control over email deliverability thanks to its actionable analytics features.
Using these actionable analytics features consisting of deliverability alerts, 60-day email logs, dashboards with critical metrics, and webhooks, you can find and fix sending issues very early on.
What’s more, if you really want to dig deeper into your email performance, you can filter the performance stats. Mailtrap categorizes email performace data by email category, mailbox provider, and/or domain.
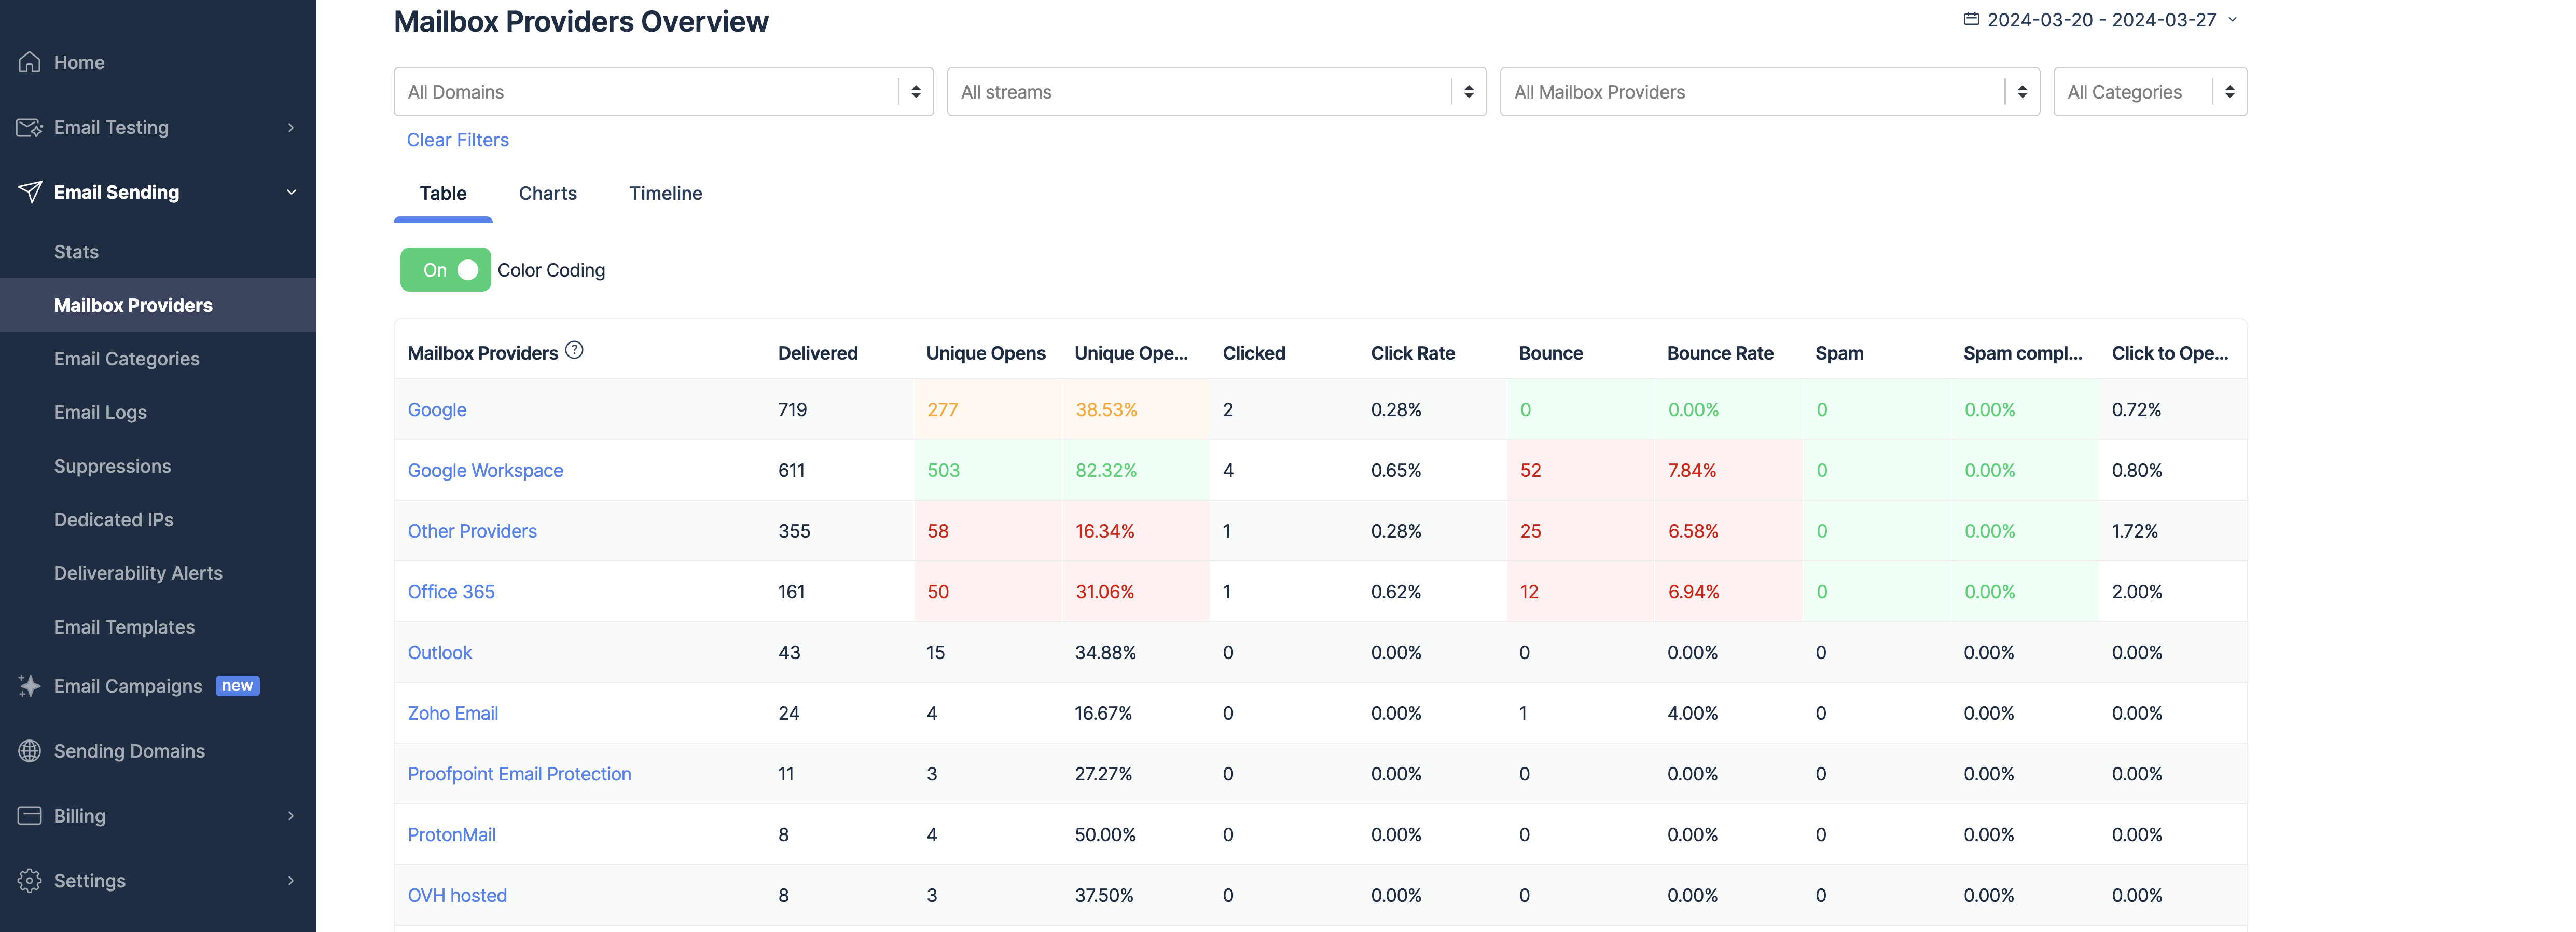
Other features of Mailtrap Email Sending include dedicated IPs, auto IP warmup, and suppression lists, just to name a few.
So, how does the sending process work?
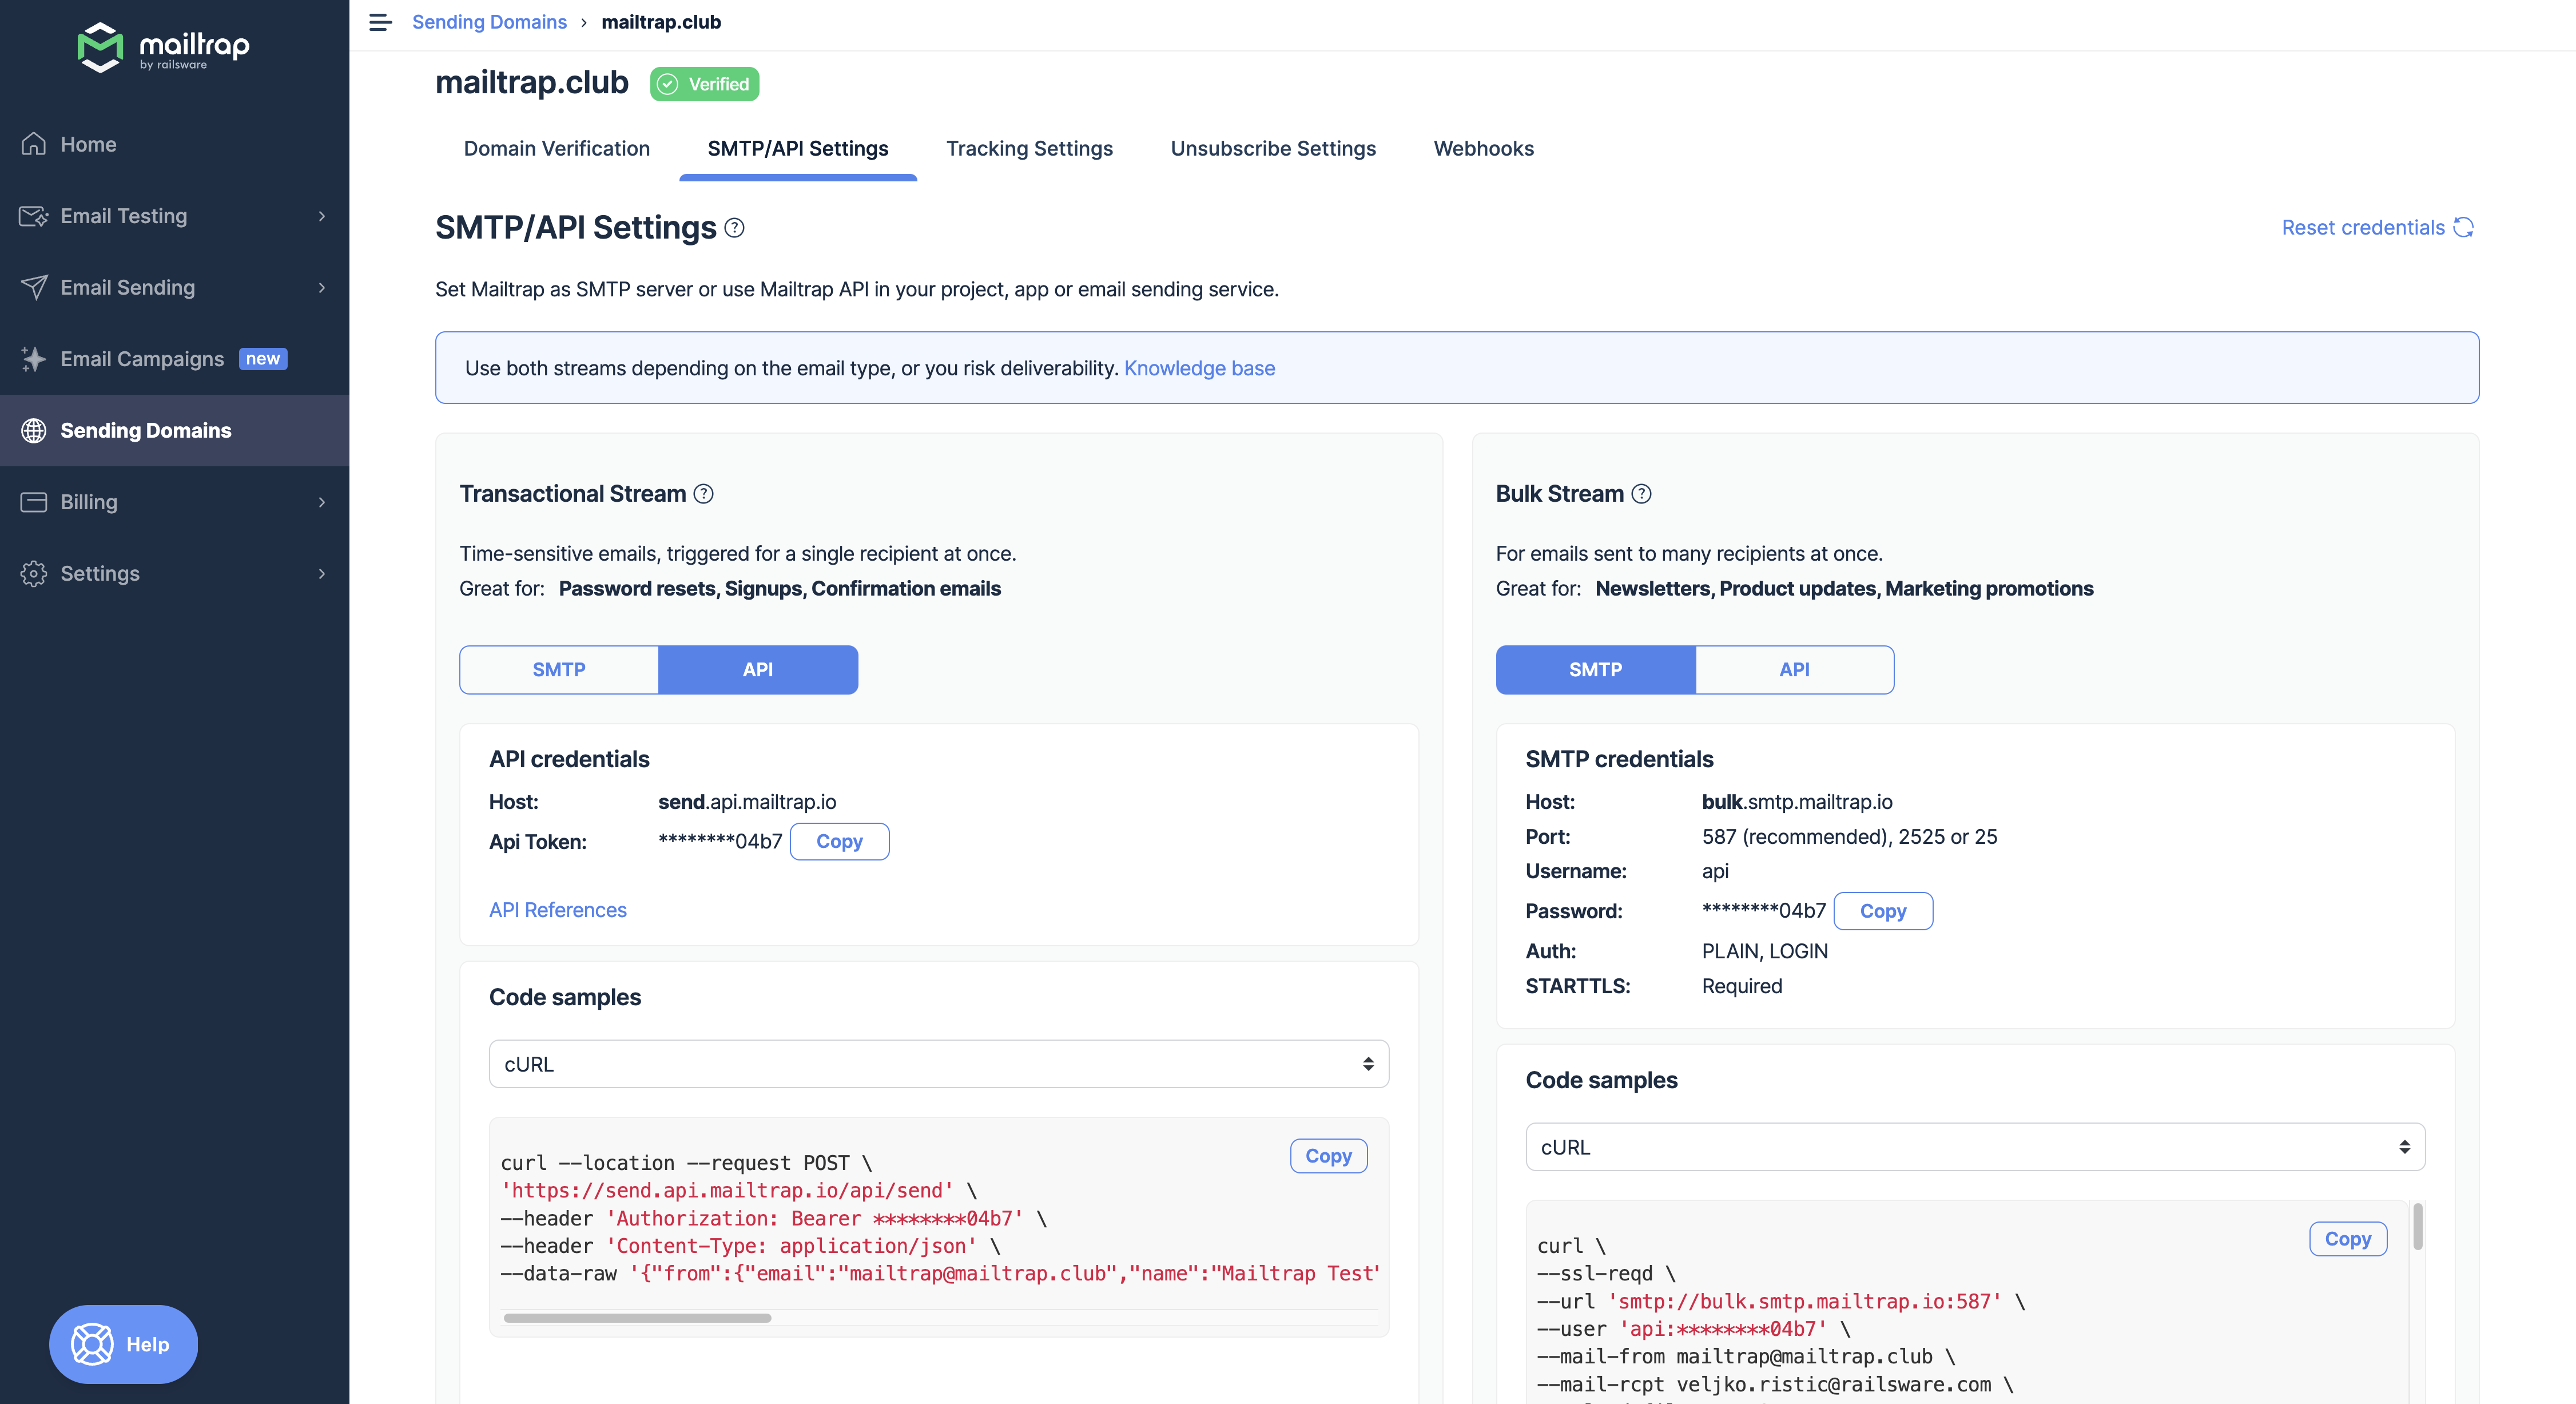
First, add and verify a domain under Sending Domains in your Mailtrap account, as described in this knowledge base article.
Then, to send with Mailtrap in Windows PowerShell, first choose one of the sending streams Transactional or Bulk. Afterward, decide whether you will be using SMTP or API and find the necessary credentials under your selection.
Example code for sending via API:
 # Define the API endpoint
$uri = "https://send.api.mailtrap.io/api/send"
# Define the JSON data
$jsonData = '{"from":{"email":"mailtrap@invminds.com","name":"Mailtrap Test"},"to":[{"email":"mailtrap.foo@gmail.com"}],"subject":"You are awesome!","text":"Congrats for sending test email with Mailtrap!","category":"Integration Test"}'
# Set headers
$headers = @{
    "Content-Type" = "application/json"
    "Authorization" = "Bearer 20a792***"
}
# Send the POST request
$response = Invoke-RestMethod -Uri $uri -Method Post -Body $jsonData -Headers $headers
# Display the response
$response
Example code for sending via SMTP:
Send-MailMessage -To "<recipient’s email address>" -From "<sender’s email address>" -Subject "Your message subject" -Body "Some important plain text!" -Credential (Get-Credential) -SmtpServer "<live.smtp.mailtrap.io>" -Port 587 -UseSsl Finally, run the script, enter the username and password requested of you, and your email should be sent off successfully.
For full instructions on how to send emails from PowerShell using the Mailtrap Email Sending email API, watch our dedicated tutorial:
Send an email from PowerShell using the Gmail SMTP server
In case you want to send emails via Gmail’s SMTP server, simply add smtp.gmail.com as the SMTP host.
We made an attempt and filled in the credentials in the pop-up window. But the server replied with an error – 551 Authentication Required. To fix this issue, you need to turn on the Less secure app access in the Security tab of your Google Account. We did it, and PowerShell successfully delivered our message to the destination. Discover more about SMTP response codes and commands in our dedicated blog post.
For full instructions on how to send emails from PowerShell using the Gmail SMTP, watch our dedicated tutorial:
SMTP settings for popular email providers
Not everyone is a Gmail user. So, the following data might be to the point if you use another SMTP host.
| Service | SMTP server | Port | Connection |
| Gmail | smtp.gmail.com | 587 25 465 | TLS TLS SSL |
| Office 365 | smtp.office365.com | 587 25 | TLS |
| Outlook.com | smtp-mail.outlook.com | 587 25 | TLS |
| Yahoo mail | smtp.mail.yahoo.com | 587 25 465 | TLS TLS SSL |
| Windows Live Hotmail | smtp.live.com | 587 25 | TLS |
| Zoho | smtp.zoho.com | 587 465 | TLS SSL |
Send emails from PowerShell using EASendMail
EASendMail is an SMTP component that supports such protocols as SMTP, ESMTP (extended SMTP), EWS (Exchange Web Service), and WebDAV (Web Distributed Authoring and Versioning) protocols. The component is mostly used to send emails in COM/.NET/.NET Core environment applications and apps built with:
- ASP
- VB
- VBA
- VC++
- C++/CLI
- C#
- VB.NET
- JavaScript
- ASP.NET
- Delphi
Also, you can use EASendMail to send emails from PowerShell. Here is a guide for this in the unlikely event that you will need it:
- Step 1: Install EASendMail using the installer
- Step 2: Create the following script
[reflection.assembly]::LoadFile("C:\Program Files (x86)\EASendMail\Lib\net20\EASendMail.dll")
#change the path to the EASendMail.dll file if you have another build of run-time assembly for .NET Framework, .NET Core, or .NET Compact Framework

function SendMailTo($sender, $name, $address, $subject, $body, $htmlFormat) {

    $mail = New-Object EASendMail.SmtpMail("TryIt") # you can replace “TryIt” with your license code for EASendMail SMTP component
    $mail.From.Address = $sender

    $recipient = New-Object EASendMail.MailAddress($name, $address)
    $mail.To.Add($recipient) > $null

    $mail.Subject = $subject
    if($htmlFormat) {
        $mail.HtmlBody = $body
    }
    else {
        $mail.TextBody = $body
    }

    $server = New-Object EASendMail.SmtpServer("smtp.mailtrap.io")
    $server.User = "*********"
    $server.Password = "*********"

    $server.Port = 587

    $server.ConnectType = [EASendMail.SmtpConnectType]::ConnectTryTLS
# specify your settings of the SMTP server, username, password, port, and connection type

    $smtp = New-Object EASendMail.SmtpClient
    $smtp.SendMail($server, $mail)
}

function SendMailFromPowerShell () {
    $sender = "mother-of-dragons@houseoftargaryen.net"
    $name = "Jon Snow"
    $address = "jon-snow@winterfell.com"
    $subject = "Happy Samhain"
    $body = "Jonny, congrats on Samhain!"
# specify your settings of sender’s email address and name, recipient’s email address, as well as subject and body text of the message
    try {
        "Start to send email to {0} ..." -f $address
        SendMailTo $sender $name $address $subject $body ""
        "Email to {0} has been submitted to server!" -f $address
    }
    catch [System.Exception] {
        "Failed to send email: {0}" -f  $_.Exception.Message
    }
}

SendMailFromPowerShell- Step 3: Run the script and go into your Email Sandbox virtual inbox to see the email.
In the code above, we used Email Sandbox SMTP credentials, and that is why the email ended up there. You can, of course, change this according to your needs.
Mass mailing from PowerShell using EASendMail Service Queue
EASendMail SMTP component is useful for sending mass emails. For this, you don’t have to code multiple threadings. All you need is EASendMail Service that can send messages with multiple threadings automatically in a background queue. Take a look at the following script for mass mailing a message with an HTML template:
[reflection.assembly]::LoadFile("C:\Program Files (x86)\EASendMail\Lib\net20\EASendMail.dll")
#change the path to the EASendMail.dll file if you have another build of run-time assembly for .NET Framework, .NET Core, or .NET Compact Framework

function SendMailToQueue($sender, $name, $address, $subject, $body, $htmlFormat) {

    $mail = New-Object EASendMail.SmtpMail("TryIt")
    $mail.From.Address = $sender

    $recipient = New-Object EASendMail.MailAddress($name, $address)
    $mail.To.Add($recipient) > $null

    $mail.Subject = $subject
    if($htmlFormat) {
        $mail.HtmlBody = $body
    }
    else {
        $mail.TextBody = $body
    }

    $server = New-Object EASendMail.SmtpServer("smtp.mailtrap.io")
    $server.User = "*********"
    $server.Password = "*********"

    $server.Port = 587

    $server.ConnectType = [EASendMail.SmtpConnectType]::ConnectTryTLS
# specify your settings of the SMTP server, username, password, port, and connection type

    $smtp = New-Object EASendMail.SmtpClient
    $smtp.SendMailToQueue($server, $mail)
}

function OpenConnection () {

    $connectionString = "Server=localhost\AdminSystem;Database=test;Integrated security=SSPI;MultipleActiveResultSets=True;"
    Write-Host(("Connecting database {0} ..." -f $connectionString))
    $sqlConnection = New-Object System.Data.SqlClient.SqlConnection
    $sqlConnection.ConnectionString = $connectionString
# You can change the connection string to yours by specifying user and password: $connectionString = "Server=localhost\AdminSystem;Database=dbname;User Id=user;Password=yourpassword;MultipleActiveResultSets=True;"
    $sqlConnection.Open()
    Write-Host 'Connected'
    return $sqlConnection
}

function BuildHtmlBody ($sqlConnection) {
    Write-Host "Building HTML body based on database ..."

    $sqlQuery = "SELECT ID, Name, Email, Age, Department FROM users"
    $sqlCommand = New-Object System.Data.SqlClient.SqlCommand($sqlQuery, $sqlConnection);
    $reader = $sqlCommand.ExecuteReader()

    $html = "<!DOCTYPE html><html><body>"
    $html += "<div style=""font-family:'Segoe UI', Calibri, Arial, Helvetica; font-size: 14px; max-width: 768px;"">"
    $html += "Dear {name}, <br /><br />This is a congrats email on Samhain. <br />"
    $html += "Here is full data in table:<br /><br />"
    $html +="<table style='border-spacing: 0px; border-style: solid; border-color: #ccc; border-width: 0 0 1px 1px;'>"

    while ($reader.Read()) {
        $name = $reader.GetString(1)
        $address = $reader.GetString(2)
        $age = $reader.GetInt32(3)
        $department = $reader.GetString(4)

        $html += "<tr>"
        $html += "<td style='padding: 10px; border-style: solid; border-color: #ccc; border-width: 1px 1px 0 0;'>{0}</td>"  -f $name
        $html += "<td style='padding: 10px; border-style: solid; border-color: #ccc; border-width: 1px 1px 0 0;'>{0}</td>" -f $address
        $html += "</tr>"

    }

    $reader.Close > $null
    $reader.Dispose > $null

    $sqlCommand.Close > $null
    $sqlCommand.Dispose > $null

    return $html
}

function SendMailFromDBToQueue () {
    $sender = "mother-of-dragons@houseoftargaryen.net"
    $subject = "Happy Samhain"

    $sqlConnection = OpenConnection
    $bodyTemplate = BuildHtmlBody($sqlConnection)

$sqlQuery = "SELECT ID, Name, Email, Age, Department FROM users"
        $sqlCommand = New-Object System.Data.SqlClient.SqlCommand($sqlQuery, $sqlConnection);
        $reader = $sqlCommand.ExecuteReader()
        while ($reader.Read()) {
            $name = $reader.GetString(1).Trim()
            $address = $reader.GetString(2).Trim()
            $body = $bodyTemplate.Replace("{name}", $name)

            Write-Host(("Start to send email to {0} ..." -f $address))
            SendMailToQueue $sender $name $address $subject $body "html"
            Write-Host(("Email to {0} has been submitted to easendmail service!" -f $address))
        }

        $reader.Close > $null
        $reader.Dispose > $null

        $sqlCommand.Close > $null
        $sqlCommand.Dispose > $null

        $sqlConnection.Close > $null
        $sqlConnection.Dispose > $null
    }
    catch [System.Exception] {
        "Failed to send email: {0}" -f  $_.Exception.Message
    }
}

SendMailFromDBToQueue
For full instructions on how to send emails from PowerShell using EASendMail, watch our dedicated tutorial:
Send emails from PowerShell using System.Net.Mail API
Send-MailMessage cmdlet is the most common option for sending emails from PowerShell. But this was not always the case. It became available starting from PowerShell 3.0 and was based on System.Net.Mail API. It is a namespace that contains classes to send electronic messages to the SMTP server. The delivery is carried out using the SmtpClient.Send or .Send method. Let’s take a look at the following example:
$EmailFrom = "mother-of-dragons@houseoftargaryen.net"
$EmailTo = "jon-snow@winterfell.com"
$Subject = "Happy Samhain"
$Body = "Jonny, congrats on Samhain!"
$SMTPServer = "smtp.mailtrap.io"
$SMTPClient = New-Object Net.Mail.SmtpClient($SmtpServer, 587)
$SMTPClient.EnableSsl = $true
$SMTPClient.Credentials = New-Object System.Net.NetworkCredential("<username>", "<password>");
$SMTPClient.Send($EmailFrom, $EmailTo, $Subject, $Body)
Alternatively, you can use the .Send method and modified syntax like this one:
$smtpFrom = "mother-of-dragons@houseoftargaryen.net"
$smtpTo = "jon-snow@winterfell.com"
$messageSubject = "Happy Samhain"
$messageBody = "Jonny, congrats on Samhain!"
$smtpServer = "smtp.mailtrap.io"
$smtp = New-Object Net.Mail.SmtpClient($SmtpServer, 587)
$smtp.EnableSsl = $true
$smtp.Credentials = New-Object System.Net.NetworkCredential("94b784b5970edf", "01a5d515011f6e");
$smtp.Send($smtpFrom , $smtpTo, $messageSubject, $messageBody)
To wrap up
The System.Net.Mail namespace is also used to create and send messages in ASP.NET C# that we’ve also blogged about. And that’s it for today. We hope that this blog post broadened your skills in using PowerShell. Follow our blog and discover useful expertise for your projects.

Comments
3 replies