


In this Flask send email tutorial, I’ll show you how to use the Flask-Mail extension and send emails via SMTP or API.
I’ll also demonstrate how you can test your email messages before sending them to make sure they arrive in your recipient’s inboxes pitch-perfect.
So, let’s cut to the chase.

Setting up Flask-Mail configuration
First things first, let’s set up Flask-Mail, a Flask extension for sending emails.
Have everything configured already? To skip ahead to the SMTP setup [click here], or for the API setup, [click here].
Install Flask and Flask-Mail
Let’s start by installing the latest version of Flask from the Python Package Index (PyPI) by running the following command:
pip install FlaskThen, let’s install Flask-Mail with:
pip install Flask-MailOr, you can also run this command to download the latest version directly from the source code:
git clone https://github.com/mattupstate/flask-mail.git
cd flask-mail
python setup.py installTip:
- I assume you are using the latest Python version 3, but if you have multiple versions of Python installed, you might need to use python3 instead of python or py for the commands, depending on your system configuration.
Add and configure virtualenv or venv (optional)
This is an optional step, but, if you want to isolate this environment, you can either use:
venv– Python’s built-in venv module is available by default with Python 3.3+ and is used as a standard module due to its simplicity and Python inclusion.virtualenv– A third-party tool for creating virtual environments in Python, mostly used for some of its features not available invenv, such as being able to create virtual environments for Python versions other than the one it’s installed with.
To utilize Python’s built-in venv module, launch the terminal and navigate to the folder you’ll use for this project and, based on the OS you’re using, type in one of these two commands:
python -m venv new_environment (macOS or Linux)
py -m venv new_environment (Windows)
You should then replace new_environment with whatever you want to name the environment and activate it, like so:
source new_environment/bin/activate (macOS or Linux)
.\new_environment\Scripts\activate (Windows)
Ensure that you have the command prompt or terminal running as an administrator on the systems (particularly Windows) to avoid possible permission issues.
However, if you want to use virtualenv, you should install `pip` and ensure it is up to date beforehand. You can install it by running the following command:
pip install virtualenvNotes:
- If you want to use
virtualenv, I recommend you install Flask-mail in the same virtualenv as your Flask application.- By doing this, you prevent conflicts between different projects or system-wide Python installations as you ensure all dependencies are managed within the isolated environment.
- To prevent the virtual environment files from being unnecessarily uploaded to version control systems and keep your repositories clean and lightweight, you should exclude your environment directory (e.g.,
new_environment) from version control by adding it to the .gitignore file. - To exit the virtual environment, run the
deactivatecommand.
Send emails in Flask using SMTP
Now that we have our setup ready, let’s start sending emails via SMTP!
1. Import the necessary classes
In Flask-Mail, email sending is handled by an instance of Mail class and Message class, which you need to import into your .py file with the following code:
from flask import Flask
from flask_mail import Mail, Message

app = Flask(__name__)

mail = Mail(app)
2. Insert SMTP credentials
Next, you need to insert SMTP credentials by your mail provider into your Flask application. In this article, I’ll use the Mailtrap Email Delivery platform, as it provides me with a reliable SMTP service that offers robust sending capabilities.
To do this, create a Mailtrap account, log in, and navigate to Sending Domains where you can add and verify your domain in a matter of seconds.

Once your domain is verified, Mailtrap will take you to the page with SMTP credentials.

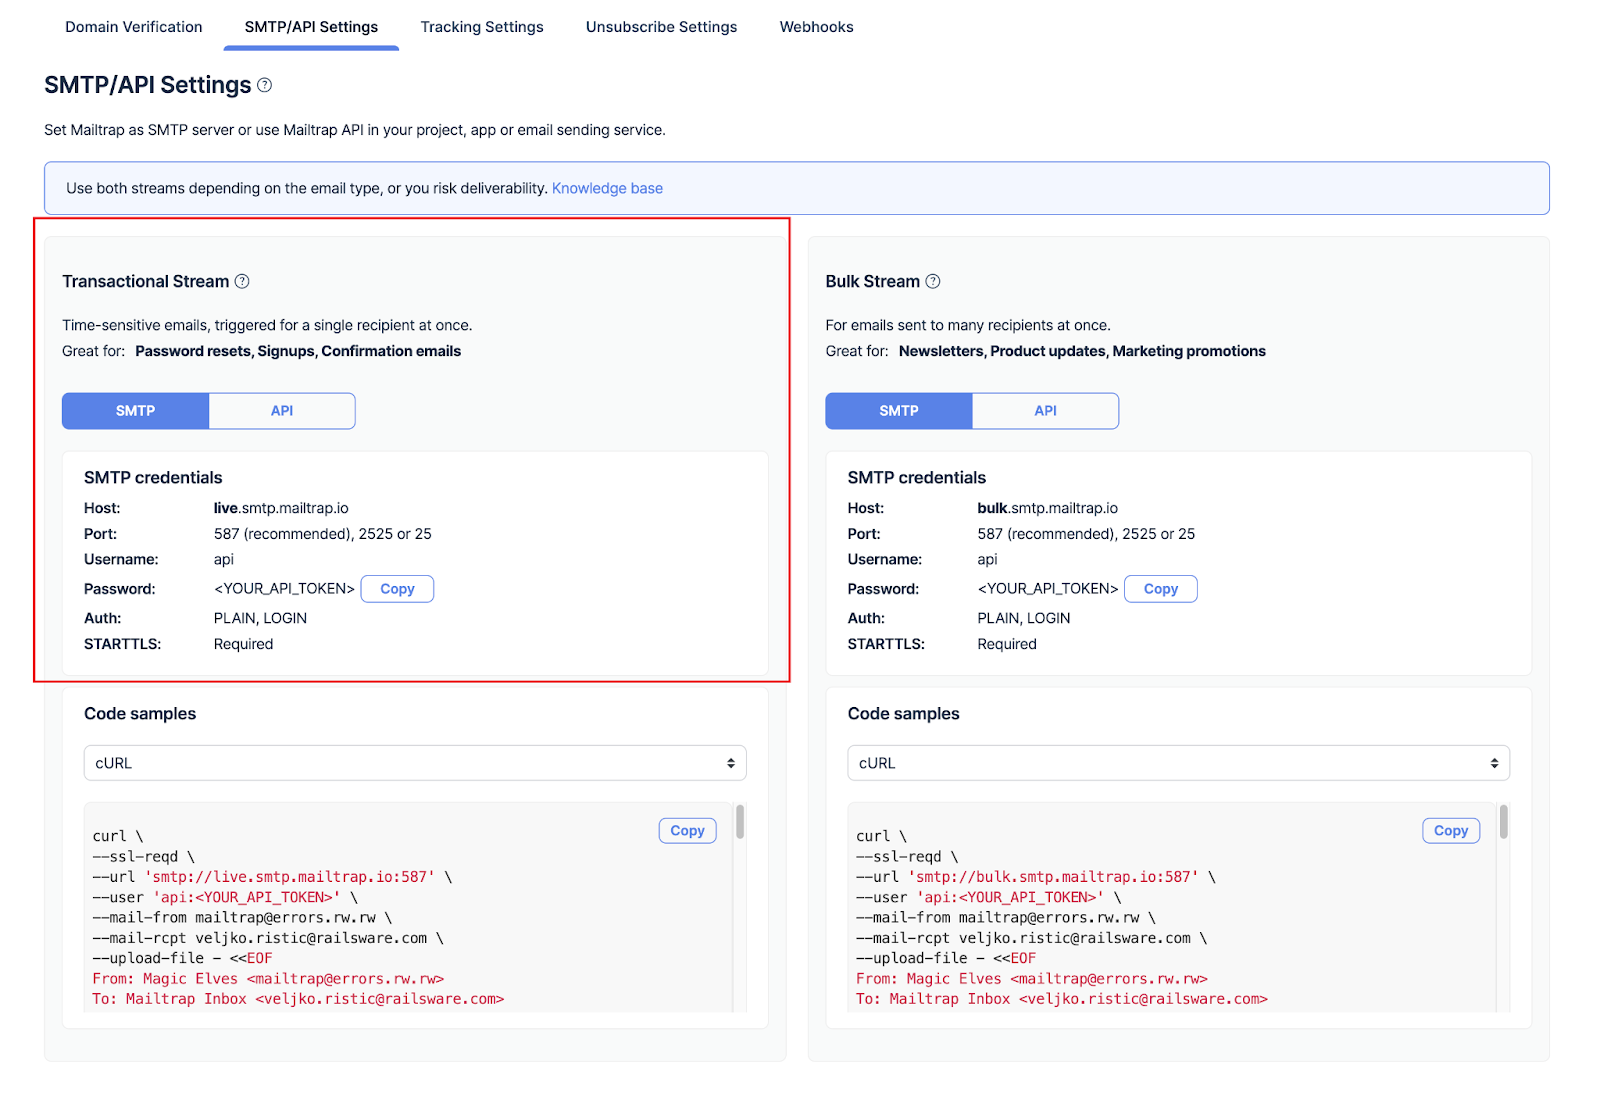
I’ll use the Transactional Stream now and show you how to put the Bulk Stream to use later on in the article.
Here’s what your code should look like with SMTP credentials inserted:
app.config['MAIL_SERVER']= 'live.smtp.mailtrap.io'
app.config['MAIL_PORT'] = 587
app.config['MAIL_USERNAME'] = 'your_email@address.com'
app.config['MAIL_PASSWORD'] = 'your_password'
app.config['MAIL_USE_TLS'] = True
app.config['MAIL_USE_SSL'] = False
3. Set up a Message object
Lastly, we need to set up a Message object, mapped by the URL rule (‘/’), and insert the base details of our message:
@app.route("/")
def index():
    msg = Message(subject='Hello from the other side!', sender='peter@mailtrap.io', recipients=['paul@mailtrap.io'])
    msg.body = "Hey Paul, sending you this email from my Flask app, lmk if it works"
    mail.send(msg)
    return "Message sent!"
And here’s what the code should look like in the end:
from flask import Flask
from flask_mail import Mail, Message

app = Flask(__name__)

app.config['MAIL_SERVER']= 'live.smtp.mailtrap.io'
app.config['MAIL_PORT'] = 587
app.config['MAIL_USERNAME'] = 'your_email@gmail.com'
app.config['MAIL_PASSWORD'] = 'your_password'
app.config['MAIL_USE_TLS'] = True
app.config['MAIL_USE_SSL'] = False
mail = Mail(app)


@app.route("/")
def index():
    msg = Message(subject='Hello from the other side!', sender='peter@mailtrap.io', recipients=['paul@mailtrap.io'])
    msg.body = "Hey Paul, sending you this email from my Flask app, lmk if it works."
    mail.send(msg)
    return "Message sent!"


if __name__ == '__main__':
app.run(debug=True)Tips:
- You can run the script in Python Shell, open http://localhost:5000/, and check whether the email arrived in your inbox.
- If you plan on sending emails from the same address, you can specify the display name for the sender, like so:
msg = Message('Hello from the other side!', sender=('Peter from Mailtrap', 'peter@mailtrap.io'), recipients=['paul@mailtrap.io'])- To avoid security risks, remember to turn off debug mode in production by setting
debug=False. - When moving to a production environment, I recommend not to hardcode the credentials in the code. Instead, I suggest you store them in environment variables and quickly update them without rewriting the code, like so:
app.config['MAIL_USERNAME'] = os.environ.get('MAIL_USERNAME')
app.config['MAIL_PASSWORD'] = os.environ.get('MAIL_PASSWORD')
Send HTML email
Sending HTML email in Flask is easy because you can use the html attribute of the Message object:
msg.body = "Hey Paul, sending you this email from my Flask app, lmk if it works"
msg.html = "<b>Hey Paul</b>, sending you this email from my <a href='https://google.com'>Flask app</a>, lmk if it works"
Send email to multiple recipients
Sending emails to multiple recipients in Flask is a breeze because you can add someone in cc and/or bcc, set a reply-to address, add extra headers, and so on.
Check out some of the parameters you can use:
flask_mail.Message(subject='', recipients=None, body=None, sender=None, cc=None, bcc=None, reply_to=None, date=None, charset=None, extra_headers=None, mail_options=None, rcpt_options=None)For explanatory purposes, here’s an example of a code snippet for sending email to multiple recipients in Flask:
from flask import Flask
from flask_mail import Mail, Message

app = Flask(__name__)

app.config['MAIL_SERVER']= 'live.smtp.mailtrap.io'
app.config['MAIL_PORT'] = 587
app.config['MAIL_USERNAME'] = 'your_email@gmail.com'
app.config['MAIL_PASSWORD'] = 'your_password'
app.config['MAIL_USE_TLS'] = True
app.config['MAIL_USE_SSL'] = False
mail = Mail(app)

@app.route("/send-email")
def send_email_to_multiple_recipients():
    # List of recipients
    recipients = ["user1@example.com", "user2@example.com", "user3@example.com"]

    # Creating the message
    msg = Message("Email to Multiple Recipients",
                  sender="your_email@example.com",
                  recipients=recipients)
    msg.body = "Hey Paul, sending you this email from my Flask app, lmk if it works."

    # Sending the email
    mail.send(msg)

    return "Email sent to multiple recipients!"

if __name__ == "__main__":
    app.run(debug=True)
Send email with attachments
To add an attachment to your message, simply load it with open_resource() method and then use a Python with statement to add the file to your email, like so:
with app.open_resource("invoice.pdf") as fp:
    msg.attach("invoice.pdf", "application/pdf", fp.read())
Don’t forget to pick a proper MIME type for each file and upload each file to the same directory as your script.
However, if the file you want to attach isn’t in a resource directory managed by Flask (e.g., static folder), you can use Python’s built-in open() function to read the file.
Here’s an example:
with open("invoice.pdf", "rb") as fp:
    msg.attach("invoice.pdf", "application/pdf", fp.read())
Send email with an embedded image
To embed images in your emails, you can use the content_id parameter of the attach method and reference the content ID in the HTML body of your message with the cid:content_id syntax.
For instance:
@app.route('/send-email-with-image')
def send_email_with_image():
    msg = Message("Email with Embedded Image",
                  sender="your_email@example.com",
                  recipients=["recipient@example.com"])

    # The HTML body with the embedded image
    msg.html = """
    <html>
        <body>
            <p>Here is an embedded image:</p>
            <img src="cid:image1">
        </body>
    </html>
    """

    # Attach the image
    with app.open_resource("image.jpg") as fp:
        msg.attach("image.jpg", "image/jpeg", fp.read(), headers=[('Content-ID', '<image1>')])

    mail.send(msg)

    return "Email sent with an embedded image!"
Asynchronous email sending
For asynchronous email sending in Flask, you can either use:
- Threading
Python’s Thread is a powerful method for multi-tasking that’s widely used for tasks such as downloading files, handling user input, and other I/O operations. However, it’s also very viable for asynchronous email sending.
Here’s a code snippet example:
```python
import threading

def send_async_email(app, msg):
with app.app_context():
mail.send(msg)

def send_email(subject, sender, recipients, body):
msg = Message(subject, sender=sender, recipients=recipients)
msg.body = body
thr = threading.Thread(target=send_async_email, args=[app, msg])
thr.start()

```- Celery
Simply put, Celery is a tool for distributing work across threads and machines. 🥬
When an email is sent, a Flask app calls a Celery task that takes the ESP connection process on its shoulders so your app can quickly respond and display a “thank you” message to a user almost instantly.
To install Celery, run the following command:
pip install celeryNote that Celery is no longer supported on Windows, so we’ll have to configure the following variable, as suggested in the repository thread:
import os
os.environ.setdefault('FORKED_BY_MULTIPROCESSING', '1')
As Celery requires something to store your queue of tasks, we can use Redis. If you’re not sure whether you have it installed, you can use it through Docker with the following command:
docker run -d -p 6379:6379 redisNow we need to install Python’s dependency to use Redis:
pip install redisThen, we need to configure a Celery variable, which will take care of connecting to Redis.
Keep in mind that it needs to be available on the file where you will define your tasks to run in the background later. For example, you can keep it on the same file we’re already using for Flask routes.
celery = Celery(app.name, broker='redis://localhost:6379/0')We must also add one more variable for cryptographic components (e.g., signing cookies) to complete our configuration:
app.config['SECRET_KEY'] = 'not_a_secret'Additionally, you can pick a custom recipient from a submitted form:
@app.route('/', methods=['GET', 'POST'])
def index():
    if request.method == 'GET':
        return render_template('index.html', email=session.get('email', ''))
    email = request.form['email']

    email_data = {
        'subject': 'Hello from the other side!',
        'to': email,
        'body': 'Hey Paul, sending you this email from my Flask app, lmk if it works'
    }

    send_async_email.delay(email_data)
    flash(f'Sending email to {email}')

    return redirect(url_for('index'))
We send this email with the send_async_email method, invoked by delay(). As the last step, specify the background task Celery is expected to perform:
@celery.task
def send_async_email(email_data):
    msg = Message(email_data['subject'],
                  sender=app.config['MAIL_DEFAULT_SENDER'],
                  recipients=[email_data['to']])
    msg.body = email_data['body']
    with app.app_context():
        mail.send(msg)
If you make an immediate request, a task will be put on Celery’s queue to send an email. But, as there isn’t anything processing this queue yet, you need to run a separate Celery process, which will pick tasks from the queue and process them.
To do this, run the following command on a separate terminal:
celery -A main.celery worker --loglevel=INFONote that main is the name of your Python file, and celery is the name of your Celery variable.
Bulk email sending
To send bulk email in Flask, we’ll use Python’s with statement, which keeps the connections to our email alive until all messages have been sent, at which point it will close automatically.
For this, you can use the following code:
users = [{"email": "paul@mailtrap.io"}, {"email": "peter@mailtrap.io"}]
with mail.connect() as conn:
for user in users:
sender = "test@mailtrap.io"
message = "..."
subject = "Hello from the other side!"
msg = Message(recipients=[user["email"]],
body=message,
subject=subject,
sender=sender)
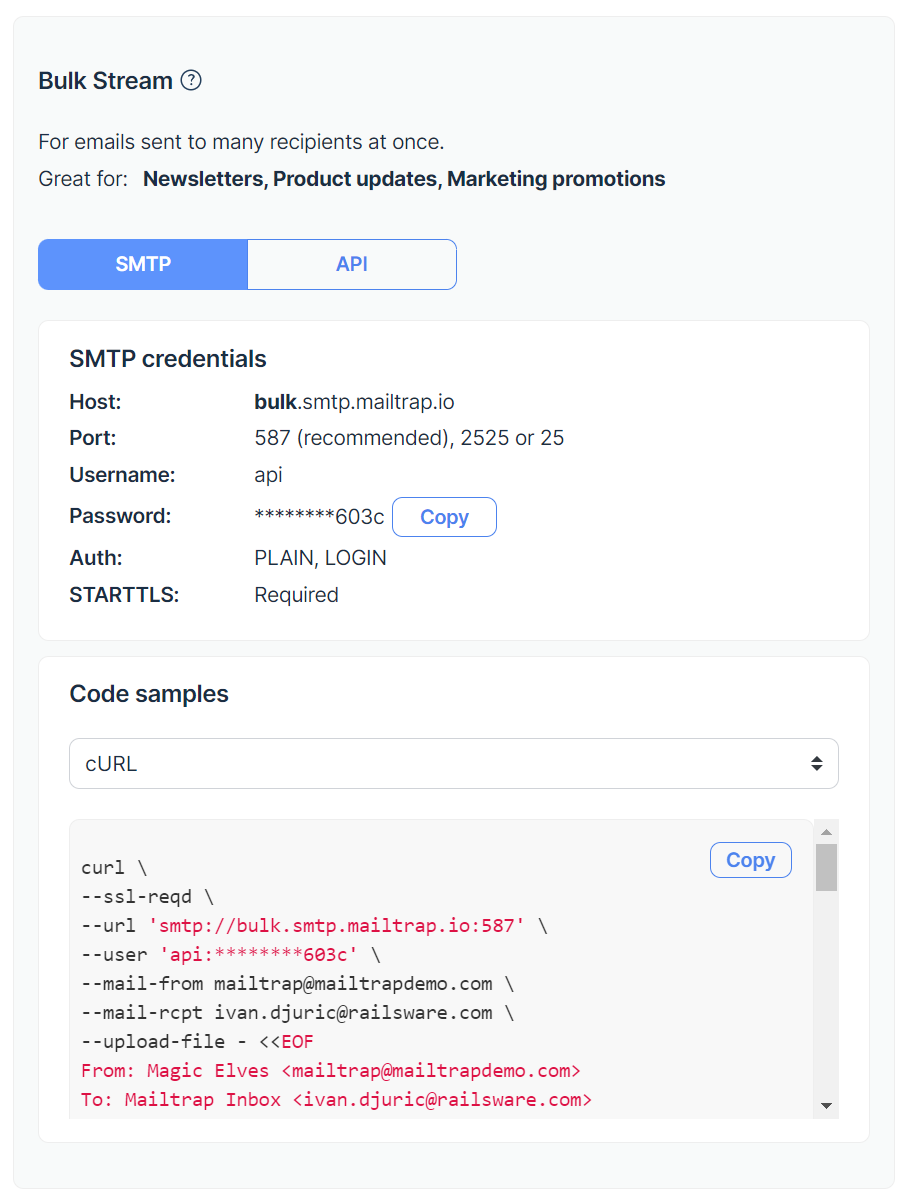
conn.send(msg)You should also utilize Mailtrap’s Bulk Stream I mentioned previously in the article, which is optimized for higher sending volumes.
Simply log into your Mailtrap account, navigate to the SMTP/API Settings tab, and copy the Bulk Stream credentials located on your right.

Here’s what the code should look like when put together:
from flask import Flask
from flask_mail import Mail, Message

app = Flask(__name__)

# Example configuration - replace with your Mailtrap Bulk Stream credentials
app.config['MAIL_SERVER'] = 'bulk.smtp.mailtrap.io'
app.config['MAIL_PORT'] = 2525
app.config['MAIL_USE_TLS'] = True
app.config['MAIL_USERNAME'] = 'your_mailtrap_username'
app.config['MAIL_PASSWORD'] = 'your_mailtrap_password'
app.config['MAIL_DEFAULT_SENDER'] = 'test@mailtrap.io'

mail = Mail(app)

# Dummy list of users
users = [{"email": "paul@mailtrap.io"}, {"email": "peter@mailtrap.io"}]

# Function to send bulk emails
def send_bulk_emails():
    with app.app_context():  # Ensure you're within an application context
        with mail.connect() as conn:
            for user in users:
                message = "..."
                subject = "Hello from the other side!"
                msg = Message(recipients=[user["email"]],
                              body=message,
                              subject=subject)
                conn.send(msg)

if __name__ == '__main__':
    send_bulk_emails()
And voila, you have a setup for bulk email sending!
Tip: If you want to specify the maximum number of emails to be sent, use MAIL_MAX_EMAILS from the configuration as no limit is set by default.
Send emails in Flask using API
If you’d rather automate your email-sending process, you can use the official Python client provided by Mailtrap Email Sending.
To integrate it, log into your Mailtrap account and navigate to Settings → API tokens. There, you’ll find your credentials, which you should copy across your verified sending domain.
Then, go back to your Flask app or project and install package version 2.0.0 or higher:
pip install mailtrapOnce you have the package installed, you can send a simple email with the following code snippet:
import mailtrap as mt

# create mail object
mail = mt.Mail(
    sender=mt.Address(email="mailtrap@example.com", name="Mailtrap Test"),
    to=[mt.Address(email="your@email.com")],
    subject="You are awesome!",
    text="Congrats for sending test email with Mailtrap!",
)

# create client and send
client = mt.MailtrapClient(token="your-api-key")
client.send(mail)
And don’t forget to replace your-api-key with the actual API key provided by Mailtrap and modify variables such as sender (email and name), to (recipient), subject, and text.

Send HTML email
To send HTML email, we’ll use the html parameter within the mt.Mail object:
html="""
<!doctype html>
<html>
  <head>
    <meta http-equiv="Content-Type" content="text/html; charset=UTF-8">
  </head>
  <body style="font-family: sans-serif;">
    <div style="display: block; margin: auto; max-width: 600px;" class="main">
      <h1 style="font-size: 18px; font-weight: bold; margin-top: 20px">
        Congrats for sending test email with Mailtrap!
      </h1>
      <p>Inspect it using the tabs you see above and learn how this email can be improved.</p>
      <img alt="Inspect with Tabs" src="cid:welcome.png" style="width: 100%;">
      <p>Now send your email using our fake SMTP server and integration of your choice!</p>
      <p>Good luck! Hope it works.</p>
    </div>
    <!-- Example of invalid for email html/css, will be detected by Mailtrap: -->
    <style>
      .main { background-color: white; }
      a:hover { border-left-width: 1em; min-height: 2em; }
    </style>
  </body>
</html>
""",
For compatibility and accessibility reasons, I suggest you provide your recipients with both HTML and plain text versions of your email when possible. This way, you make sure that recipients who use clients that do not render HTML content or who prefer plain text emails can still read your mail.
To provide the plain text version of the email along with HTML, simply add the text parameter:
text="Congrats for sending test email with Mailtrap!",Send email to multiple recipients
For sending email to multiple recipients, you can use the following parameters:
to=[mt.Address(email="your@email.com", name="Your name")],
cc=[mt.Address(email="cc@email.com", name="Copy to")],
bcc=[mt.Address(email="bcc@email.com", name="Hidden Recipient")],
Parameters explanation:
To– Used for the main recipients of the mail you’re directory addressing in your message.CC(Carbon Copy) – Used for listing recipients who will receive a copy of the email and whose addresses will be visible to all recipients of the message.BCC(Blind Carbon Copy) – Used for listing recipients who also receive a copy of the email and whose addresses will not* be visible to other recipients.
Send email with attachments
To send email with attachments, we’ll use the attachments parameter within the mt.Mail object, like so:
attachments=[
    mt.Attachment(
        content=base64.b64encode(welcome_image),
        filename="welcome.png",
        disposition=mt.Disposition.INLINE,
        mimetype="image/png",
        content_id="welcome.png",
    )
],
Code breakdown:
content– The base64-encoded content of the file you’re attaching. We’ll also use this for embedding images later on.filename– The name of the file as it will appear in the email.disposition– If set tomt.Disposition.INLINE, it indicates that the attachment will not just be downloaded, but also displayed within the email’s body.mimetype– The MIME type of the attachment, which helps clients understand how to handle the file. Some of the common MIME types for images areimage.jpegorimage.png.content_id– A unique identifier for the attachment, used to reference it in the HTML body of the email.
Send email with an embedded image
Sending emails with embedded images is similar to adding attachments because we’ll use the same attachments parameter:
attachments=[
    mt.Attachment(
        content=base64.b64encode(welcome_image),
        filename="welcome.png",
        disposition=mt.Disposition.INLINE,
        mimetype="image/png",
        content_id="welcome.png",
    )
],
But, we’ll have to reference the embedded image within the HTML body of the email with an <img> tag, where the src attribute is set to cid:welcome.png, which tells the email client to display the image inline.
Here’s the line of code you can use:
<img alt="Inspect with Tabs" src="cid:welcome.png" style="width: 100%;">Bulk email sending
For bulk email sending in Flask, we’ll use Mailtrap’s Bulk Stream again, which you can find under Sending Domains → SMTP/API Settings.

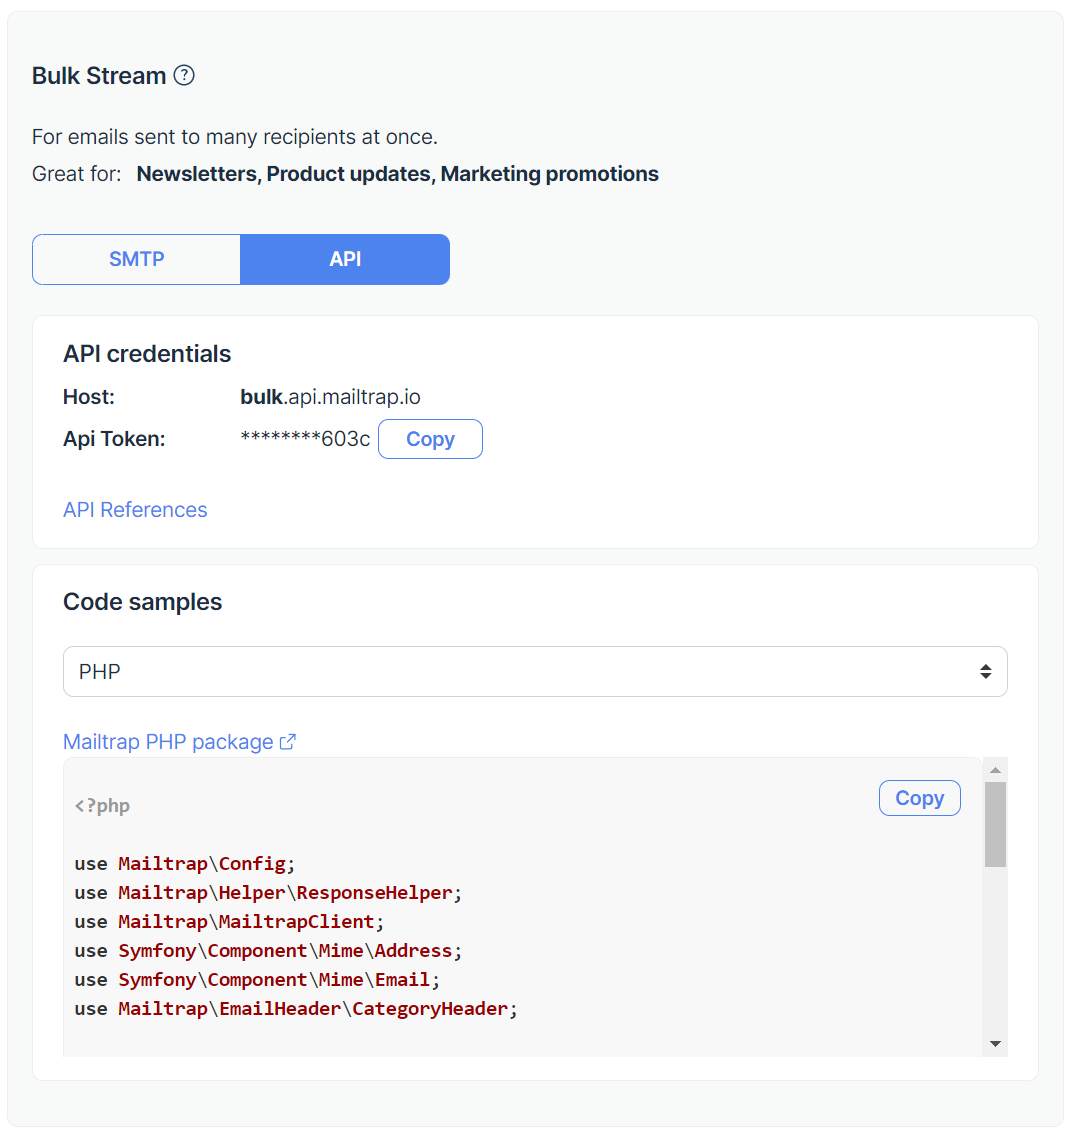
Be sure to select API and use the Python code sample located under API credentials. Pasted into your Flask configuration, it should look something like this:
import requests

url = "https://bulk.api.mailtrap.io/api/send"

payload = "{\"from\":{\"email\":\"mailtrap@mailtrapdemo.com\",\"name\":\"Mailtrap Test\"},\"to\":[{\"email\":\"demo@mailtrap.io\"}],\"subject\":\"You are awesome!\",\"text\":\"Congrats for sending test email with Mailtrap!\",\"category\":\"Integration Test\"}"
headers = {
#
"Authorization": "Bearer ba12312312312312312312312312312c",
  "Content-Type": "application/json"
}


try:
    response = requests.request("POST", url, headers=headers, data=payload)
except requests.exceptions.HTTPError as errh:
    print(f”HTTP Error: {errh})

print(response.text)
Additionally, you can define the payload as a Python dictionary and let the requests library convert it to JSON, and add some basic error handling, like so:
import requests

url = "https://bulk.api.mailtrap.io/api/send"
payload = {
    "from": {"email": "mailtrap@mailtrapdemo.com", "name": "Mailtrap Test"},
    "to": [{"email": "demo@mailtrap.io"}],
    "subject": "You are awesome!",
    "text": "Congrats for sending test email with Mailtrap!",
    "category": "Integration Test"
}
headers = {
    "Authorization": "Bearer your_real_token_here",  # Replace with your actual Mailtrap API token
    "Content-Type": "application/json"
}

response = requests.post(url, headers=headers, json=payload)

if response.status_code == 200:
    print("Email sent successfully!")
else:
    print(f"Failed to send email. Status code: {response.status_code}, Response: {response.text}")
Asynchronous email sending
Similarly to sending asynchronous emails via SMTP, we’ll use Celery again to do it through an API.
Simply modify the send_async_email function to make an HTTP request to the API endpoint instead of using Flask-Mail. Here’s an example:
from flask import Flask
import requests
from celery import Celery

app = Flask(__name__)
# Configure your Flask app here, including MAIL_DEFAULT_SENDER and MAIL_API_KEY

celery = Celery(app.name, broker='your_broker_url')
celery.conf.update(app.config)

@celery.task
def send_async_email(email_data):
    with app.app_context():
        url = "https://bulk.api.mailtrap.io/api/send"
        payload = {
            "from": {"email": app.config['MAIL_DEFAULT_SENDER'], "name": "Your App Name"},
            "to": [{"email": email_data['to']}],
            "subject": email_data['subject'],
            "text": email_data['body'],
            "category": "Your Category"
        }
        headers = {
            "Authorization": f"Bearer {app.config['MAIL_API_KEY']}",
            "Content-Type": "application/json"
        }
        response = requests.post(url, headers=headers, json=payload)

        if response.status_code != 200:
            # Log error or handle it accordingly
            print(f"Failed to send email: {response.text}")

# Remember to update your Celery worker command according to your project structure
However, regardless of whether you’re sending emails via SMTP or API, you need to run a Celery worker to process the tasks in the queue with the following command:
celery -A main.celery worker --loglevel=INFOImportant:
- Replace
current_app.config['MAIL_DEFAULT_SENDER']andcurrent_app.config['MAIL_API_KEY']with your actual sender email and API key. - Replace
mainwith the name of your Python file andcelerywith the name of your Celery variable.
Test emails and email sending in production
Before you deploy any email functionality, testing whether your emails are actually sent without spamming users is pretty much a must.
To do this, you can block sending in Flask with two simple settings:
- Set
MAIL_SUPRESS_SENDfrom the earlier configuration toFalse. - Add a
TESTINGsetting to the configuration file and set it toTrue.
Then, you can use the record_messages method to see what’s being sent from your Flask app (make sure you have the blinker package installed). You’ll see the list of Message instances under outbox.
with mail.record_messages() as outbox:

    mail.send_message(subject='testing',
                      body='test',
                      recipients=emails)

    assert len(outbox) == 1
    assert outbox[0].subject == "testing"
However, if you wish to see emails that your app sends, you’ll need a different solution.
I personally recommend Mailtrap Email Testing, a part of Mailtrap Email Delivery Platform, which provides you with a safe environment where you can preview and test your emails before sending them out.
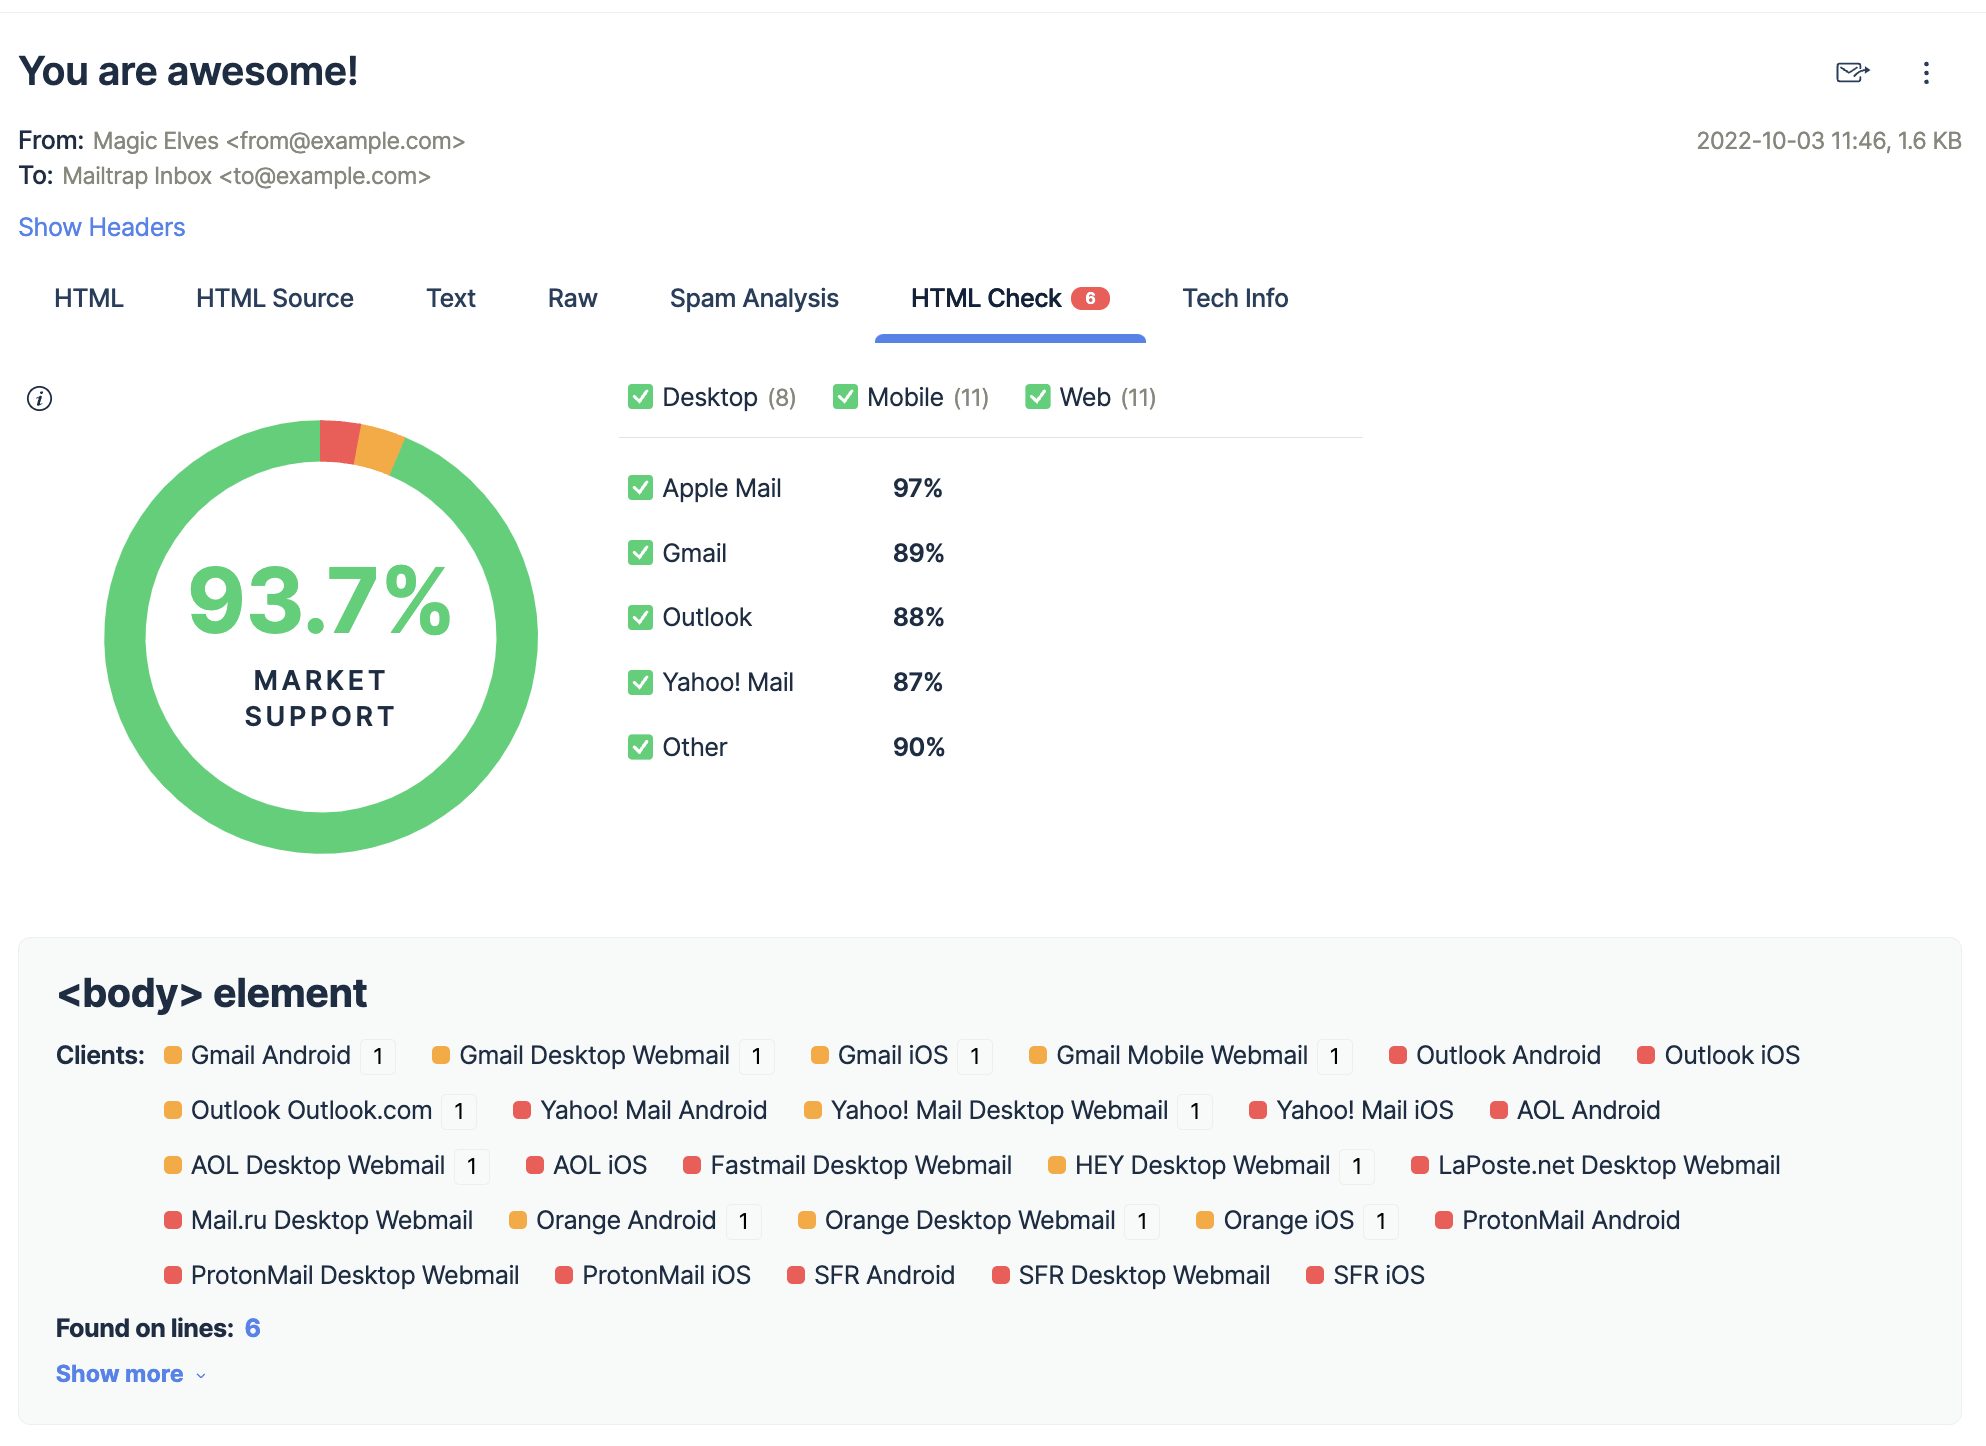
With Mailtrap Email Testing you can preview how your HTML emails look before you send them out to your recipients, see them in their source HTML, text, raw, and more.

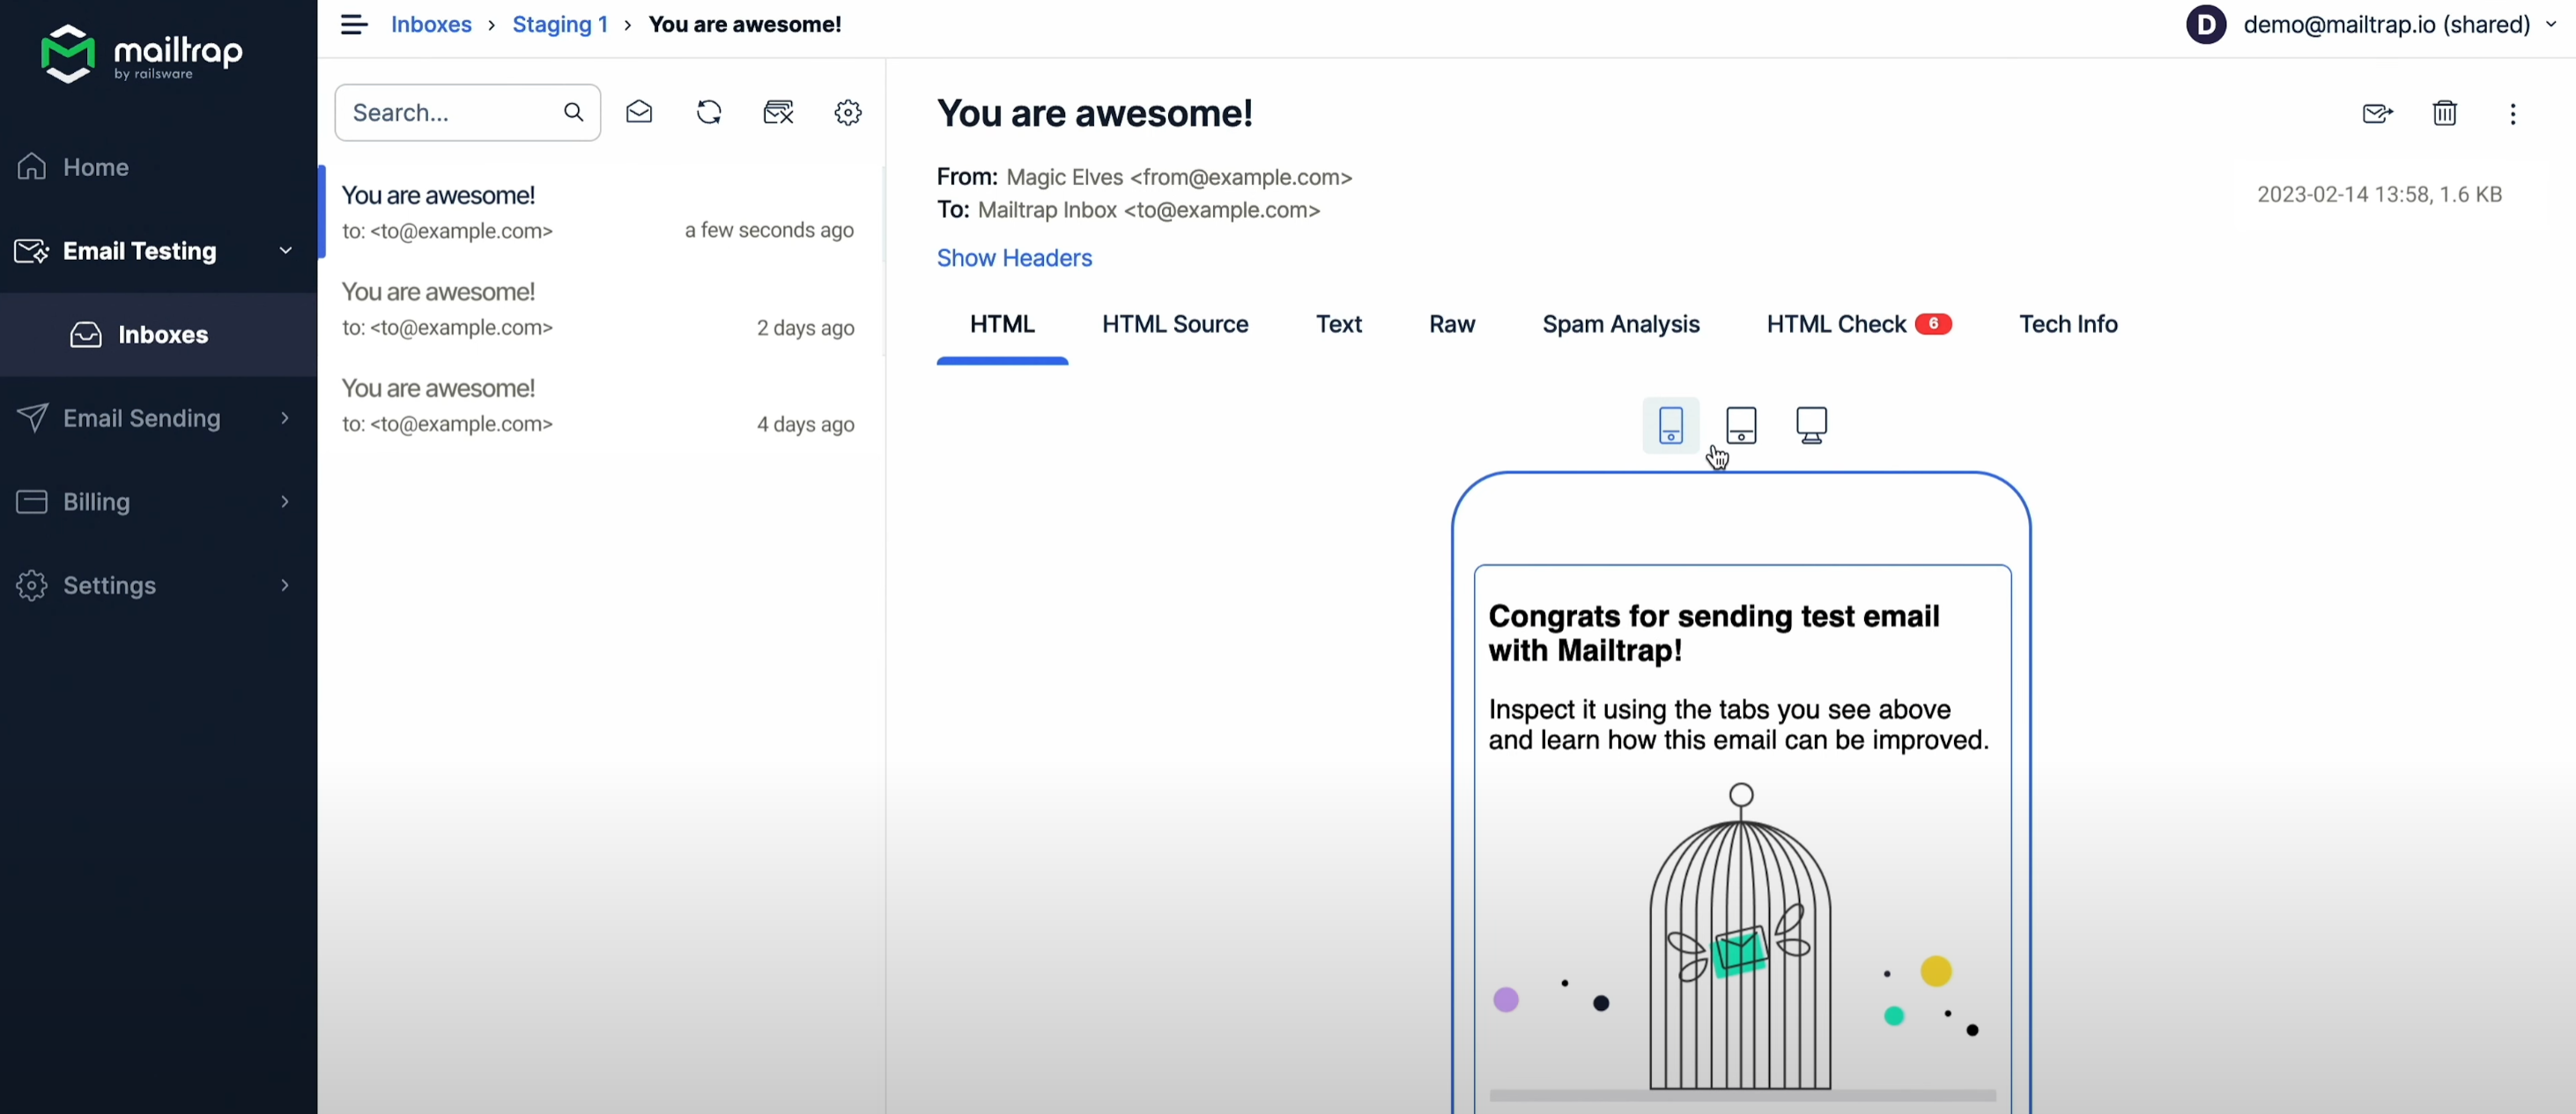
You can also use the HTML Check feature to analyze the HTML/CSS of your emails and easily spot any faulty lines of code. This way, you can fix potential errors in code and make sure your emails reach your recipients’ inboxes looking flawless.

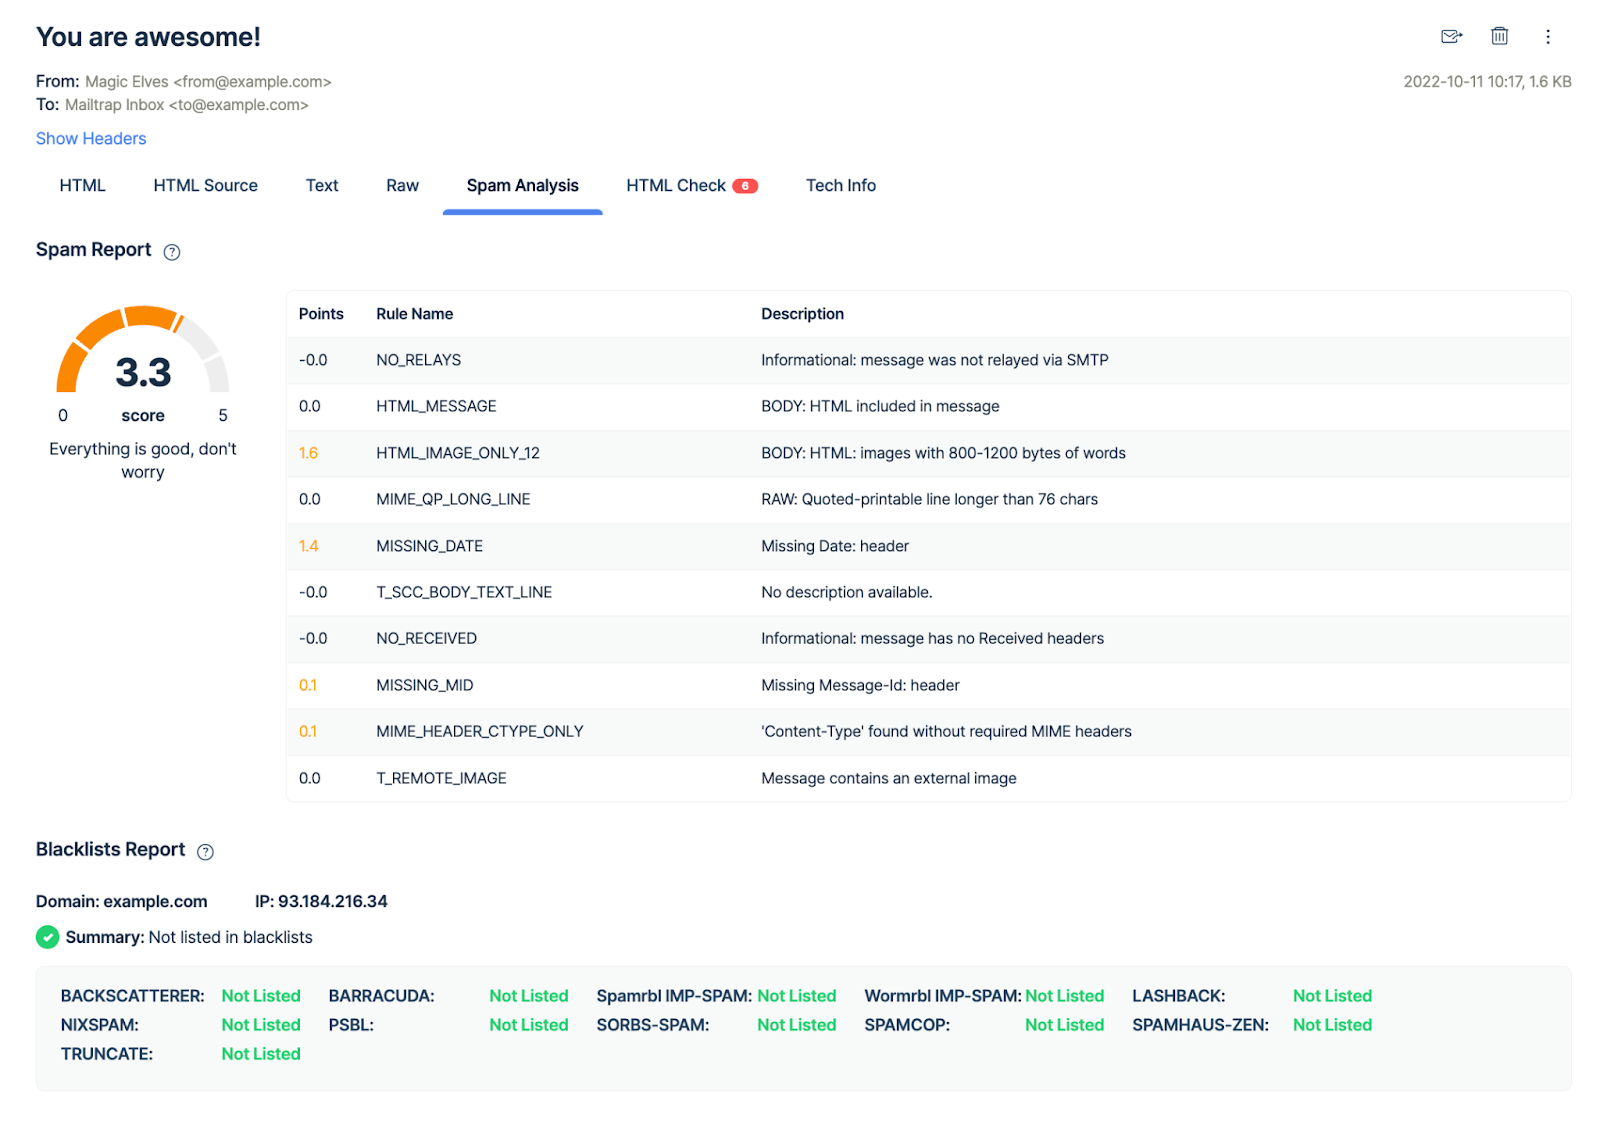
Additionally, with the Spam Analysis feature, you can check your spam score, which, if you keep under 5, you effectively solve a significant number of potential email deliverability issues when your app moves to production.

On top of these and other advanced features, Mailtrap Email Testing is super easy to set up. Check it out!

SMTP
To start testing your emails, all you have to do is:
- Log in to your Mailtrap account.
- Navigate to Email Testing → Inboxes → SMTP Settings
- Select ‘Flask-Mail’ on the list of integrations.

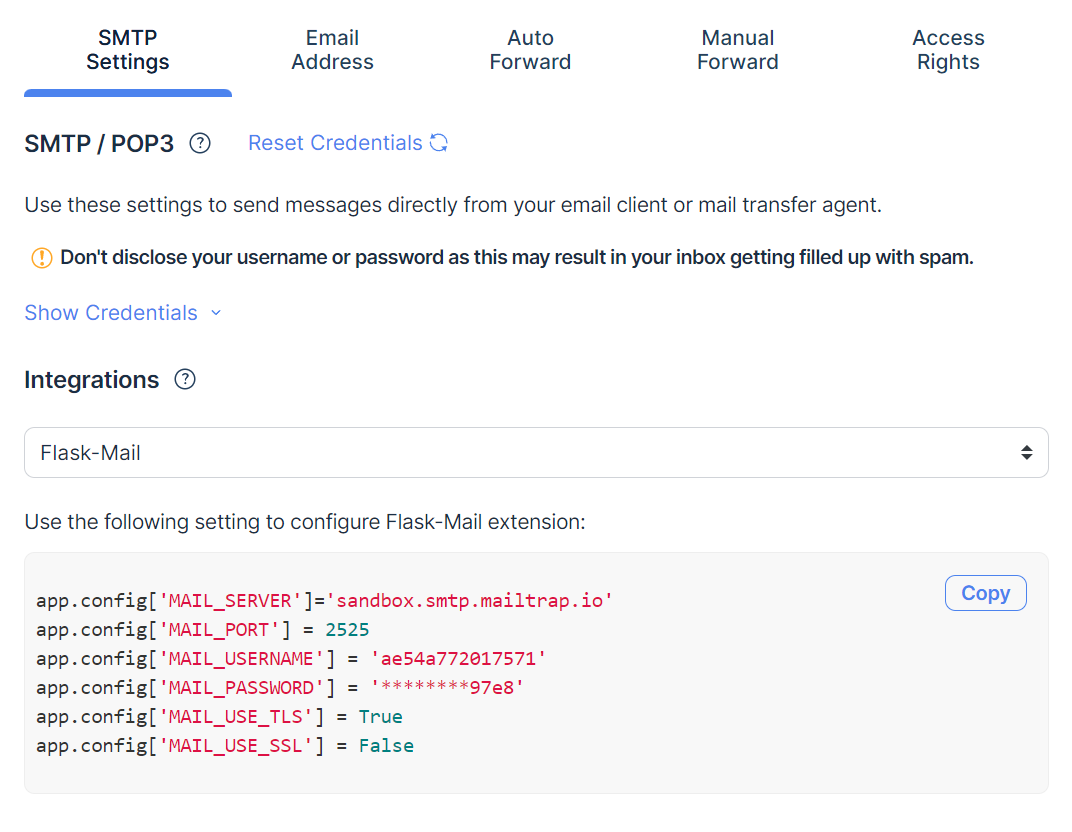
- Paste the settings provided to you by Mailtrap into your Flask configuration, which should look like this:
from flask import Flask
from flask_mail import Mail, Message

app = Flask(__name__)

# Mailtrap configuration


# Initialize Flask-Mail
mail = Mail(app)

@app.route("/send_email")
def send_email():
    msg = Message('Hello', sender='you@example.com', recipients=['test@example.com'])
    msg.body = "This is a test email from Flask using Mailtrap."
    mail.send(msg)
    return "Email sent!"

if __name__ == "__main__":
app.run(debug=True)API
If you’d rather integrate Mailtrap API for testing, automation, and testing automated sequences, simply run the following command:
pip install mailtrapAnd then use the following code snippet:
import mailtrap as mt

# create mail object
mail = mt.Mail(
    sender=mt.Address(email="mailtrap@example.com", name="Mailtrap Test"),
    to=[mt.Address(email="your@email.com")],
    subject="You are awesome!",
    text="Congrats for sending test email with Mailtrap!",
)

# create client and send
client = mt.MailtrapClient(token="your-api-key")
client.send(mail)
Of course, you should modify the variables such as sender, subject, text, and most importantly, your-api-key.
For more information, be sure to check out the official Mailtrap API documentation or the dedicated Python repository on GitHub.
Wrapping up
And with that, we’ve arrived at the end of our Flask tutorial!
I’ve shown you how to leverage the Flask-Mail extension and Mailtrap so you can seamlessly add email-sending functionality to your web application, and don’t forget to test your messages!
However, if you wish to explore other methods for sending emails in Flask, like Python’s smtplib, be sure to check out our dedicated Python tutorial. Or, check out our other Python-related articles, such as: